Throughout your playthrough of Baldur’s Gate 3, almost every NPC character and every quest ultimately points to the eponymous city. With the kind of emphasis put on reaching the city, you’d think that it would be the end of all your worries, but you’ll soon find that Acts 1 and 2 were only preparing you for the nightmares within. One such nightmare is Helsik, a diabolist who is found in the aptly named ‘Devil’s Fee’ store.
Helsik in Baldur’s Gate 3 is a key part of the quests ‘Deal with the Devil’ and ‘Free Orpheus’. She is the key to entering a location with a very misleading title ‘The House of Hope’, which is in fact the palace of Raphael in one of the nine Hells.
How to navigate Helsik’s deal before the ritual
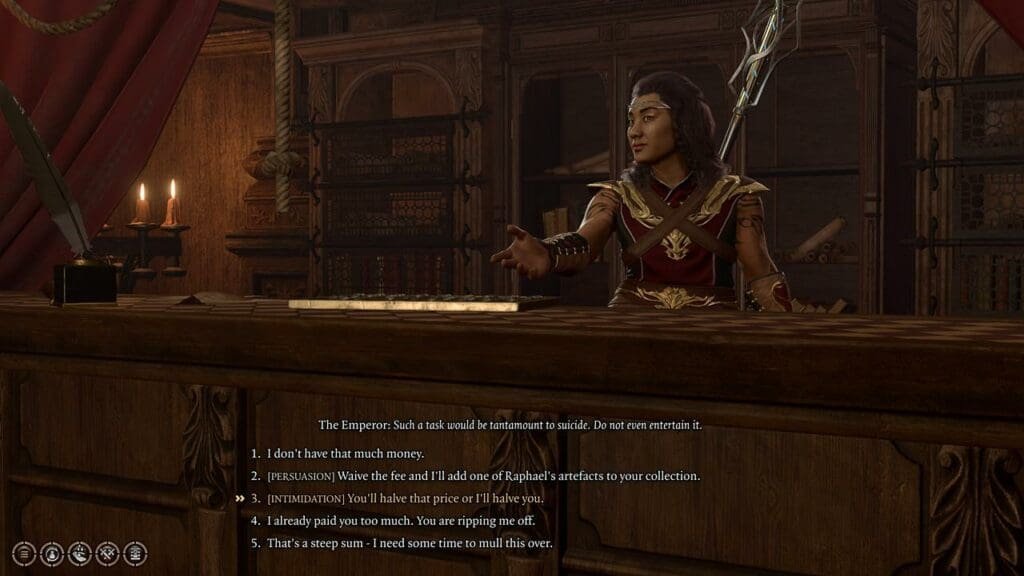
After entering the Devil’s Fee store and interacting with Helsik, you can reveal your interest in the House of Hope. To this she’ll remark that she is Mammon’s Picklock and that her actual business is breaking people into the hells. Helsik is a shrewd businesswoman though, so she’ll get you into the House of Hope for a steep fee of 20,000 gold. You can approach this deal in multiple ways.

The first involves coughing up the sum and going to the next step. You can also pass a level 20 Persuasion check to ask Helsik to waive the fee in exchange for one of Raphael’s artefacts. Alternately, you can intimidate Helsik into halving her price after a level 20 check.
If you choose the Raphael’s artefact option, she will ask you to acquire the Gauntlets of Hill Giant’s Strength. She will then hand you a grimoire and access to the necessary items for the ritual along with the key to a ritual room with the blood circle already drawn. Helsik also hands you a note with a set of instructions on how to perform the Helsik ritual.
How to complete Helsik’s Ritual puzzle in Baldur’s Gate 3
As you head to the ritual room, you’ll find the blood circle right in the center of the room. The note that Helsik gave you may seem self-explanatory, but since this is BG3, there is some ambiguity in the instructions which could lead to some confusion.
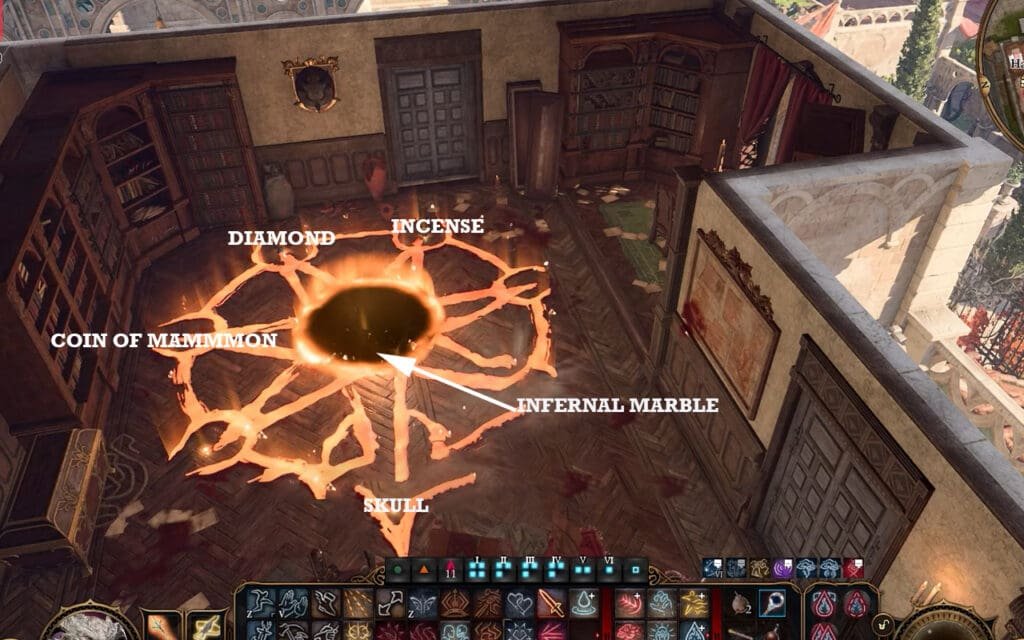
The items in the note Helsik gave you are in a purple chest to the right of the room as you enter. You need to place the skull on the first circle with the pointy mark on the circle. Then place the coin of Mammon on the circle to its left.

The diamond goes in the circle to the far left of the room and the incense to its right. Finally, you can place the infernal marble in the center circle. To place these items accurately, you can choose each one of them and use the throw action. Once you’ve thrown the marble on the circle in the middle, a mysterious portal opens which will lead you directly to the House of Hope.
Holding up your end of the bargain
The Gauntlets of Hill’s Giant Strength can be quite handy for quests in Act 3. If you’ve chosen to offer the gauntlets to Helsik, you have a few options to finish your deal. You can pass a difficult deception check and keep the Gauntlets for yourself. You can simply hand it over and be done with the deal. Or you can refuse to hold up your end of the deal and fight Helsik, which of course will mean killing her and losing the option to trade with her.
While you may not feel like parting with the gauntlets, there is an easy solution to reacquiring it. After you’ve given the Raphael’s prized artefact to Helsik, you can trade with her to purchase it back for a very small sum (usually under 1000 gold).


