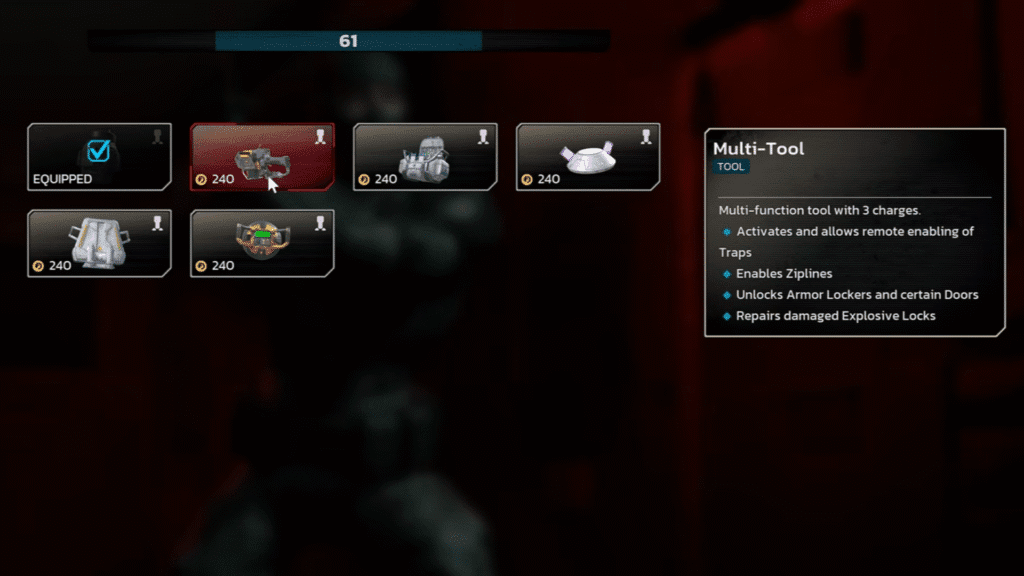
We’re used to looking for weapons in games like this, but the Multi-Tool in Killing Floor 3 is different. It isn’t meant for tearing through Zeds but instead acts as a vital utility item that can quietly decide how smooth your run goes. From unlocking armor lockers to enabling ziplines and repairing objectives, it plays a bigger role than it first seems.
If you’re unsure where to get it or why it’s worth keeping in your loadout, here’s what you need to know.
Buying the Multi-Tool in Killing Floor 3 During Matches

You won’t find the Multi-Tool in Killing Floor 3 lying around on the map — it’s something you purchase directly from the Trader Pod between waves. After each round ends, the game rewards you with Dosh (its in-game currency) based on kills and objectives. That Dosh is what you’ll spend to stock up on ammo, grenades, or new weapons… and the Multi-Tool.
When you reach the Trader, follow the blue holographic path that guides you to the station. Open the shop menu, switch to the Tools section, and scroll until you see the Multi-Tool listed. Buy it, confirm, and it will be immediately added to your loadout for the next round.
Why the Multi-Tool Matters
The Multi-Tool in Killing Floor 3 doesn’t do damage, so there is a chance that budding gamers sometimes ignore it in favour of extra firepower. But its uses go beyond combat and can seriously improve your team’s efficiency mid-match:
- Unlocking armor lockers and special doors : These lockers refill your armor meter, and some locked doors open shortcuts or new areas worth exploring.
- Activating Ziplines: Ziplines are lifesavers for quick escapes or repositioning during hectic waves, and only the Multi-Tool can power them up initially.
- Powering Traps and Automated Turrets: Certain traps, like giant fans that sweep Zeds off catwalks, or Auto-turrets that lay down covering fire, must be activated with the Multi-Tool first. After you turn them on, anyone can interact with them freely when they come off cooldown.
- Repairing Explosive Locks and Objectives: Some mission objectives require quick repairs, and this tool handles that job efficiently.
Each Multi-Tool in Killing Floor 3 comes with three charges, so you’ll need to think about when to use it rather than spamming it on every interaction.
Using It Effectively
We recommend using the Multi-Tool in Killing Floor 3 for activating traps, turrets, or ziplines early so the whole squad can benefit, especially since most of these map elements can be reused once their cooldowns reset. If you’re playing solo, having one is practically mandatory because it opens up routes and defenses you’d otherwise miss entirely.
Another small but important tip: you can switch tools at the Trader between waves. For example, activate a turret with the Multi-Tool, then swap it for an Explosive Lock or Syringe Kit to help in the next phase. Those activated traps will remain functional, giving you flexibility in your loadout without losing progress.
That concludes our guide on the Multi-Tool in Killing Floor 3. For more updates on games, do check Games Horizon.


