Milk Molars In Grounded 2 are one of the biggest must-haves for any player trying to fully upgrade their character stats or hit that sweet 100% completion. But once you jump into New Game+, all of them vanish. So before crossing that line, you’ll want to grab every last one.
This guide breaks them down location by location in a way that’s easy to follow. This is all based on in-game tracking and real-time placements.
Locations for all the Milk Molars In Grounded 2
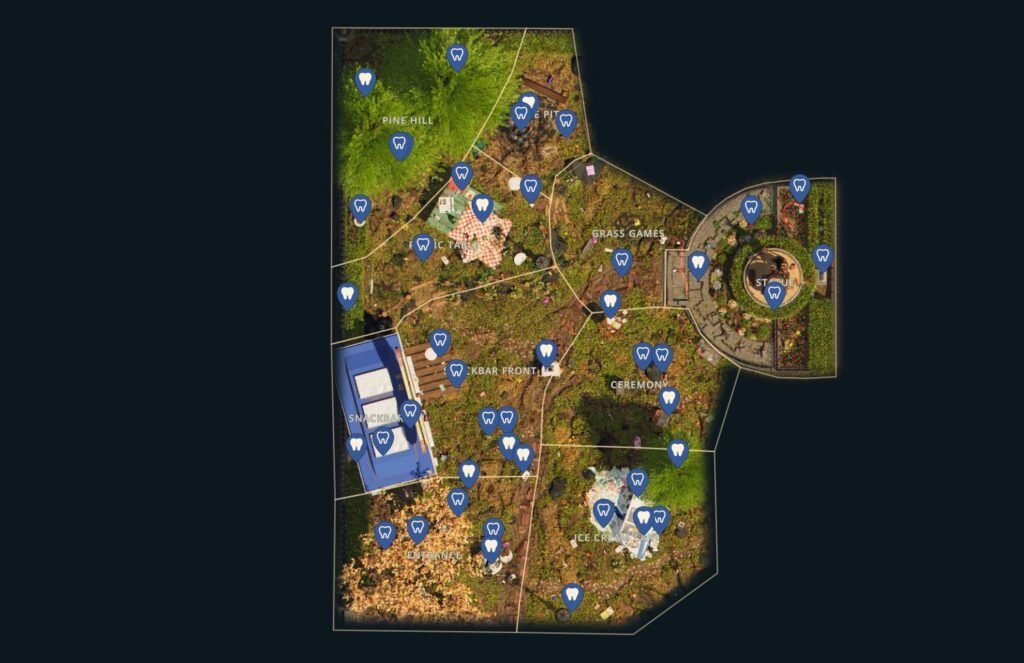
The following table displays the Region and number of all the Milk Molars In Grounded 2, along with a brief, unique marker on how to locate or identify it. Additionally, we recommend you follow the map provided for the precise location.

Every location for the teeth are below, including mega milk molars. However, keep in mind that the image above will be updated as we get more images.
| # | Region | Description & How to Reach It | Tools / Tips |
|---|---|---|---|
| 1 | Lower Yard | Under giant plank, north of big branch, inside cave (night helps avoid wolf spider) | None or fight spider |
| 2 | Lower Yard | Under decking by house near paint cans, next to wolf spider | Be ready to fight |
| 3 | Lower Yard | North side of oak tree, sleeping spider nearby | Night visit or kill spider |
| 4 | Lower Yard | Inside Oak Lab → through breakage → behind toward red ant hill, up top | Navigate lab passages |
| 5 | Lower Yard | By Franke‑line puddle along wall between lower & upper yard | None |
| 6 | Upper Yard Ascent | Beneath a leaf under ascent leading to upper yard | Sneak underneath |
| 7 | Lower/Upper Yard | Jump from upper yard wall near remixer room with flowers to lower yard wall | Jump or build up |
| 8 | Lower Yard | Underneath can by oak tree | Crawl under |
| 9 | Lower Yard | East side, near pagoda, by rocks south of squirts carton | Edge of wall |
| 10 | Red Ant Hill | Entrance → through food‑filled area → follow path deep inside | Avoid lag zone |
| 11 | Hedge | On top of juice carton after climbing with parkour from ascended hedge | Glide or climb |
| 12 | Hedge | Inside hedge lab via first zipline landing spot, open mer | No hammer needed |
| 13 | Hedge | Top of spiral tubing above hedge lab | Sprint up tubing |
| 14 | Hedge | Beneath collapsed hedge lab piece under upper portion | Enter fallen structure |
| 15 | Hedge | On branch under zip tie near broodmother route | Traverse branch |
| 16 | Hedge | Beginning of hedge maze: red wire/glide jump to black socket protector | Glider skills |
| 17 | Hedge | Bottom‑right corner under hedge | Just walk to corner |
| 18 | Pond | On top of pond net → follow path → chop roots on giant log | Breathing gear + tier‑2 dagger |
| 19 | Pond | Deep drop‑off cave under lily pad flower → chop roots | Oxygen supply + underwater tools |
| 20 | Pond | Inside Pond Lab; behind breaker area, in back roots | Root chop needed |
| 21 | Pond | Deep cave with soggy roots beyond labyrinth swimming → bubble helmet suggested | Extended swim |
| 22 | Haze | Ravine opening before plugging haze | Gas mask optional |
| 23 | Haze | At Field Station ravine drop‑in | Needs gas mask if haze active |
| 24 | Picnic Table | Inside milk container under picnic table | Crawl in |
| 25 | Picnic Table | On top inside yellow spark box | Jump to top |
| 26 | Trash Heap | Just outside sandbox near back edge of heap | None |
| 27 | Trash Heap | Up shovel into trash can → inside blue cup | Climb carefully |
| 28 | Trash Heap | Behind yolked girth pack outside Black Ant Hill | Sneak and grab |
| 29 | Sandbox | At top of sandcastle, build up with clover ramps or clay | Build needed |
| 30 | Black Ant Hill | Bottom of hill near ant/soldier spawn; blow cracked rock, pass through | Explosive or busting tool |
| 31 | Black Ant Hill | Bottom area, left through door from spawn zone | Just walk in |
| 32 | Upper Yard | Inside charcoal bag area near edge; watch for sizzling | Avoid fire |
| 33 | Upper Yard | Inside hamster skeleton cave; bonk red ball → parkour onto ball → mer | Tier‑3 tool & parkour sequence |
| 34 | Upper Yard | In exposed pipe by mushrooms; chop roots, bomb cracked rock, swim through | Tier‑3 axe, bomb arrow |
| 35 | Upper Yard | Inside broken mer location: drop & chop through tier‑3 dead roots → find five mers | Huge cluster spot |
| 36 | Upper Yard | South rock pile room with ox beetles → one mer | May need to kill beetles |
| 37 | Upper Yard | North of Moldark; complex branch parkour to find hidden mer | Watch wasps |
| 38 | Upper Yard | Behind a leaf near Java‑matic top‑left | Quick snag |
| 39 | Upper Yard | Under shed decking right side; infected wolf spider may appear if haze plugged | Grab before plugging haze |
| 40 | Upper Yard | Cracked ground rock → bomb or weed‑stem climb into cave with widow & mer | Widow fight or weed‑stem trick |
| 41 | Upper Yard | Broken BBQ pipe ravine: glide inside crack | Glider needed |
| 42 | Upper Yard | Near mint box in ravine; climb ramp → roots ledge → drop → find it | Parkour flow |
| 43 | Upper Yard | Top of wheelbarrow side via poison ivy climb or build | Jump off side |
| 44 | Upper Yard | Under ladder rung on far north wall | Squeeze in rung |
| 45 | Upper Yard | Inside tipped plant pot → through hole to second pot → mer inside | Crawl jump |
| 46 | Upper Yard | Inside toolbox top drawer | Watch for enemies |
| 47 | Upper Yard | Rung at top ladder (via lawnmower climb & glider step) | Glider when dropping |
| 48 | Upper Yard | Fallen stump above mushrooms → broken bark path → parkour → mer | Friendly moth nearby |
| 49 | Upper Yard | At foot of giant tire in yard edge | Just walk up |
| 50 | Upper Yard | Inside giant tire chest (requires sticky key from gum) → two mers | Key + chest opening |
| 51 | Termite Hill | Top of bike pedals (parkour from leaves above) | Step jump |
| 52 | Termite Hill | Under blue tarp area with web sacs | Crawl through |
| 53 | Termite Hill | Deep interior passageway ending in small dead‑end → mer | Follow the only path |
| 54 | Ladybird Cave | Entrance side: fight ladybirds, parkour to ledges | Be strong |
| 55 | Ladybird Cave | Field station entrance: take sharp right among quartzite rocks | Clear path |
| 56 | Fire Ant Hill | Glide drop from top into pit; mer visible during descent | Timing and glider |
| 57 | Fire Ant Hill | Entrance via jungle ant hill: path straight ahead → gum area → branch | Climb upward |
| 58 | Stump Area | On wood north of field station → simple pickup | Open area |
| 59 | Stump Area | Inside stump lab at top intersection | Lab unlocked |
| 60 | Stump Area | Top of stump via branch route → jump over top → drop on mer head | Parkour finesse |
| 61 | Castle Mold Area | Crack in ground near rocks before castle entrance → drop in → mer | Quick drop |
| 62 | Castle Mold Area | On roof after climbing stairs around outside castle | Rooftop parkour |
| 63 | Castle Mold Inside | Inside castle beside lab curve at inner wall → hidden mer | Locate curve |
| 64 | Undershed | Entrance pillar: jump across wooden pillars | Jump over |
| 65 | Undershed | Mid‑ravine middle zone → deep at back | Crouch drop |
| 66 | Undershed | Far side near lab: backward step to map corner → mer | Sneak behind |
| 67 | Undershed | Back beside lab but to the right on wooden pillar | Walk & climb |
| 68 | Undershed | At entrance ramp plank → jump left to second plank → widowlings → mer | Watch for widowlings |
| 69 | Brrawny Boy Bin | Front area behind PC | Clear out wasps |
| 70 | Brrawny Boy Bin | Inside Taze Tee structure via tricky parkour | Jump inside |
| 71 | Brrawny Boy Bin | Near joystick → down and right between cardboard and arcade games | Crawl sideways |
| 72 | Brrawny Boy Bin | Back area behind black widow spawn → kill widow → grab mer behind | Combat required |
| 73 | Cluster spot | Five mers under broken dead roots inside Upper Yard broken mer site (part of #35 cluster) | Massive reward |
| 74 | Hedge (optional path) | Zipline diversion near spinner hub → hidden niche mer | Use alternate zip route |
| 75 | Fire‑Ant Hidden Alcove | Under hanging gum roots inside fire‑hill shell | Crawl under |
| 76 | Ladybird Cave Deeper | After lava ledges climb junction → secret nook mer | Parkour toward lava junction |
| 77 | Termite Hill Secret | Beneath statue base supporting tarps | Crawl opening |
| 78 | Castle Mold Secret Underbridge | Below moat inlet bridge near mold core | Drop down |
Also read: Tips on Staying Alive in Grounded 2
Quick Tips on Using Milk Molars In Grounded 2
It can be hard to find all the milk molars, but they’re worth it. You should keep a few things in mind while looking for them:
- Start with upgrades to Health and Stamina. These give you the best survivability early on, especially when you’re still getting used to hostile bugs or tougher biomes.
- Healing and hunger/thirst drain can be left for later. They’re helpful, but not essential if you manage your food well.
- Mega Milk Molars should be spent on resource stack size upgrades first. It drastically cuts down on inventory juggling and helps you stay out in the field longer.
If you get frustrated, just keep your eye on the prize. You should have a very fun time looking for milk molars in Grounded 2.


