





It takes quite a while to set up a server in Palworld, but once that’s done, you can make further changes to the server to make it more to your liking. The steps to start a server can be a bit complicated; the market is filled with software of all shapes and sizes to help you achieve that for a price, but here we are going to look at the free-est way to accomplish the task of creating a dedicated server in Palworld.
Setting up a Dedicated Server for Palworld 1.0
There are mutliple ways to set up a dedicated server for Palworld, but most of them are paid service that privdes an easier connection route but with a cost. Some of them are: Nitrado, Gportal, Bisect Hosting, and more.
- First Step: Install Steam. Download Palworld. Once installed, we are ready for the next step on the line.
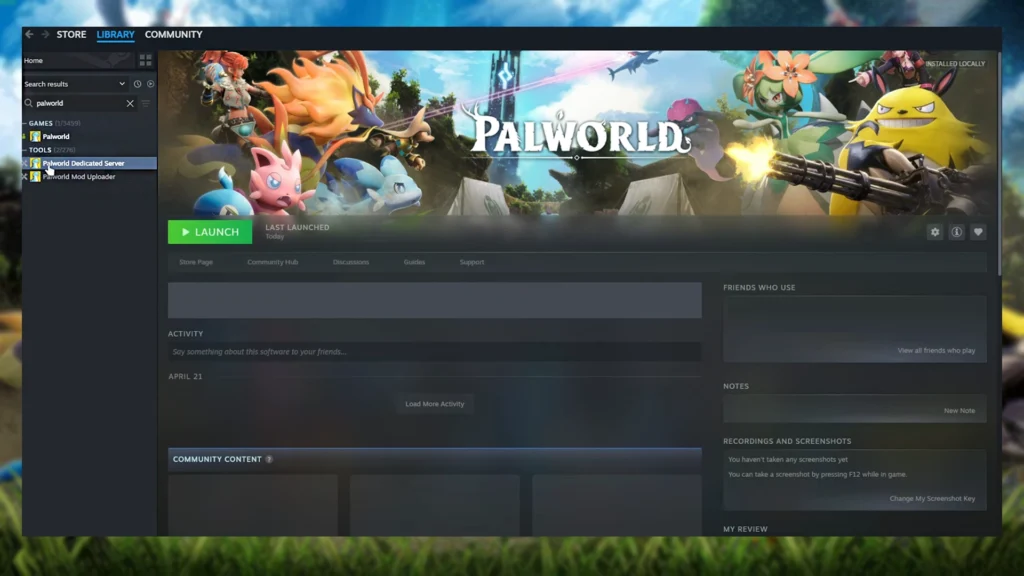
- Second Step: Head to Library, then on the left panel, tick: Games/ Software/ and Tools. Then type Palworld in the search box under it. And you will see Palworld Dedicated Server appearing on the left panel.
- You are going to see: Palworld (The game)/ Palworld Dedicated Server/ and Palworld Mod Updater
- Third Step: Choose Palworld Dedicated Server and hit Launch. You will be asked to choose between:
- Play Palworld Dedicated Server
- Open and start as a community Server
Just choose the first option: Play Palworld Dedicated Server. Command Prompt will open up soon after you hit Play. Don’t worry about it; we don’t have to add any fancy code into the black box.
- Fourth Step: With Palworld Dedicated Server running in the background, click on Palworld and launch the main game. Now choose Join Multiplayer. At the bottom, you will see the Enter Password box; you will also see the Connect button next to the password. Click on Connect to start the server.
This will start the dedicated server; you can create your character and roam around the map.
Customize the Experience
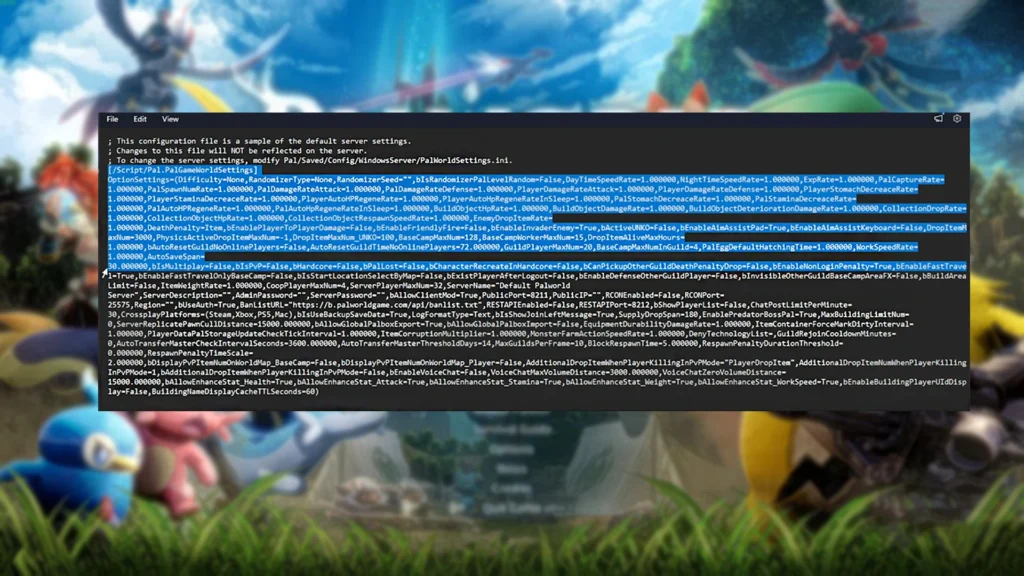
Head to the Palworld Dedicated Server via Library> right-click and choose Browse Local Files. Once the folder opens up, open up the .INI file with the title “Default PalworldSettings.ini”. Now, skip the first three lines and copy the entire text. Start from [/Script/Pal.PalGameworldsettings] as seen in the image above, then make your way to the bottom and copy every line of text.
Now head back to the same folder we found the “Default PalworldSettings.ini” file. Follow the following route:
[Pal folder > Saved folder > Config folder > WindowsServer folder]
Now, under the WindowsServer folder, search for “PalWorldSettings.ini”, open up the ini file via Notepad, and paste everything we copied before.
Now you can customize your experience by tweaking the game’s difficulties, setting up a name for the server, selecting a max player count, and enabling or disabling crossplay; you can also set up a password for admin and server-side. Once you’re done making the changes, save the ini file with all the changes made to the text.
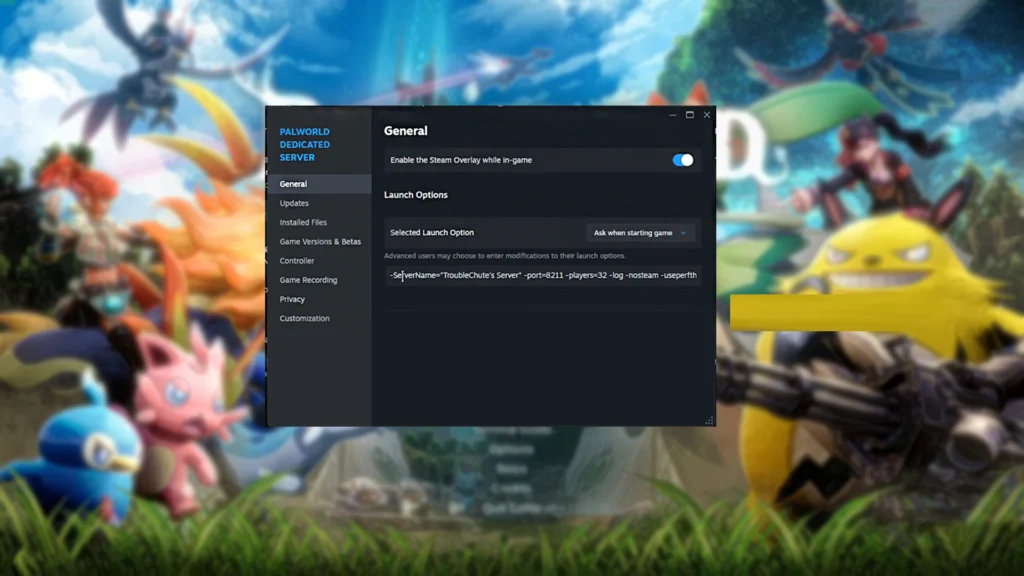
Now click on Palworld Dedicated Server on the left panel of the Steam Library, right-click and choose Properties, then make your way to the General section. Here, under Launch Options, paste the following commands:
-ServerName=”Your Server Name” -port=8211 -players=32 -log -nosteam -useperfthreads -NoAsyncLoadingThread -UseMultithreadForDS -publiclobby EpicApp=PalServer
Note: Do make changes to the name and player count for it to take effect in the game.
Once done, close the window and launch Dedicated Palworld Server. Choose Join Multiplayer Game, and hit Connect at the bottom of the screen, next to the Enter Password.
Enable it through the firewall
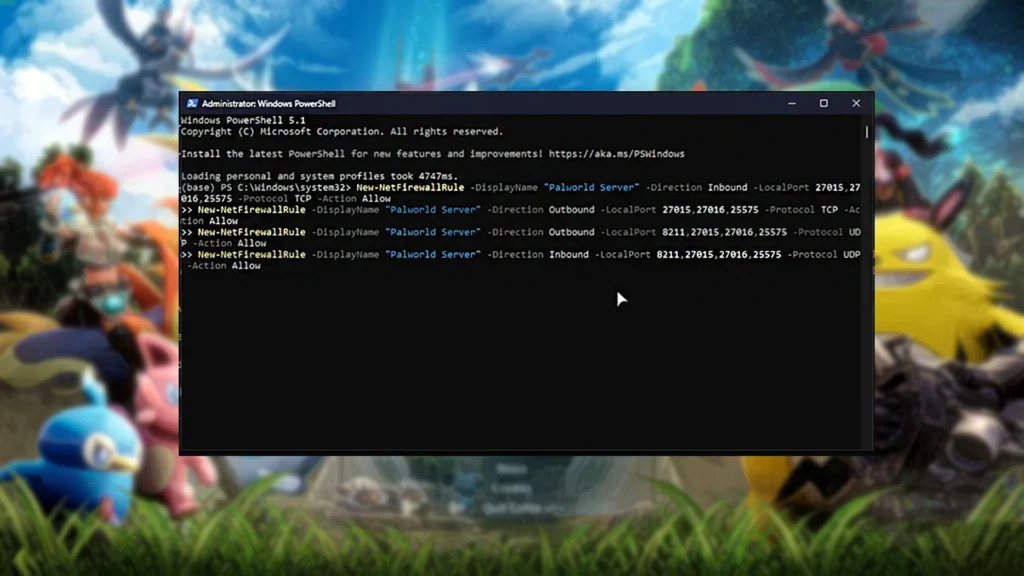
We have to input some special code to make the game run through the firewall. Now open up Search on your Windows, type in Windows PowerShell > and choose Run as Administrator. PowerShell will now open up; paste the following code to enable the Palworld via Windows Firewall.
New-NetFirewallRule -DisplayName “Palworld Server” -Direction Inbound -LocalPort 27015,27016,25575 -Protocol TCP -Action Allow
New-NetFirewallRule -DisplayName “Palworld Server” -Direction Outbound -LocalPort 27015,27016,25575 -Protocol TCP -Action Allow
New-NetFirewallRule -DisplayName “Palworld Server” -Direction Outbound -LocalPort 8211,27015,27016,25575 -Protocol UDP -Action Allow
New-NetFirewallRule -DisplayName “Palworld Server” -Direction Inbound -LocalPort 8211,27015,27016,25575 -Protocol UDP -Action Allow
Paste the code and then Enter. You can check the connection by typing Ipconfig to see all the connections. Now you have to set up port forwarding on your router to allow friends to join the game. The port forwarding differs from one router to another; check the port forwarding details on your router system to enable your friends to join the dedicated server via Community Server in-game.
