






The new Neverness to Everness NTE Duskmoor map recently came out, and you will probably be looking for all the Oracle Stone locations. You can later turn in these Oracle Stones for a bunch of useful rewards and items. The Duskmoor map is north of Illusion Town, and you can drive into this region without any restrictions. So, grab your favorite vehicle and get ready for a long drive.
All Oracle Stone Locations in Neverness To Everness Duskmoor
First Batch of Oracle Stones (1-18)
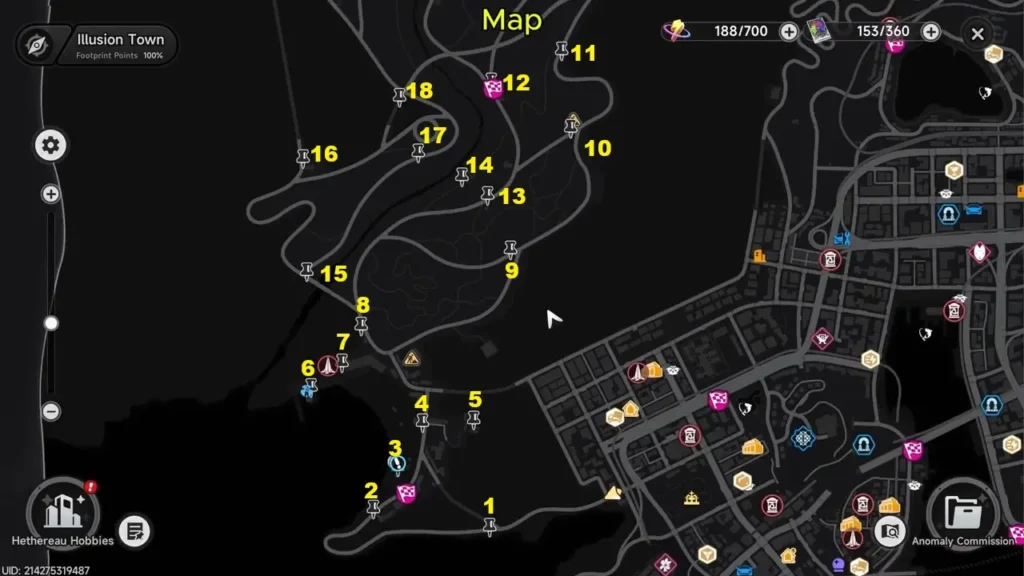
Here are the first batch of Oracle Stones in NTE Duskmoor:
- Start from Onion Road and collect Oracle Stones No. 1-4 in that order. All of them are out in the open and hard to miss. I found the HUD to be quite useful here, as it marked the Stones whenever I got close to them.
- Turn right from the fourth and follow the road to reach Oracle Stone No. 5.
- Come back to Onion Road and keep going upwards to reach Oracle Stone No. 8. I also found the sixth and seventh off to the side nearby, towards the coast.
- Go right towards Blue Jay Mountain Road and proceed until you collect Oracle Stone No. 9, 10, and 11.
- Keep going and take the first turn left and come back down to collect Oracle Stone No. 12. I would suggest going on this same path to find Oracle Stone No. 13 and 14 next to each other.
- Follow the road back down towards Oracle Stone No. 8 (which I had already collected by this point). Now turn north and collect Oracle Stone No. 15 just a short trip away.
- Follow the road without any turns to collect Oracle Stone No. 16, and then backtrack just a bit to turn right towards Oracle Stone No. 17.
- Take a U-turn and follow the road north to find Oracle Stone No. 18.
Second Batch of Oracle Stones (19-46)
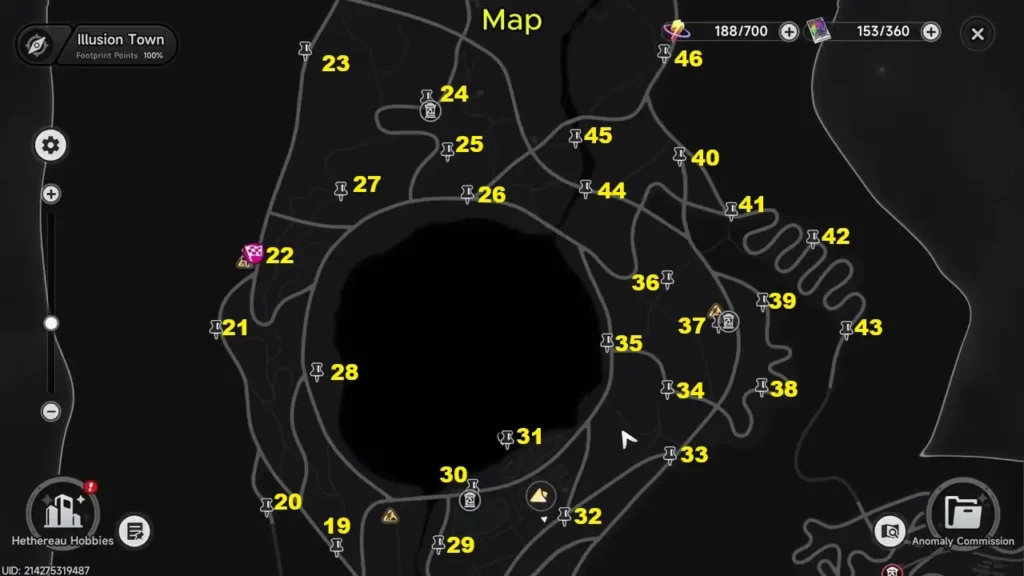
These Oracle Stones should not be hard to find, since they appear on your HUD as soon as you get close enough to them. The above marked image shows all the Oracle Stone locations in NTE Duskmoor:
- If you follow the road from Oracle Stone No. 18, then you will eventually arrive at No. 19. Collect this and keep moving forward.
- Take the first left you see, which will put you on a road back south. This leads you to Oracle Stone No. 20.
- From here, take a U-turn and follow the road north while collecting Oracle Stones No. 21-23. Take the next right after you do so.
- Turn right again to get on Aurifloria Way. Collect Oracle Stones Nos. 24, 25, and 26.
- Right now I was on Teardrop Ring Road. So, I had to take a U-turn, pass Aurifloria Way, and take the first exit afterwards. From here, turning right into the smaller road let me collect Oracle Stone No. 27.
- Come back to Teardrop Ring Road and go further down to collect Oracle Stone No. 28 and 30. Go south from this point to collect No. 29 as well. Return back to the location for No. 30.
- Collect Oracle Stone No. 31, which is a little ways inwards from the road. Make your way back to the road, and keep going.
- Take the first right to collect Oracle Stone No. 32, and turn left to reach No. 33 too.
- This time, turn left and collect Oracle Stone No. 34 and 35. Follow the smaller road towards the right to collect No. 36 as well.
- Keep going on this road to reach Blue Jay Mountain Road, and turn right to get Oracle Stone No. 37.
- Drive straight down from 37 until you can turn left. This will take you to Villard Corner Road, where you can quickly grab Oracle Stones No. 38 and 39.
- Exit onto Blue Jay Mountain Road, and when the road splits, go right. Here, you will find Oracle Stone No. 40. Drive forward a little bit, and you can turn to your right to go back south.
- You will find Oracle Stone No. 41 right at the start of Whitetail Ridge Road. Follow this road, and you will find Oracle Stones No. 42 and 43 as well.
- Head back to Blue Jay Mountain Road, and this time, go north towards Foliage Row. I found Oracle Stones No. 44 and 45 quite close by.
- Follow Foliage Row towards the north, and you will find Oracle Stone No. 46.
Third Batch of Oracle Stones (47-50)
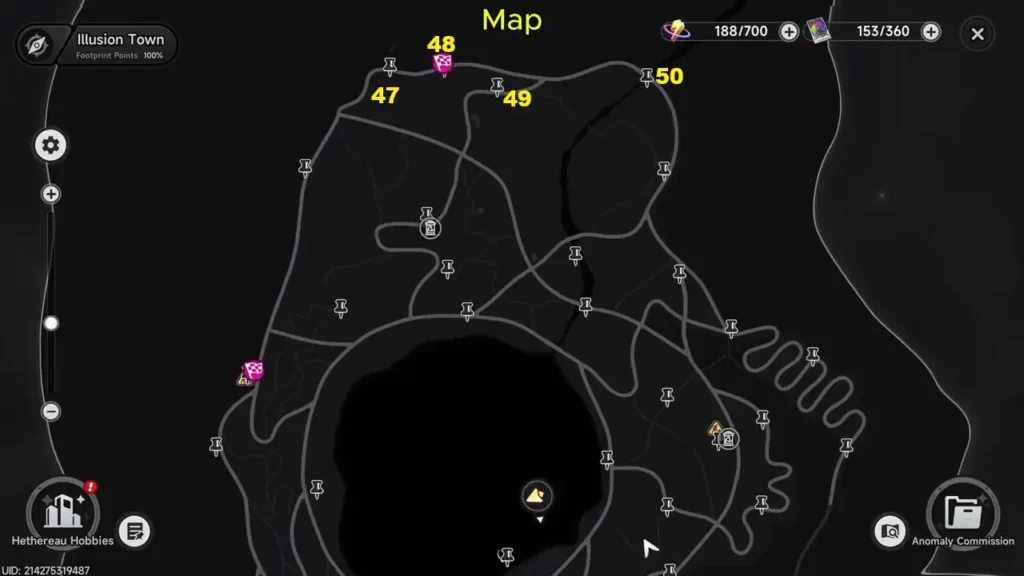
If you followed the instructions properly, then only four Oracle Stones should be remaining. This time, the order of collection will differ slightly.
- I was on Foliage Row, which led me to collect Oracle Stone No. 50 first.
- Afterwards, make your way forward and take the fork to the left to get No. 49.
- From here, I would suggest backtracking a bit until you reach Raccoon Mountain Road again. Finally, keep moving ahead in the original direction to collect No. 48 and 47.
This will wrap up your search for all 50 Oracle Stones in NTE Duskmoor. If you accidentally missed one, then do not worry. You can use an Oracle Crystal to find the ones that evade you.
