



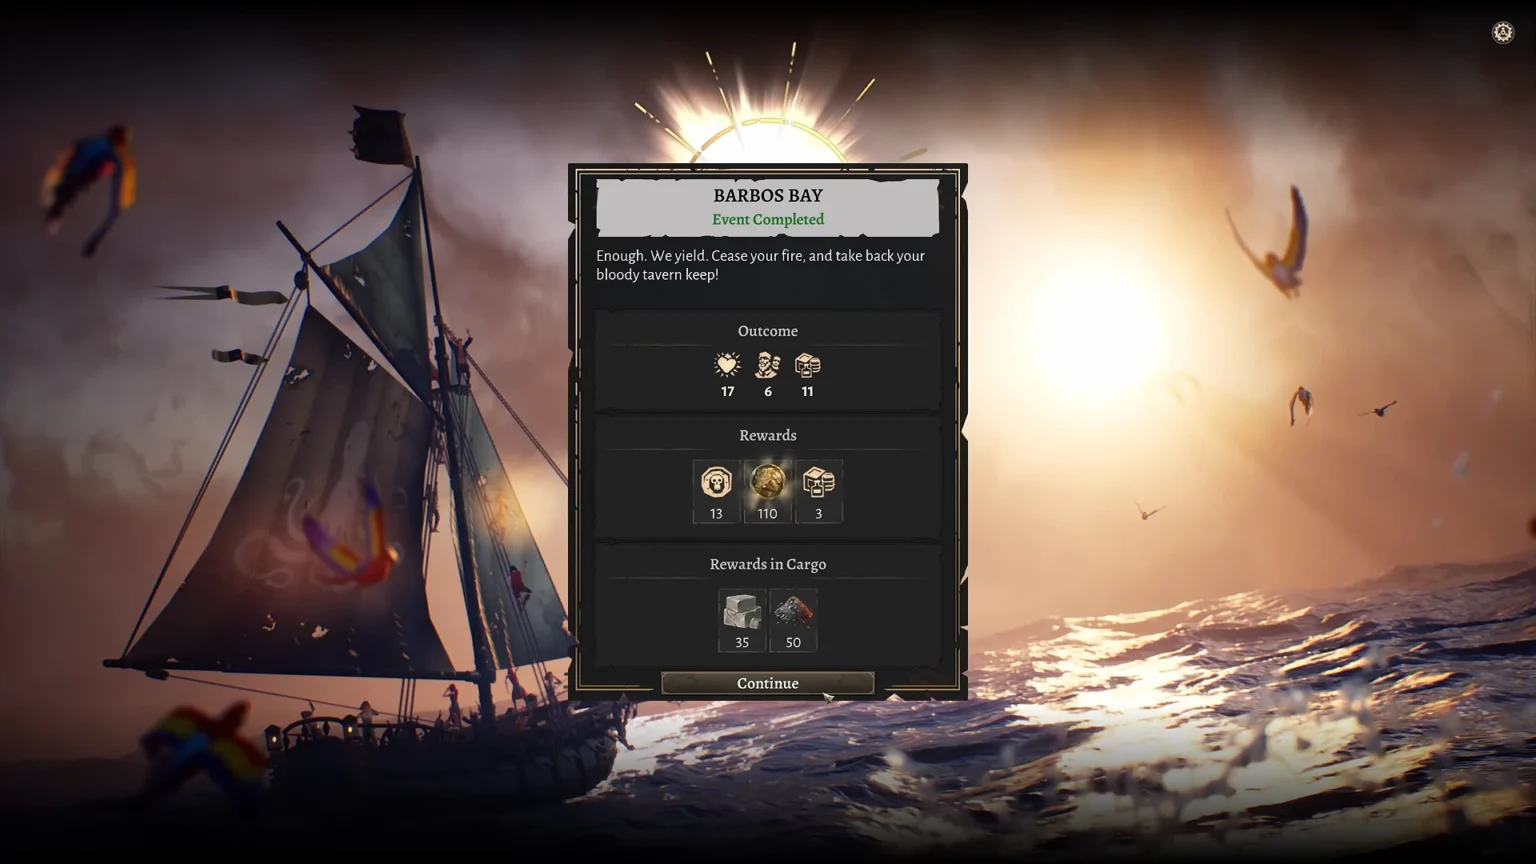

Naval Battles in Corsair Cove require a complete understanding of the combat gameplay to grab victory from the enemy’s clutches. The gameplay for this part is different than the rest of the game, as the main game focuses on resource gathering and constructing different buildings to survive on an isolated island. In contrast, the naval battles have you defeating higher-tier ships to unlock more rewards.
Here is a complete guide on naval battles in Corsair Cove – including a deep dive into the core mechanics, strategies to prepare and win, as well as early game tips to start on a strong footing.
Understanding the Naval Battles Mechanics in Corsair Cove
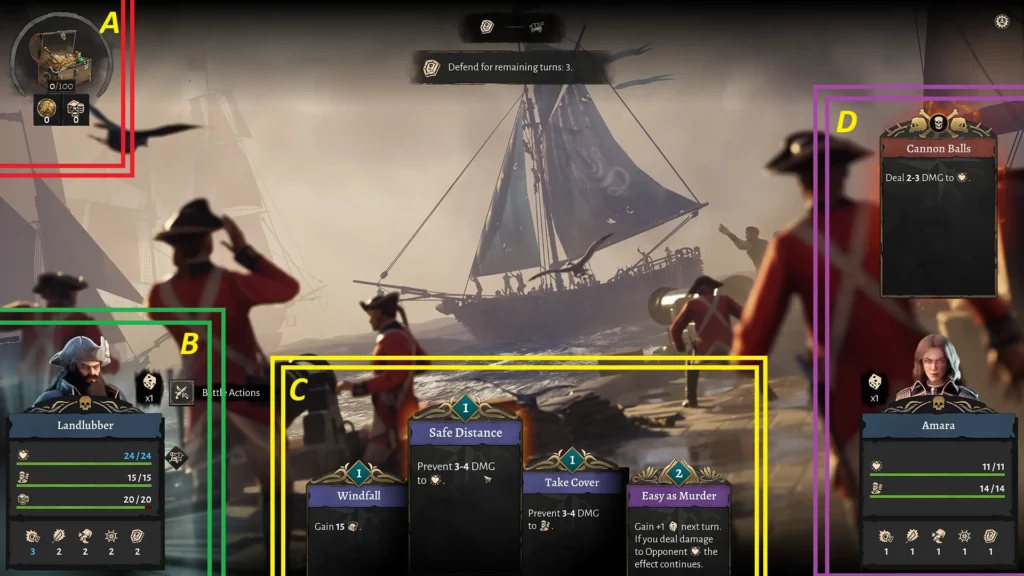
After you craft your first ship, the Landlubber, you will soon be thrown into a Naval battle; it can get overwhelming with the sheer amount of information shown on the HUD. As the game turns into a whole new game compared to the last hour or so of gameplay, where we were building Taverns and huts for pirates. Now it’s all Naval warfare. Before engaging with the enemy, here are the explanations of all the things you see in the HUD. I’ve categorized the HUD into multiple parts for easier understanding:
- A Section (Red Color): The top left spot on the HUD displays the current treasure you hold in possession. Throughout the battle, the number will rise as we raid the enemy ship and steal the booty.
- B Section (Green Color) – Here we see our own ship’s stats along with our Captain and dice roll details.
- Health – Displayed by the heart icon, which shows the current HP of our Ship.
- Crew – The second icon shows the current crew info. The ship here has 15 crew out of 15.
- Supplies– Shows the current number of supplies we have on our ship.
- C Section (Yellow Color): Shows the current cards we have for the battle.
- D Section (Purple Color): Here we see the opponent’s next card information, and at the bottom-right corner we see the enemy’s HP, Crew, and dice roll Information.
Battle Preparation
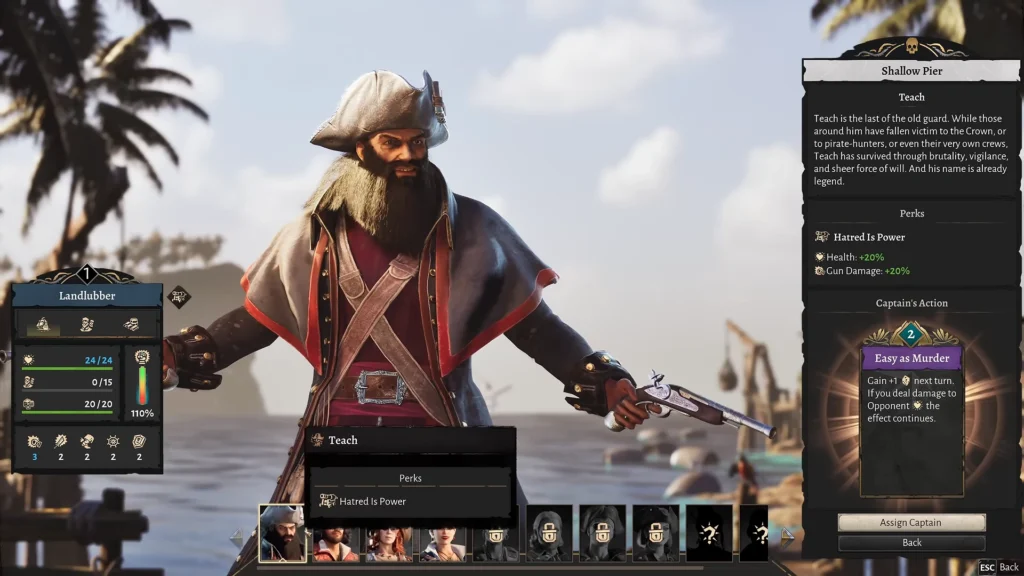
You have to first figure out three things:
- Select the Ship
- Fill the Crew to Max
- Assign a proper Captain
At the start of the game, you will have a Tier 1 ship, Landlubber, with the max crew limit at 15. You have to make do with what you have, so first fill the ship with 100% of its crew, 15/15. Now select the Captain for the job, as each will offer different perks for the ship. All of these changes to the ship are done at the Shallow Pier building on the main island. In short, select the perfect ship; a higher tier is always better, then fill it up with crew and a captain, and you are good to go!
For this guide, the ship is Landlubber, a Tier 1 ship; Teach is the Captain, who offers the Captain’s Action ‘Easy as Murder’ and a perk point that will come in handy in the naval battles. You will have access to four captains at the start of the game: Teach/ Kanja/ Scarlet/ and Honorata.
- Teach: Adding Teach will increase the damage potential for the ship’s gun damage and boost overall health.
- Honorata: She will boost the ship’s overall speed and maneuverability.
- Kanja: He will boost supplies and speed of the ship.
- Scarlet: She will boost the health and boarding damage of the ship.
Choosing different captains can drastically change the gameplay and how the battle unfolds. Choose the captain based on your current needs.
Winning the Naval Battle
At the start of the battle, we have four cards of our own, and the enemy has one, as seen on the right side of the screen. Our cards are viewed at the bottom of the HUD. The only way to win the battle is to utilize our offensive and defensive cards at the right time to grab the victory.
The entirety of the Naval battle minigame relies on the opponent’s move; we make our move based on the enemy’s move so we will have a chance of succeeding. The rest is left to the RNG dice roll to give good numbers so we can deal more damage or defend upcoming cannonballs, or lose the dice roll and see our ship take more damage and deal less in return.
Here I will offer three separate examples to give you a basic idea of Naval warfare.
- #1| When the enemy has an offensive card
- Basically, the next card on the enemy is about attacking our ship; here we cover the steps on what to do when you are at the receiving end of cannon fire.
- #2| When the enemy has a defensive card
- Here is what to do when the enemy is pulling a defensive card to prevent upcoming damage to their ship.
- #3| When the enemy card is either defensive or offensive.
- This is also a scenario where the enemy is playing neither offensive nor defensive.
#1 | When the Enemy has an Offensive Card
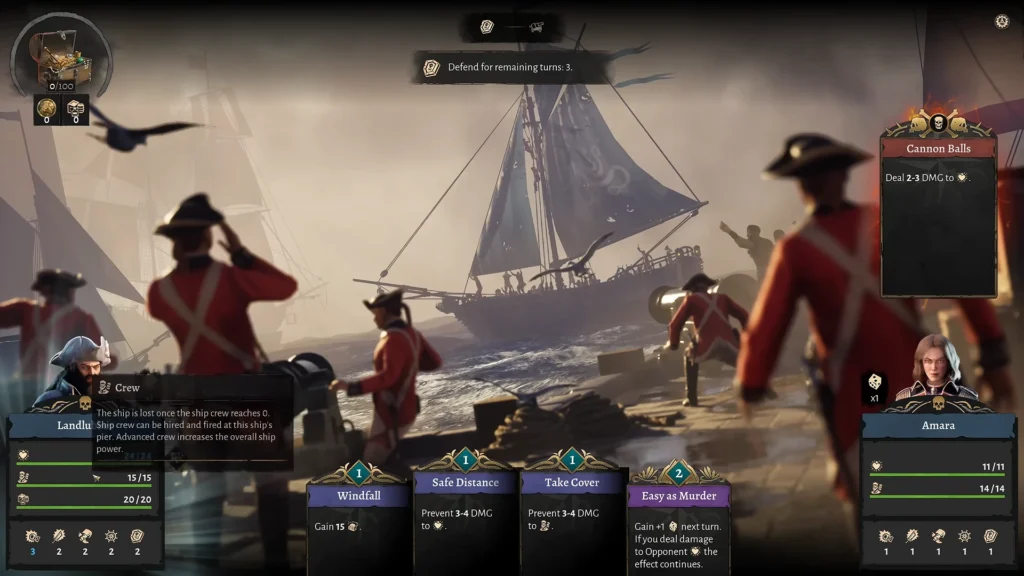
The first thing you should notice is the enemy’s next card. If you look at the image above, her next card is Cannon Balls – which could deal between 2 and 3 damage to the ship’s Health. In short, the enemy is playing offense, so it’s our chance to maneuver the attack.
Note: The reason why I said it could deal 2 to 3 damage is that the damage is left to the RNG dice rolls. It’s the dice roll that determines if the enemy’s attack will deal the highest, in this case 3, or the lowest, 2, to our vessel.
Since the opponent’s card is focused on offense, we will have to turn our defensive option to brace for damage. If you look at our cards, we have:
- Windfall: Gain 15 Treasure
- Safe Distance: Prevent 3 to 4 Damage to Health
- Take Cover: Prevent 3 to 4 damage to Crew
- Easy as Murder: Gain +1 dice roll next turn.
Since the Cannon Ball attack is targeting the ship’s Health, we will have to choose Safe Distance, since it prevents 3 to 4 Damage to our Health. Take Cover does the same thing as Safe Distance but for the Crew.
Note: The same rule of dice rolls also applies here; it will decide whether the Safe Distance card prevents either 3 to 4 damage to our vessel.
Since Cannon Ball is set to deal the most serious 3 damage to our ship, the Safe Distance card is perfect, as the card has 3 as the lowest damage prevention number. Now we take a look at an offensive play.
#2 | When the enemy has a Defensive card
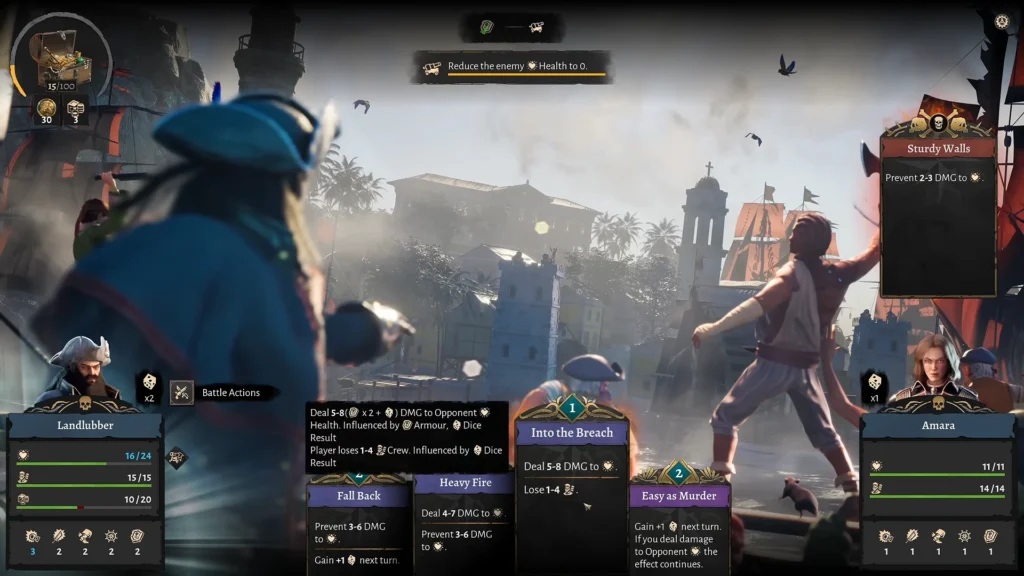
Here we have the complete opposite of the first Naval scenario. If you look at the enemy’s card here, Sturdy Wall, it is set to prevent damage between 2 and 3 to their ship’s HP. In short, the enemy is preparing for the attack, but the highest number of defenses is 3. In order to succeed, we must deal damage above 3 to truly lower their HP.
Let’s look at the cards we have for this round:
- Fall Back: Prevents 3 to 6 damage and gains a dice roll in the next turn.
- Heavy Fire: Deals 4 to 7 damage and prevents 3 to 6 upcoming damage to the ship’s Health.
- Into the Breach: Deals 5 to 8 damage to the enemy ship’s health but loses 1 to 4 crew.
- Easy as Murder: Gain +1 dice roll next turn.
Fall Back and Easy as Murder should be avoided, since Fall Back prevents damage and Easy as Murder will grant us 1 dice roll, but it will skip the round. Since the enemy is bracing for impact, we should go all out. This leaves us with two options: Heavy Fire and Into the Breach. While Heavy Fire deals good damage, it also prevents damage; we could use the card later on for a different scenario. Especially when we are receiving upcoming damage.
Since we are not getting any upcoming damage, the perfect choice here is Into the Breach, as it will deal 5 to 8 damage to the enemy ship’s Heart, but we might lose 1 to 4 crew during the attack. A small price to pay to deal heavy loads of damage to the enemy’s ship by passing their Sturdy Wall’s 2 to 3 damage protection.
That’s how you will set a counter to the enemy’s defensive play by firing back with everything. Now let’s look at what else you can do in these moments.
#3 | When the enemy card is neither defensive nor offensive
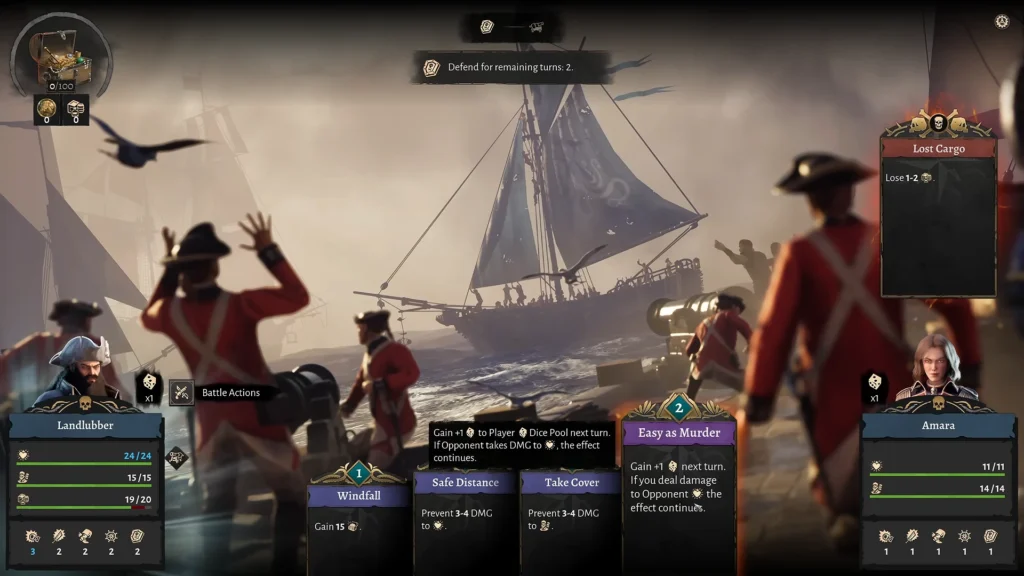
If the enemy card is not offensive or defensive, as shown in the image above, then we can do other things besides attacking the ship. As you can see, the next card of the enemy is Lose Cargo, where the enemy will lose 1 to 2 Cargo. That’s it; the ship will neither attack nor prepare for any sort of offense.
Which means we are free to do anything here. If you look at our card collection, we have the same set as before.
- Windfall: Gain 15 Treasure
- Safe Distance: Prevent 3 to 4 Damage to Health
- Take Cover: Prevent 3 to 4 damage to Crew
- Easy as Murder: Gain +1 dice roll next turn.
Since we are not taking any damage, we can skip out Safe Distance and Take Cover. Which leaves us with Windfall and Easy as Murder. Windfall will allow us to charge in and steal the treasure, which will get updated at the top-left of the screen. Easy as Murder is also a solid choice, as we get +1 Dice Roll for the next game, and if we deal damage to the enemy’s HP, the effect of the dice roll will continue.
Tips for Naval Combat
- Starting out, you are stuck with the basic ship with nothing to write home about, but later on you will unlock fancier ships with more slots for crew and excellent stats.
- Choose the captain that meets your current need; there are many captains in-game that favor different actions than just shooting. Also note that each captain comes with their own unique ability that can also change naval combat, as you will get unique perk cards.
- One of the effective ways to raise the ship’s stats is by getting a better crew. You can add Marauders, Scallywags, Bambadiers, Navigators, and more to boost the ship’s offense and defensive numbers.
- Pick the cards in the Naval battle that act as a counter card for the opponent. If the opponent is pulling a card that deals damage, then you need to set a card that can prevent that, and vice versa.
- A bit later in the game, I advice to unlock Shrine of the Sea building, which applies a buff to the ships at the ocean. You will need Seafaring Principle Points for the skill trade via Compass.
