

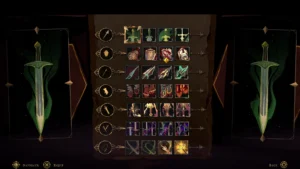

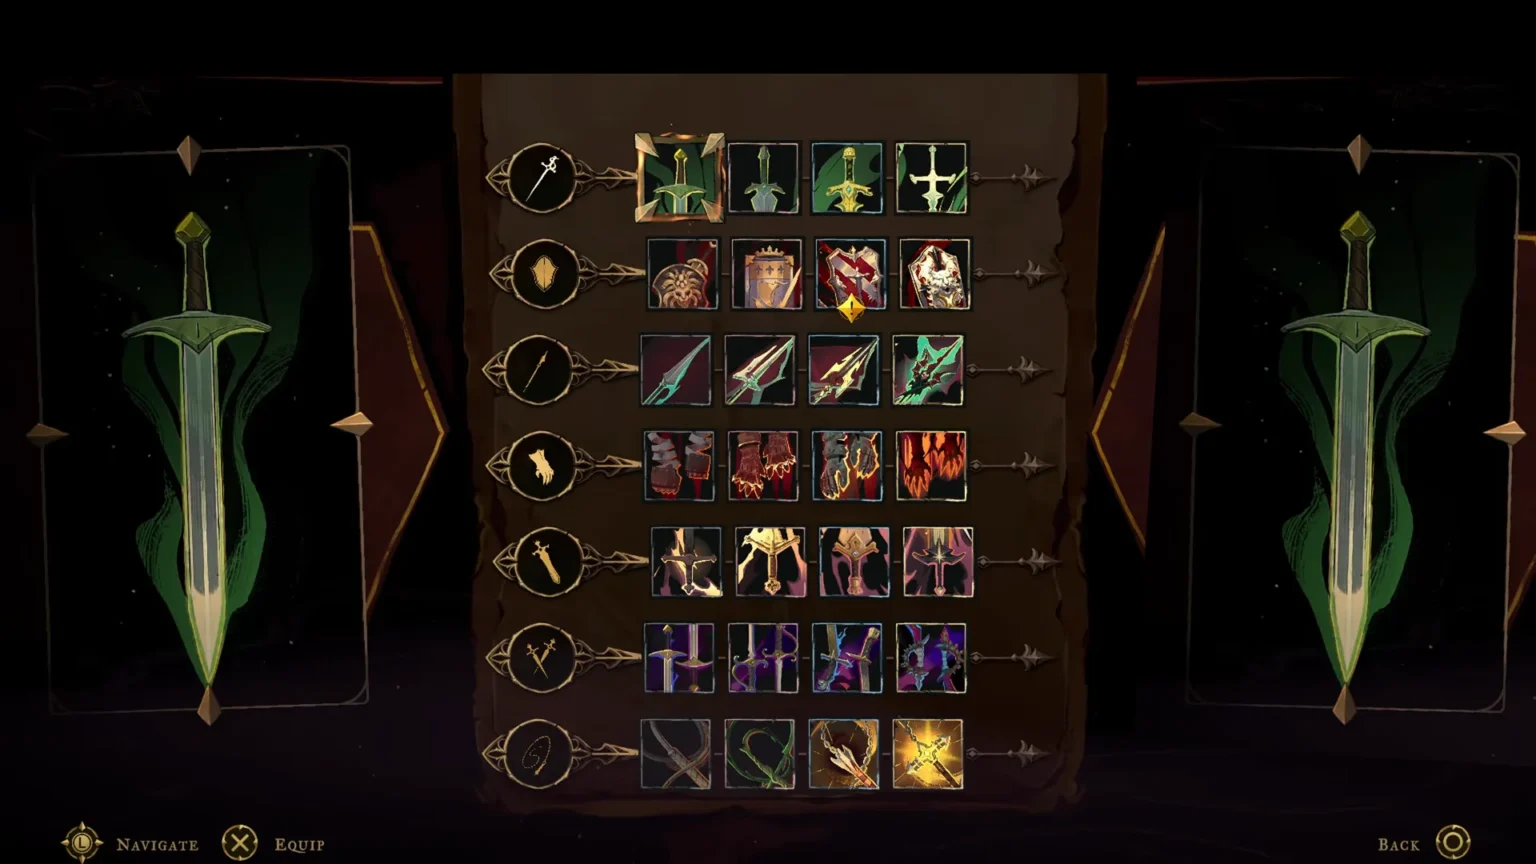

Dracula’s castle houses twisted abominations that will not go down easily without putting up a tough fight. In a game where you fend off a variety of bosses after gathering the clues, the next thing you should do is prepare yourself by getting familiar with the weapons before facing the bosses. The right weapon can help you easily demolish the common enemies and make the boss encounters manageable.
Since there are over two dozen weapons in Castlevania: Belmont’s Curse, picking your favorite one will take time, as each weapon comes with its own unique perk that stands out from others and makes the overall game look and feel drastically different. In this guide, I will take a look at all 29 Weapons found in Castlevania: Belmont’s Curse.
All Weapon Locations in Castlevania: Belmont’s Curse
Here is a brief look at all 29 weapons found in Castlevania: Belmont’s Curse, each with its own location and attack stats. If you are looking for a specific weapon that you want to play with, then look through the perks until you find one that sings your tune.
| Weapon Name (Rarity) | Attack Details | Location |
| Longsword (Ordinary) | Attack – 25 * Attack right after a backdash or slide to deal more damage. * Dash through | Starting Weapon |
| Cestus (Ordinary) | Attack – 25 * The more you hit enemies, the more weapon damage you deal. * Uppercut | Found in Prison Tower, Paris Streets |
| Bastard Sword (Refined) | Attack – 50 * Attack right after a backdash or slide to deal more damage. * Dash through | Found in Docks, Paris Streets |
| Burnt Sword of Fierbois (Ordinary) | Attack – 25 * Hold and release the Square to charge and unleash a stronger attack. * Blade Dive | Found by defeating Joan of Arc in Paris Streets |
| Almace and Hauteclaire (Masterpiece) | Attack – 75 * Press Square when the previous attack hits the target to prolong the combo. * Blade Flurry | Found by completing the ambush in Holy Innocent’s Cemetery. |
| Lance (Ordinary) | Attack – 25 * Hold Square to aim with the weapon, then release to throw it. * Push | Found in Holy Innocents’ Cemetery. |
| Rusted Harpe and Aegis (Ordinary) | Attack – 25 * Hold Square to block attacks coming from the front. * Shield Bash | Found after defeating Medusa |
| Pair of Longswords (Ordinary) | Attack – 25 * Press Square when the previous attack hits the target to prolong the combo. * Blade Flurry | Can be obtained in the Catacombs of Paris. |
| Gungnir (Masterpiece) | Attack – 75 * Hold Square to aim with the weapon, then release to throw it. * Push | Can also be found in the Catacombs of Paris. |
| Whip (Ordinary) | Attack – 25 * The furthest point of the weapon’s attack deals more damage. * Whip Drag | Found in the Catacombs of Paris. |
| Valmanway (Legendary) | Attack – 75 * Attack right after a backdash or slide to deal more damage. * Dash through | Found in Paris Streets. |
| Morning Star (Legendary) | Attack – 75 * The furthest point of the weapon’s attack deals more damage. * Whip Drag | Found in the Main Hall. |
| Rapiers (Refined) | Attack – 50 * Press Square when the previous attack hits the target to prolong the combo. * Blade Flurry | You can find it in the Main Hall. |
| Jewel Knuckles (Refined) | Attack – 50 * The more you hit enemies, the more weapon damage you deal. * Uppercut | Can also be found in the Main Hall. |
| Alucard’s Sword and Shield (Legendary) | Attack – 100 * Hold Square to block attacks coming from the front. * Shield Bash | Found in the Main Hall. |
| Thorn Whip (Refined) | Attack – 50 * The furthest point of the weapon’s attack deals more damage. * Whip Drag | Found in the Library. |
| Durandal (Masterpiece) | Attack – 75 * Hold and release the Square to charge and unleash a stronger attack. * Blade Dive | Can be Obtained in the Library. |
| Fleuret and Tower Shield (Refined) | Attack – 50 * Hold Square to block attacks coming from the front. * Shield Bash | Can be Found in the Library. |
| Bernhard’s Wrath (Legendary) | Attack – 100 * The more you hit enemies, the more weapon damage you deal. * Uppercut | Found in Hall of Mirrors |
| Fists of Talos (Masterpiece) | Attack – 75 * The more you hit enemies, the more weapon damage you deal. * Uppercut | Found in Clock Towers |
| Halberd (Refined) | Attack – 50 * Hold Square to aim with the weapon, then release to throw it. * Push | Obtained in the Clock Towers |
| Claymore (Refined) | Attack – 50 * Hold and release the Square to charge and unleash a stronger attack. * Blade Dive | Look for it in the Clock Towers |
| Chauve-Souris (Legendary) | Attack – 100 * Hold Square to aim with the weapon, then release to throw it. * Push | Earned after beating Issac the boss. |
| War and Famine (Legendary) | Attack – 100 * Press Square when the previous attack hits the target to prolong the combo. * Blade Flurry | Found in Notre-Dame |
| Joyeuse (Masterpiece) | Attack – 75 * Attack right after a backdash or slide to deal more damage. * Dash through | Found in Notre-Dame |
| Excalibur (Legendary) | Attack – 100 * Hold and release the Square to charge and unleash a stronger attack. * Blade Dive | Obtained After Defeating the Arthur Boss |
| Arondight and Lancelot’s Shield (Masterpiece) | Attack – 75 * Hold Square to block attacks coming from the front. * Shield Bash | Found in Notre-Dame |
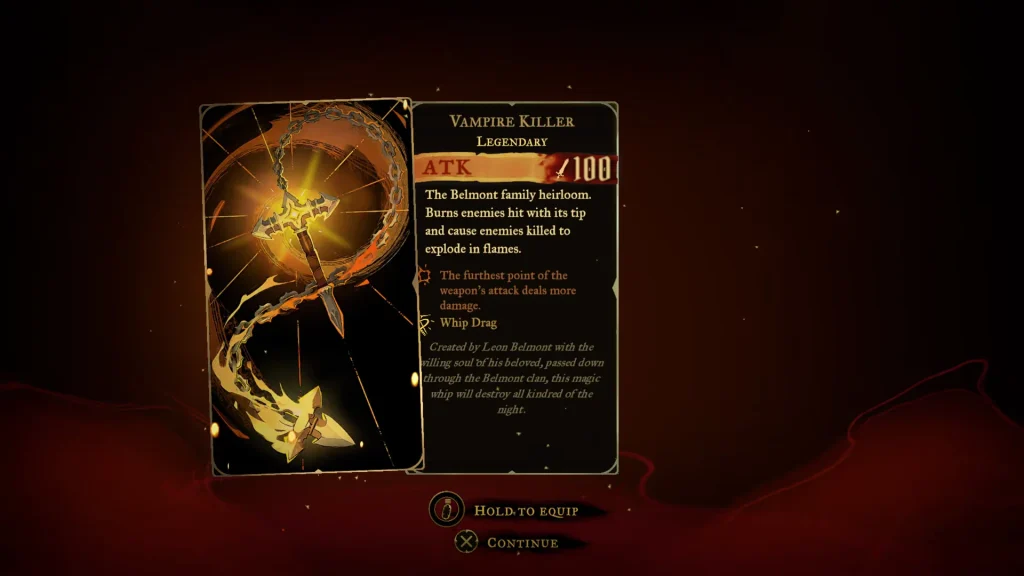
| Vampire Killer (Legendary) | Attack – 100 * The furthest point of the weapon’s attack deals more damage. * Whip Drag | Given by Trevor Belmont after Defeating Death |
There are several achievements related to the weapons collection:
- Jack of All Trades: Find a weapon of each family in the game.
- Stuff of Legends: Find a Legendary weapon.
- Armed to the Fangs: Find every weapon in the game.
Just continue following the guide, and you will get all three of them by the end of it. Suffice to say, Legendary is the best quality weapon that comes with a unique perk that separates it from most of the weapons in the game. Once you get a Legendary weapon, you are all set; you can change it to another Legendary if you find any value from the perk.
Longsword | Default Starter Weapon
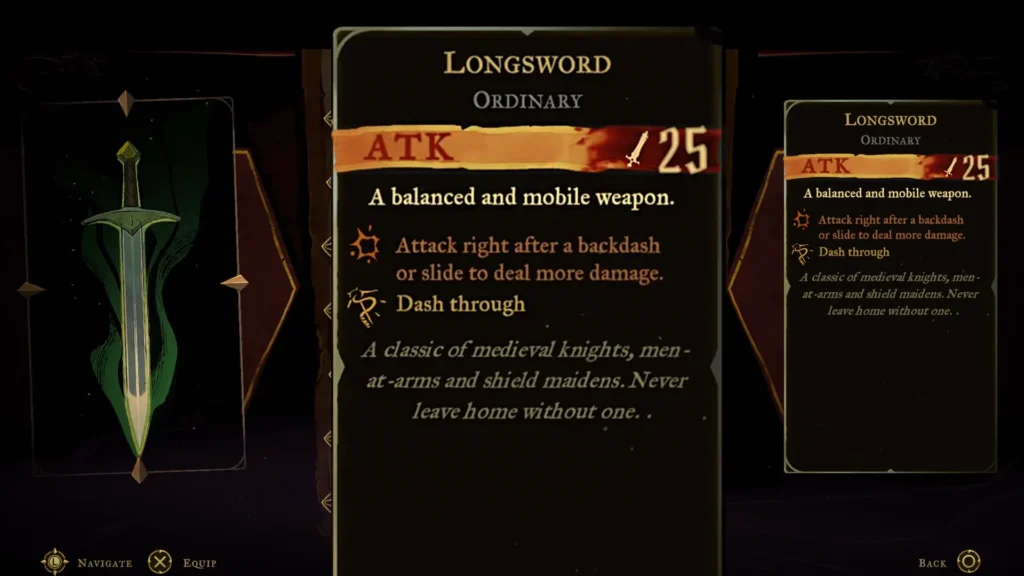
Longsword is your very first weapon that comes with a solid perk of dealing more damage after performing a backdash or slide. It offers decent perks to deal with most enemies early on in the game.
Cestus | Paris Streets
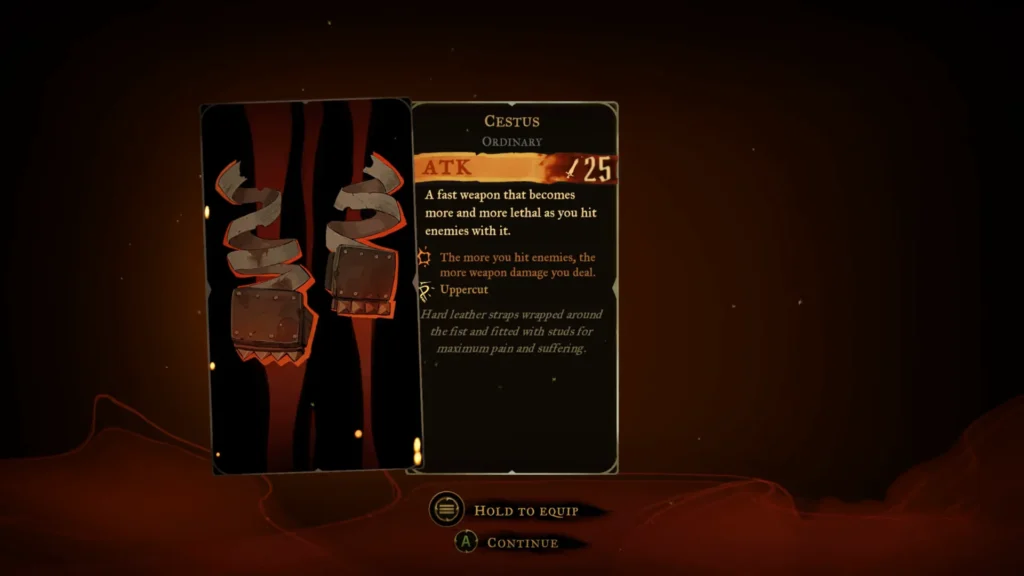
You can head to the Prison Tower in Paris Streets to find this weapon. The weapon we are looking for is hidden inside a room, in one of the many dark corners of the game. This route has many twists and turns, typical of a Metroidvania, so you can easily get lost. Check the guide for the exact location to begin your search for this Cestus Weapon in Paris Streets.
Bastard Sword | Paris Streets
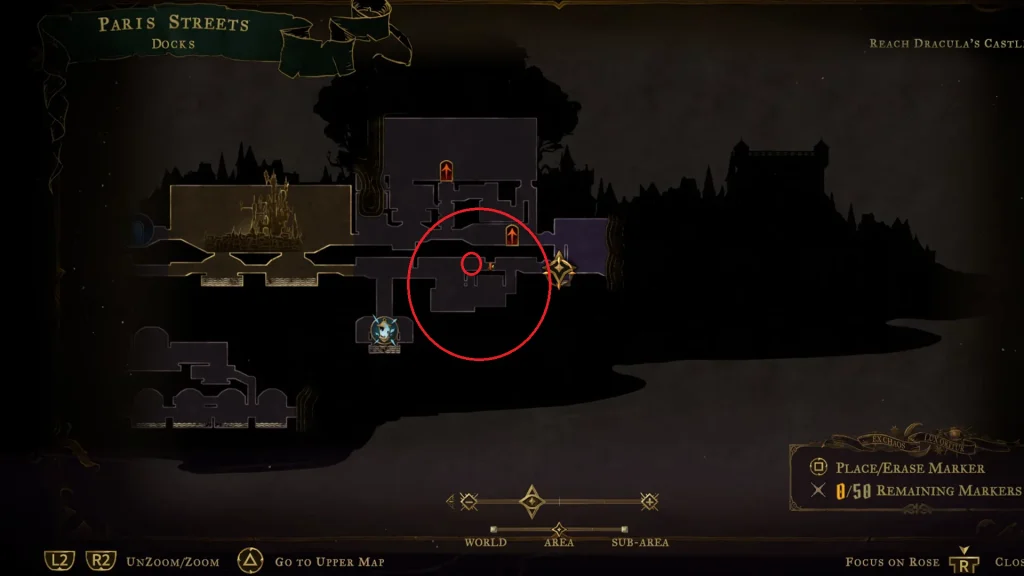
Make your way to the spot marked on the map, at the docks on Paris Street. Head left, and you will have to go through a platforming challenge in the room called “Justice District Sewers“. Once the route to the left side of the room opens up, jump on the platform on the right, and you will find a treasure chest with the weapon inside.
Bastard sword is an upgrade over the default sword we get in the game; it carries pretty much the same perks but with a higher attack rate of 50 instead of 25. Grabbing this weapon lets you deal more damage if you are already fond of the sword mechanics and how it plays in the game.
Burnt Sword of Fierbois | Paris Streets
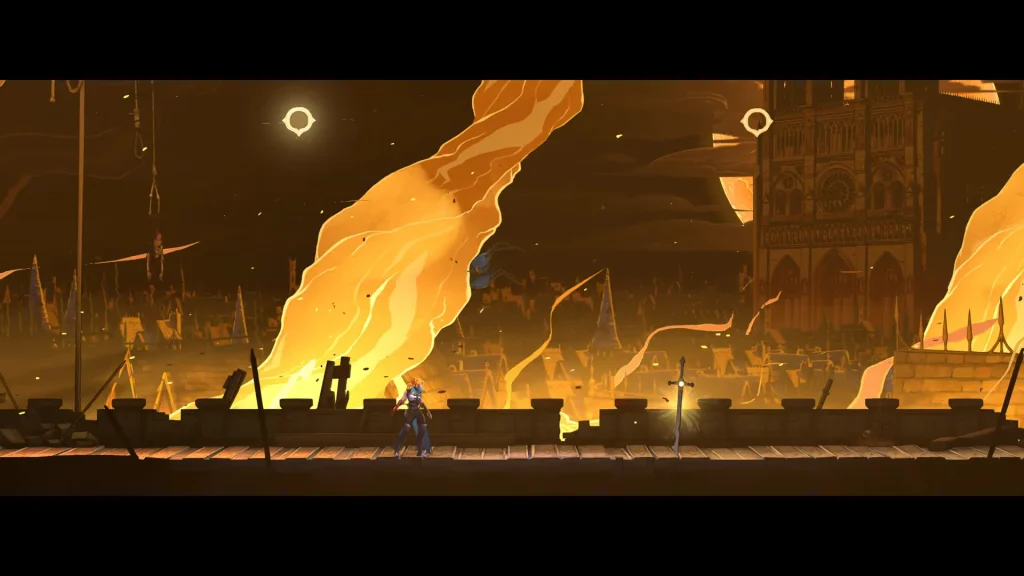
Follow the Warrior Clues to get into a combat encounter against Joan of Arc, the Warrior boss. Defeat Joan, and you will find the Burnt Sword of Fierbois on the ground.
Here we have another sword, but this one is a bit different; instead of dealing damage with backdashing. The Burnt Sword of Firebois offers a charged attack style, where you hold the Square button on the controller to charge the sword to deal more damage by performing a strong attack. It does significantly change the game and each encounter by introducing charging mechanics.
Almace and Hauteclaire | Holy Innocents’ Cemetery
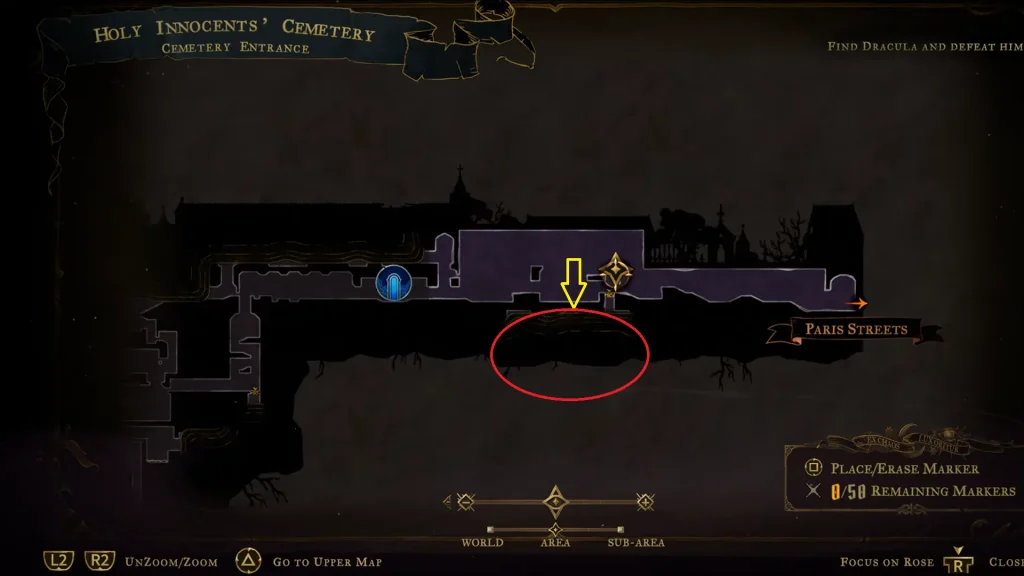
Get to the spot marked on the map at the Cemetery Entrance in Holy Innocents’ Cemetery. Here, dive bomb into the ground to get into the hidden area called “Flooded Crypt“. Soon, as you move to the left of the area, you will get ambushed by enemies on both sides. Use the grappling hook on the ceiling to jump around to defeat all of them. Once the room is cleared of enemies, head to the left side of the room and wall jump to the upper floor to find the treasure chest with the weapon.
Here we have a dual-sword build around creating nothing but sweet combos. If you want something fast and want to deal rapid hits, then you can move forward with Almace and Hauteclaire to get the job done. You can press Square after landing a hit on the enemy to chain the combo with this weapon.
Lance | Holy Innocents’ Cemetery
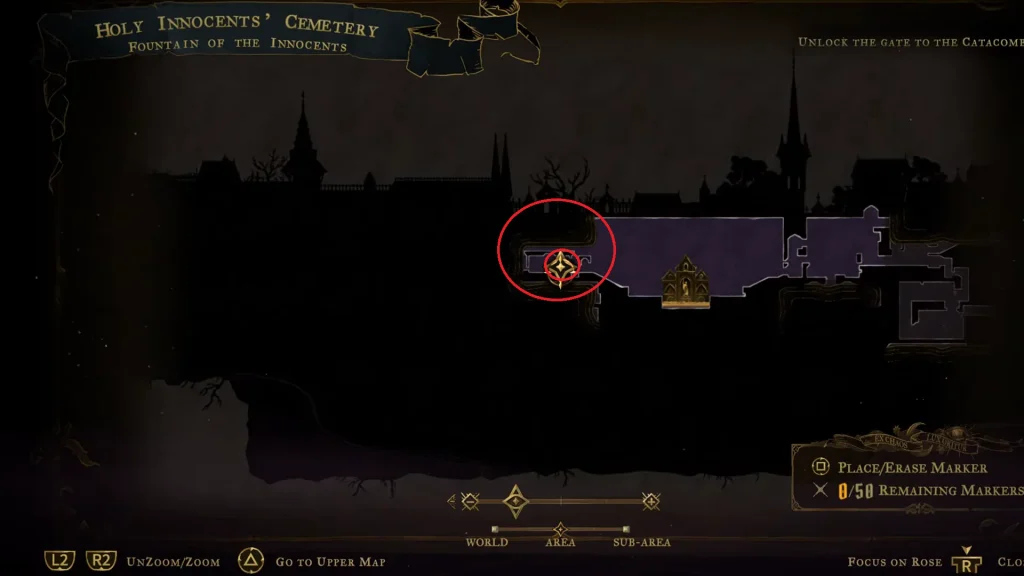
Lance can be found west of the Fountain of the Innocents in Holy Innocents’ Cemetery. Once you get to the spot marked on the map, you will find a lever on the ground. Just like the last time, hitting the lever here will start the ambush, defeat all of them, and then head to the platform directly above the combat floor to find the chest with the Lance.
Here we have the first long-range entry on the list: The Lance can hit enemies at a range without having you go close to them. You also have the ability to throw the spear at enemies to deal damage. This is not the first; we will see many more spear-type weapons on our journey.
Rusted Harpe and Aegis | Holy Innocents’ Cemetery
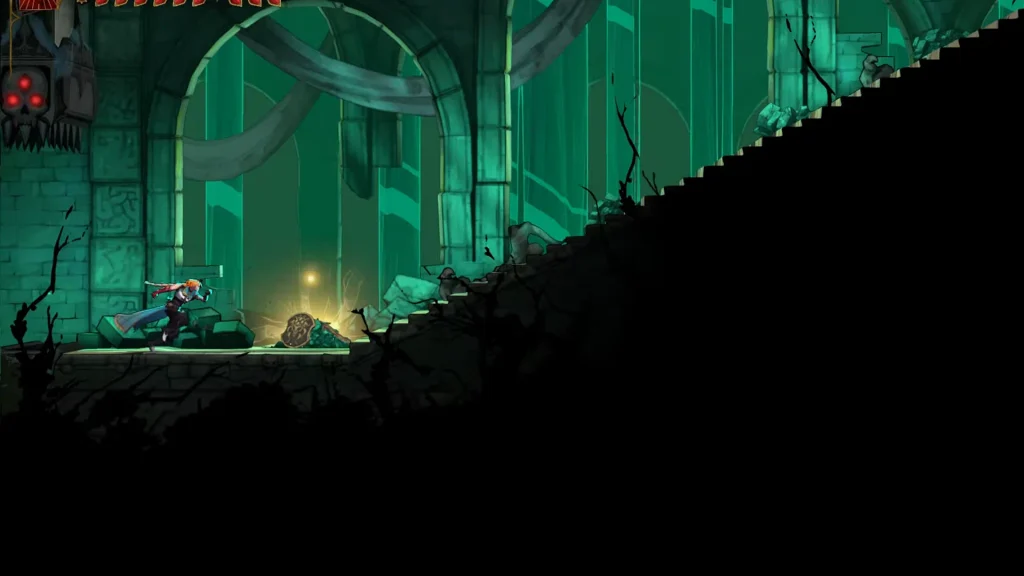
Gather all the clues for the Prophetess to get to the Medusa boss fight. Once you beat the boss, start moving to the entrance section of the boss room. Down the stairs, you will find the sword Rusted Harpe and Aegis on the floor.
Rusted Harpe and Aegis is a shield and sword combo, so we are not only dealing damage but at the same time defending ourselves from getting hurt. Do note, the shield here will block the attacks at the front. Hold the Square to block the attacks coming at the front. This is going to be a typical stat on all sword and shield combos in the game.
Pair of Longswords | Catacombs of Paris
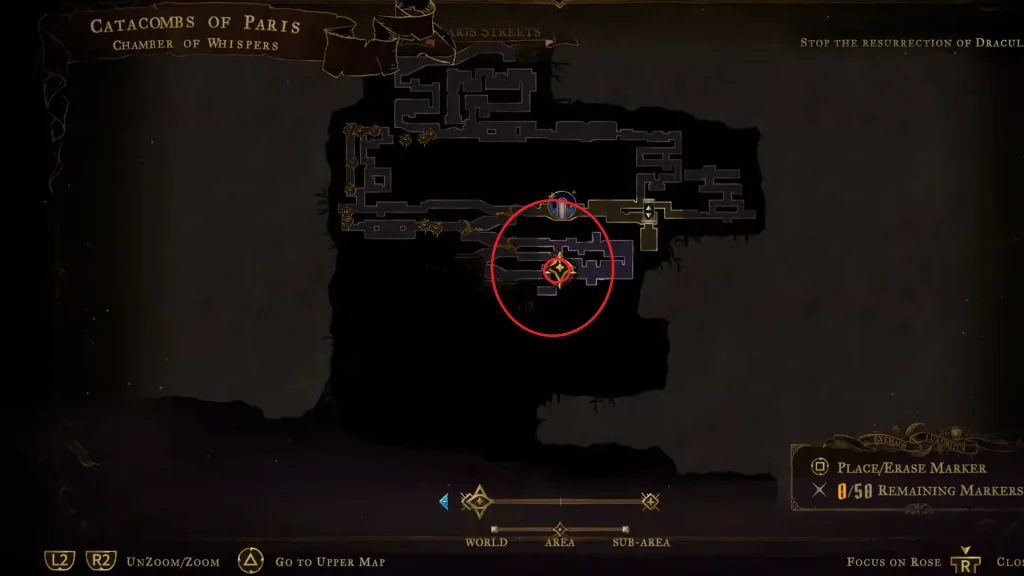
This one is located in the Chamber of Whispers in the Catacombs of Paris. Get to the spot marked on the map, go through the environmental platforming, and on the door to the left, you will find the treasure chest for the Pair of Longswords.
Here we have a pair of dual longswords that offer the Blade Flurry combo, hitting one enemy and hitting continuously with the combo again. The classic dual sword play style but with two longswords. This weapon falls into the same category as the previous weapon we encountered with the same effect, Almace and Hauteclaire. If you are into fast combos and want to experiment with different pairs of swords, this is one of the perfect fits in the game.
Gungnir | Catacombs of Paris
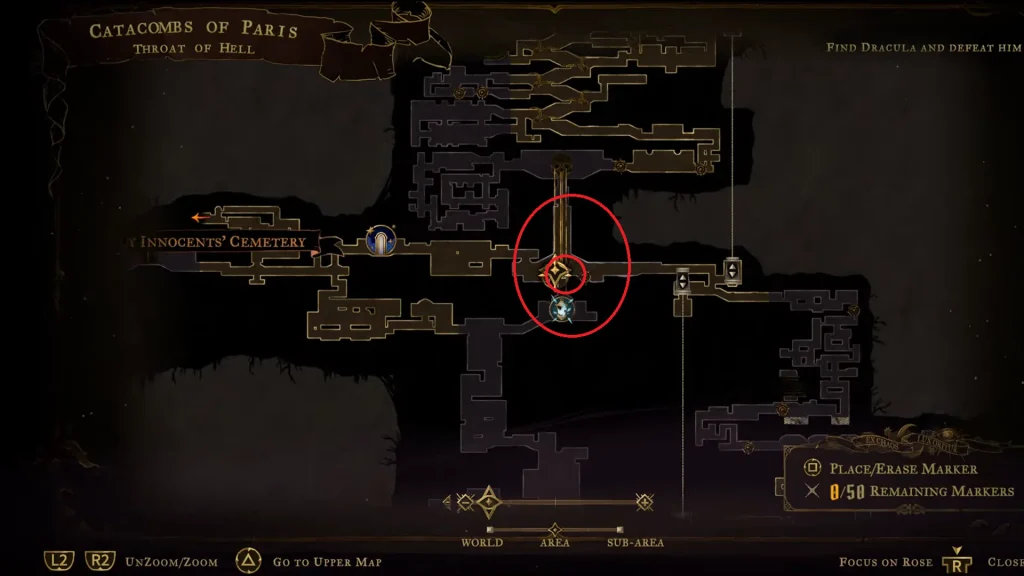
Get to the point marked on the map in Throat of Hell in the Catacombs of Paris region. Now dive down the floor and break it to enter a hidden room called “Collapsed Path of Orpheus“. The area is somewhat hidden, so prepare to dive bomb the spot marked on the map, and you will land right in the area with the chest.
Gungnir is a classic spear weapon that deals 75 attack damage and has a throwing ability. Just hold Square on the controller to throw the spear at the enemy. Overall, the weapon acts in the same fashion as Lance but with more damage. The Lance was limited to 25 attack damage; here you’re going over 70 attack ratings, making it a far superior choice for Lance replacement.
Whip | Catacombs of Paris
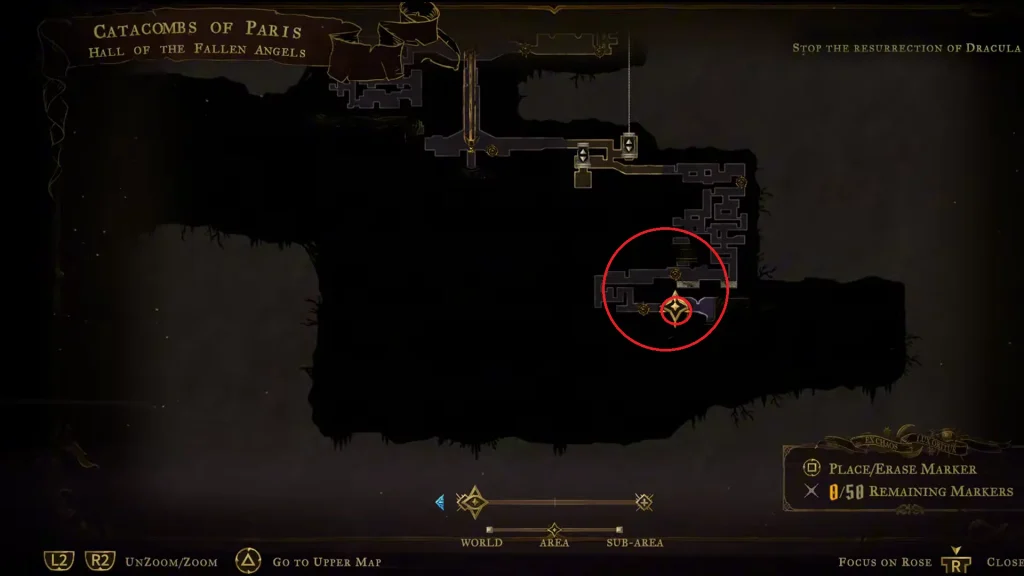
Whip is found in the Hall of the Fallen Angels in the Catacombs of Paris. Get to the marked spot, and you will find the treasure chest in front of a pile of skulls with a red cave in the background.
Here we have the first Whip in the list; this weapon style acts similarly to Spear. One of the highlights here is how the weapon operates; the perk of the weapon activates the farther you are from the enemy. The furthest point of the Whip deals more damage, making your gameplay a bit safer, as you are not going up close and personal. This is going to be the typical stat on all whip-related weapons we will come across in the game.
Valmanway | Paris Streets
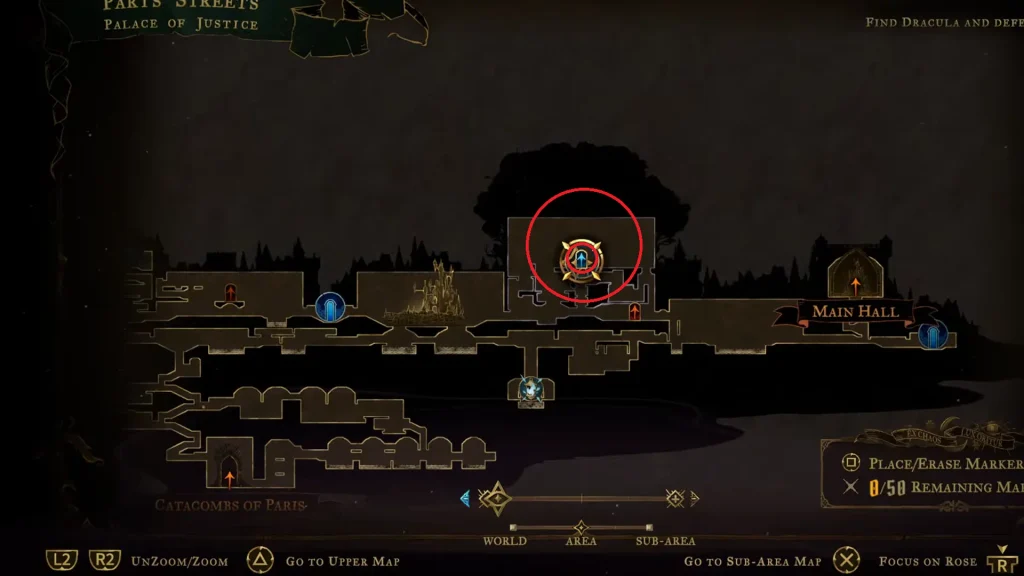
Requirement: You need to have at least half of all Heart Upgrades (Health and Mana)
Get to the Palace of Justice on Paris Street; here, interact with the large measuring scale to get Valmanway. Again, you need to have at least half of the Heart upgrades to get the weapon after interacting with the scale. The black heart that sits on the right side of the scale will turn gold and award you the weapon Valmanway.
Valmanway is a wind-infused blade that deals double damage after a quick delay. Another strong point of the sword is its attack rating, which sits at 75. The sword is a legendary weapon, so if you like sword-focused gameplay, you can replace your current one with Valmanway. The wind-infused aspect of the sword comes from its legendary rarity; we are going to see different unique perks on each legendary weapon we come across in the game.
Morning Star | Main Hall
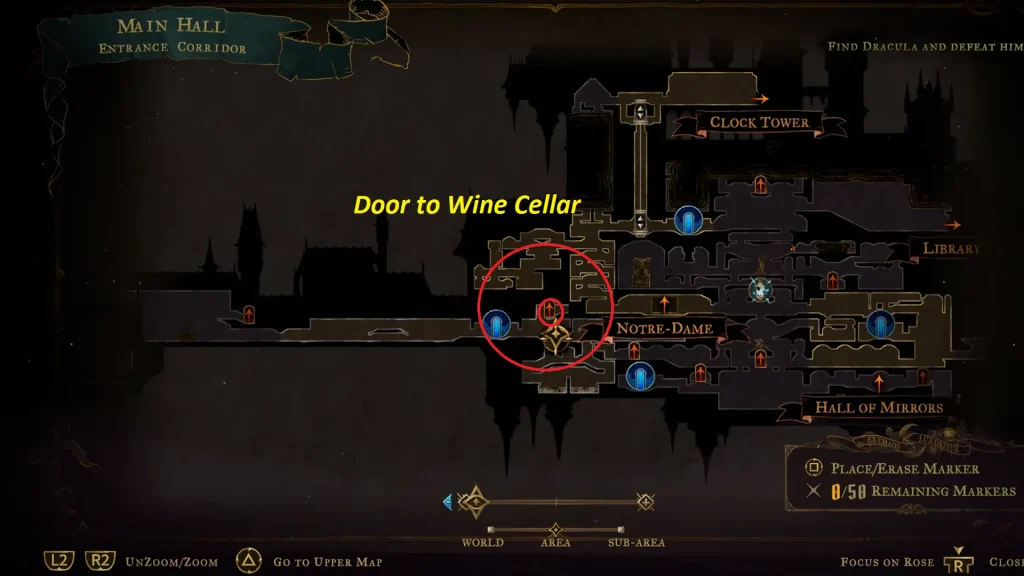
Morning Star is found inside the Entrance Corridor in the Main Hall. Get to the spot marked on the map and then take the door to the “Wine Cellar“. Now drop down and start moving, and you will find yourself in the “Storeroom“; here, move through the environmental platforms to get to the left side of the room. The route will lead you to the Inner Courtyard, where you will find the treasure chest with the Morning Star weapon inside.
Morning Star is a Masterpiece rarity weapon; the weapon looks cool, and it deals 75 attack damage on hit. Since it’s a whip, the furthest point of the weapon deals more damage. If you are into dealing damage via a ranged-based weapon, Morning Star is the perfect choice.
Rapiers | Main Hall
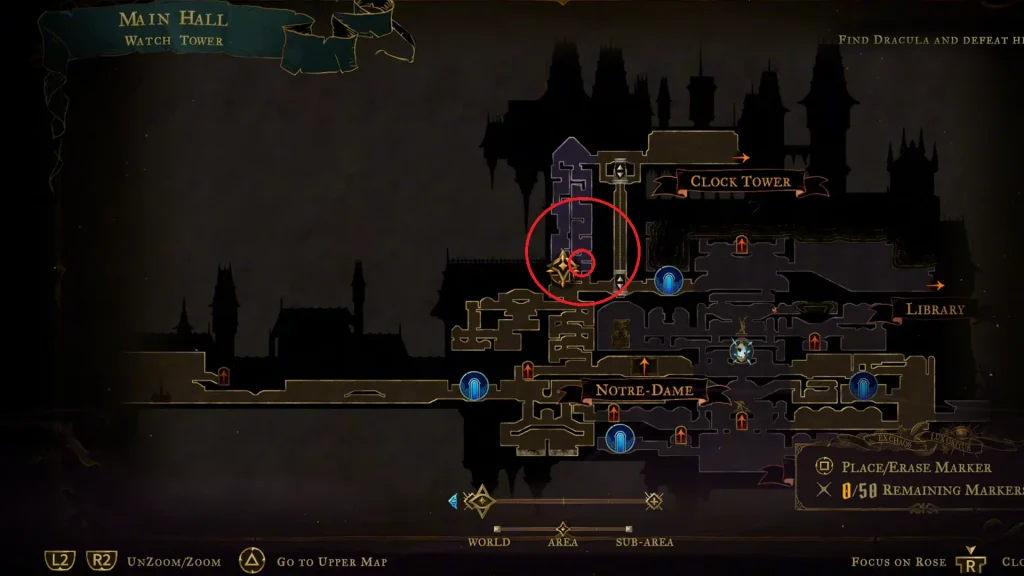
Prepare to put yourself through another environmental platforming challenge at the top of the Watch Tower in Main Hall. Get to the marked spot on the map and start moving up, and avoid touching the spikes covering the walls and moving blocks. The route will lead you to the treasure chest on the other side. It is one of the many cases where the game shows you the chest outright, but it will be blocked by a wall, and the only way to the other side of the wall is by taking a detour.
Rapier is another combo-focused weapon by having you equip two swords at once. The weapon comes with a 50 Attack rating; it is a decent entry, but we have better dual sword weapons that deal more damage. If you already have a dual sword that deals less than 50 attack rating, then swap the old ones for the Rapier duos.
Jewel Knuckles | Main Hall
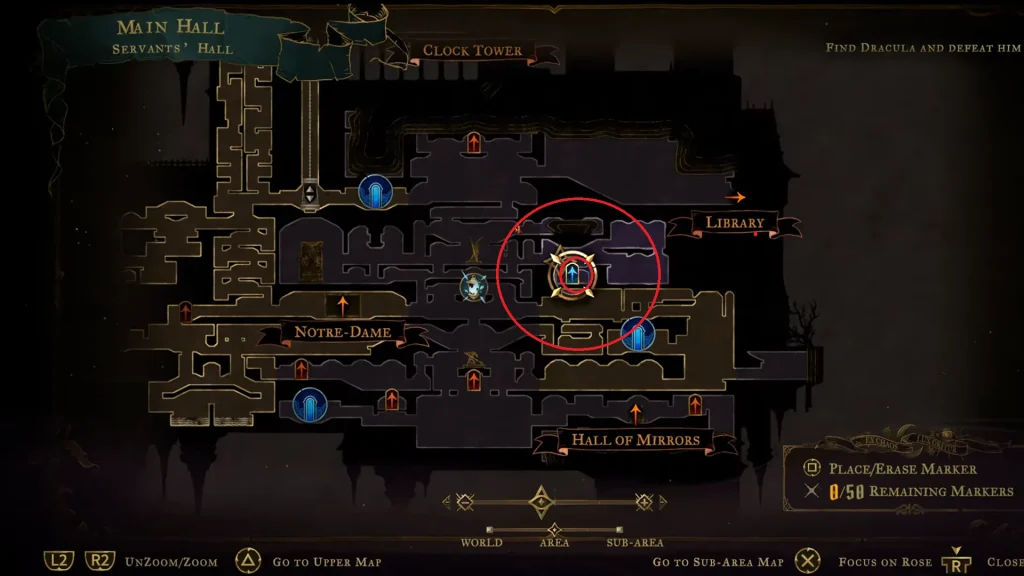
Get to the door in the Servant’s Hall in the Main Hall marked on the map above. Once inside, turn left; you will enter the platforming challenge. Complete the challenge, then proceed to the doorway on the right, and then drop down to the floor to enter the door with red glowing lights coming out of it. The door will take you to “Old Gallery“. Once you are in this room, jump to hit the platform on the ceiling to lift up the barricade on both sides of the room, then move to the right to loot the treasure box carrying the weapon inside.
The platforming section for the weapon will be a bit difficult, with a lot of spinning blades covering every space around the player. Besides the spinning blades, you also need to be careful about the enemies in here; make sure to go slow and kill the enemies before rushing to the endpoint. Don’t just skip past the enemies, or they will become a nuisance on your platforming.
The weapon here is knuckles, best for keeping things up close and personal. If you are into dealing damage to enemies up close, they are extremely good, as dealing more hits will equal dealing more damage. The attack rating is set at 50, which makes them a decent pair to have in the game.
Alucard’s Sword and Shield | Main Hall
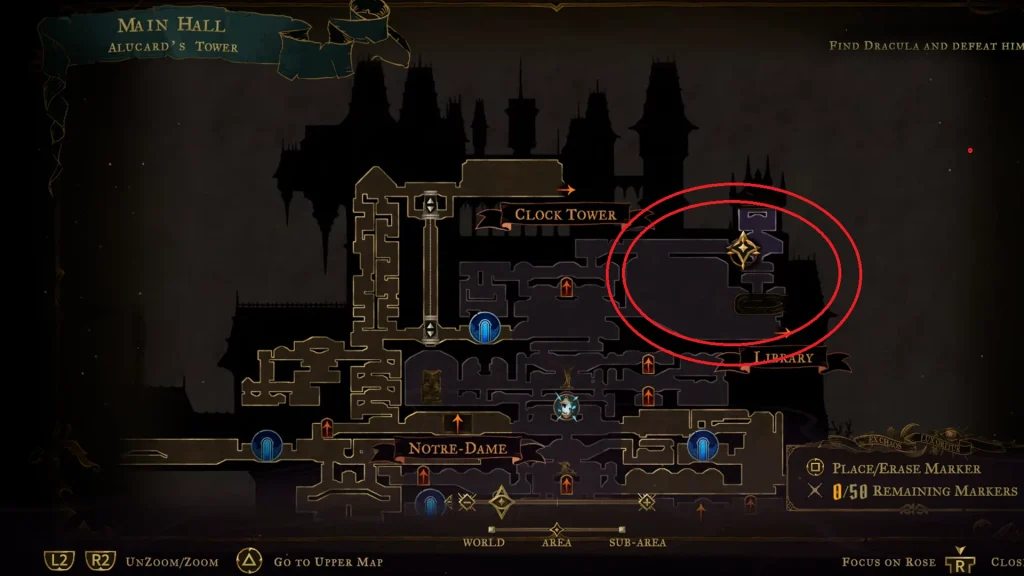
Requirement: Destroy the 5 Blue Flames to unlock the passage to obtain the weapon.
This one is available at Alucard’s Tower in the Main Hall, as seen on the map above. In this area, you will find blue flames hanging on the wall; they will not be in a single place. You will find them throughout the area. Hunt all of them down, then get to the Bridge of Knowledge; here you will find the painting of Alucard with five blue flames all around it. If you have hit all five blue flames, then the flames around the painting on the wall will also be lit; then head to the bedroom at the top to grab the weapon.
Alucard’s Sword and Shield is a sword and shield combo, one of the legendary weapon sets in the game. The attack rating here sits at 100, with the ability to block attacks from the front. The unique perk of this weapon is that it allows users to teleport when they attack with the weapon set. Overall, we are looking at one of the best legendary weapons in the game.
Thorn Whip | Library
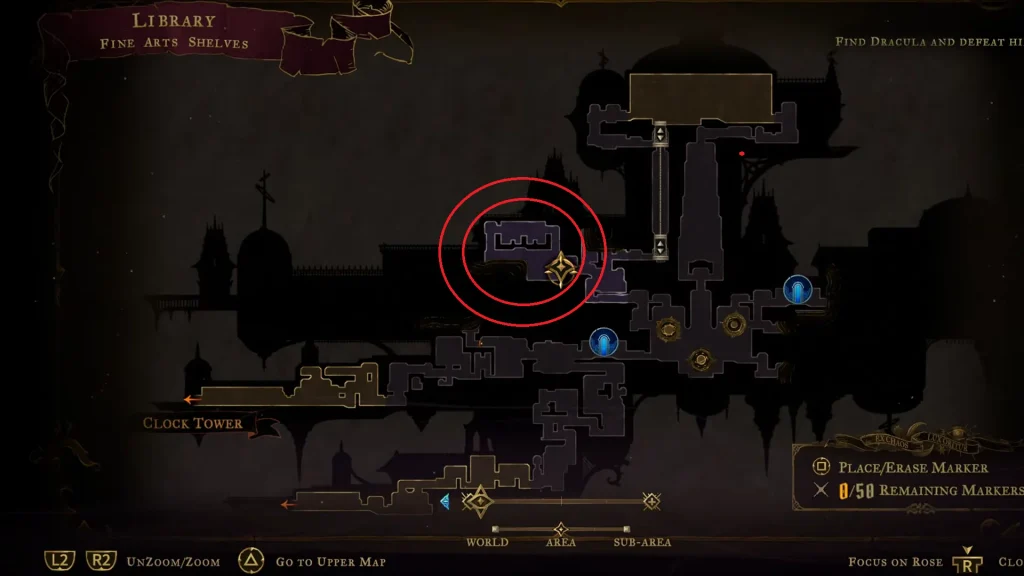
Get to the marked spot in Fine Arts Shelves in the Library, then move up to complete the platforming challenge to find the treasure map carrying the item inside. The challenge here is short; all you have to do is navigate over spikes. Don’t worry, you will not come across any rotating blades in this section. Another thing about this challenge is its length; it’s short. Just keep on moving to the left, and eventually you will find the treasure box.
The weapon here is a whip, which functions like a common whip, but the attack is rated at 50. If you have any weak weapons or prefer to change to a Whip-style gameplay style, Thorn Whip certainly will make a great addition to the combat encounters.
Durandal | Library
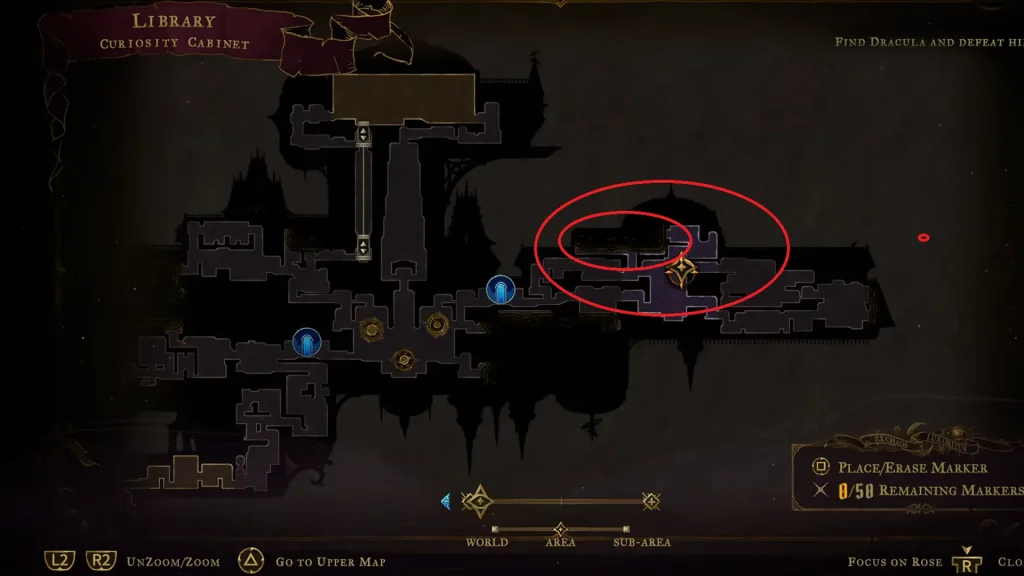
Durandal is found inside a treasure chest in Lisa’s Laboratory. First, make your way to the red-circled section marked on the map, in the Curiosity Cabinet in the Library. Once you make your way to the top, move towards the left. You will have to tackle another spike-covered platforming challenge; your only goal here is to move to the left. Avoid the spikes on the floor and make your way to the left, pass the doorway, and you will be in Lisa’s Laboratory. Open the chest on the ground to find the weapons.
Durandal is a Masterpiece rarity weapon, as it comes with a 75 Attack rating and the charge ability to deal even more damage. The sword is sick to look at and deals a good amount of damage to keep the gameplay fresh and new. If you are looking to replace your current sword-type weapon, then Durandal is an excellent choice that will not leave you disappointed.
Fleuret and Tower Shield | Library
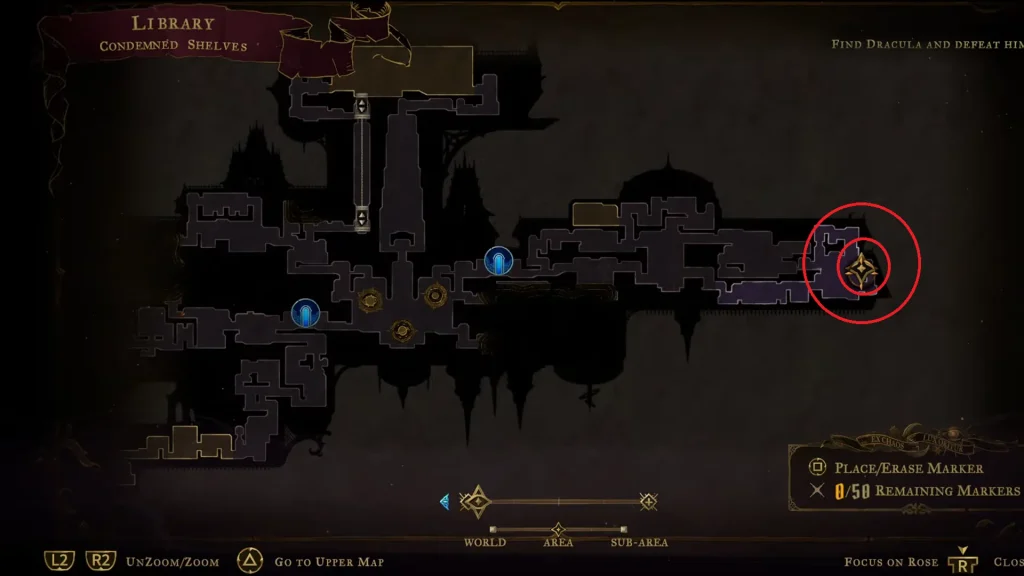
Go to the spot marked in the Condemned Shelves in the Library, as seen in the image above. Once you are in the spot, move up and complete a small platforming challenge to find the treasure chest with the weapon set inside. Compared to the platforming puzzles we dealt with in the past few weapons, this one will not be hard, and the length is short.
Fleuret and Tower Shield is your classic sword and shield combo that comes with a 50 Attack rating and the ability to block attacks from the front. It’s a decent piece of sword and shield but nothing to write home about.
Bernhard’s Wrath | Hall of Mirrors
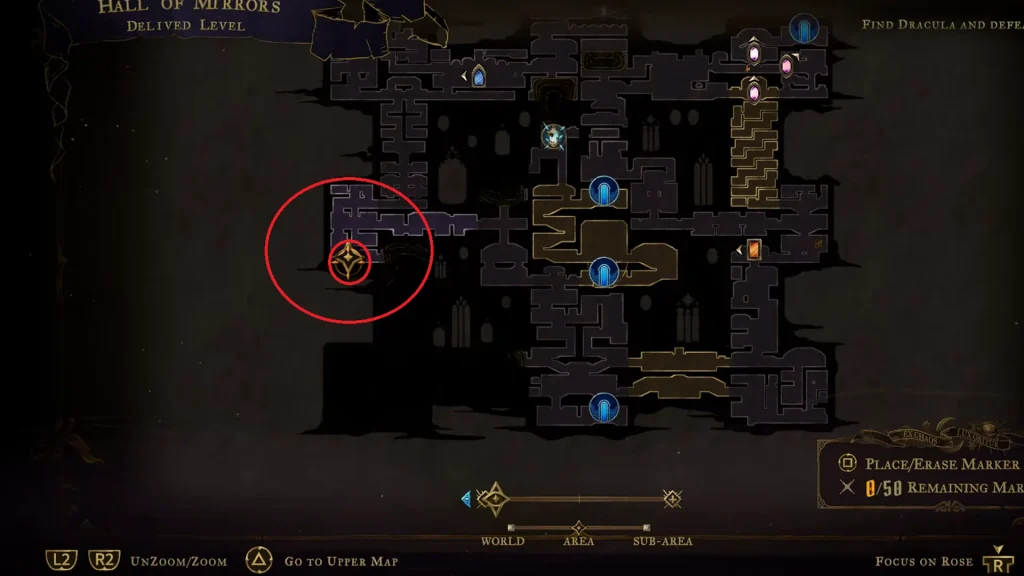
You will need to head to the Delived Level in Hall of Mirrors, get to the spot, and you will teleport to a new area called “Level Deviled.” Once you are here, you must deal with an ambush; you are probably aware of how the song ends. Defeat the enemies and claim the treasure chest to find the weapon.
Defeating all the enemies here awards you “Bernhard’s Wrath.” It is a legendary weapon; one of the unique perks here is that dealing damage heals your character. Since it’s a gauntlet, dealing damage increases the weapon damage, and the legendary bonus perk of healing is the icing on the very delicious cake.
Fists Of Talos | Clock Tower
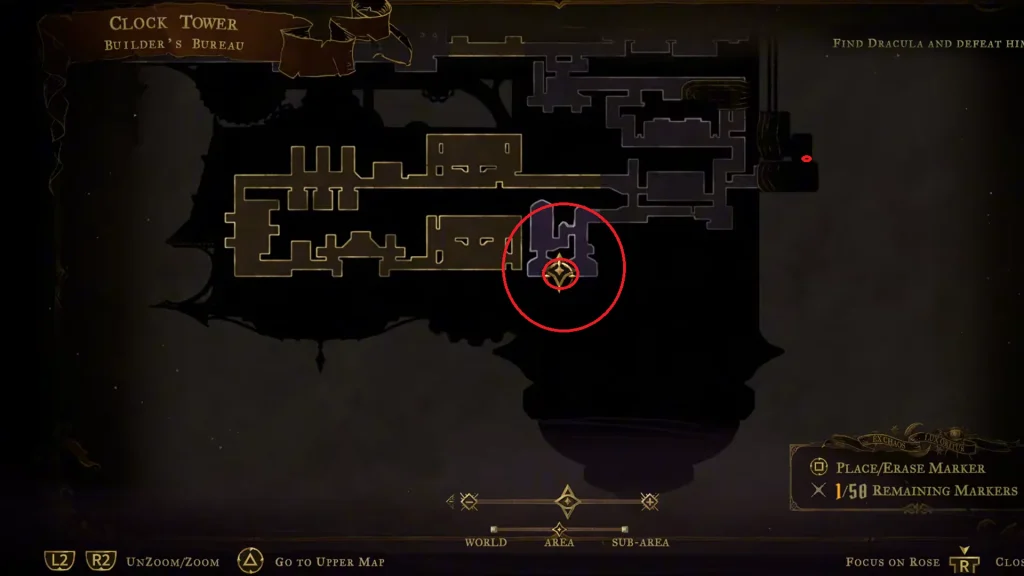
Head to the Builder’s Bureau in Clock Tower, as seen in the image above. Unlike all the other weapons on the list, this one will be sitting on a bench. Just walk up to the bench, interact, and congratulations, now you have the Fists of Talos. There is no platforming challenge or a long detour; just get to the spot on the map and grab it, and it’s yours to keep.
With this weapon, you can deal more damage the more times you hit the enemy, so if you want to feel aggressive in combat encounters, this weapon will certainly spice up your gameplay. It also has a 75 Attack rating that is very good against multiple foes in the game. Compared to the last gauntlet, Bernhard’s Wrath, it falls apart, but it’s decent enough to help you a lot in combat.
Halberd | Clock Tower
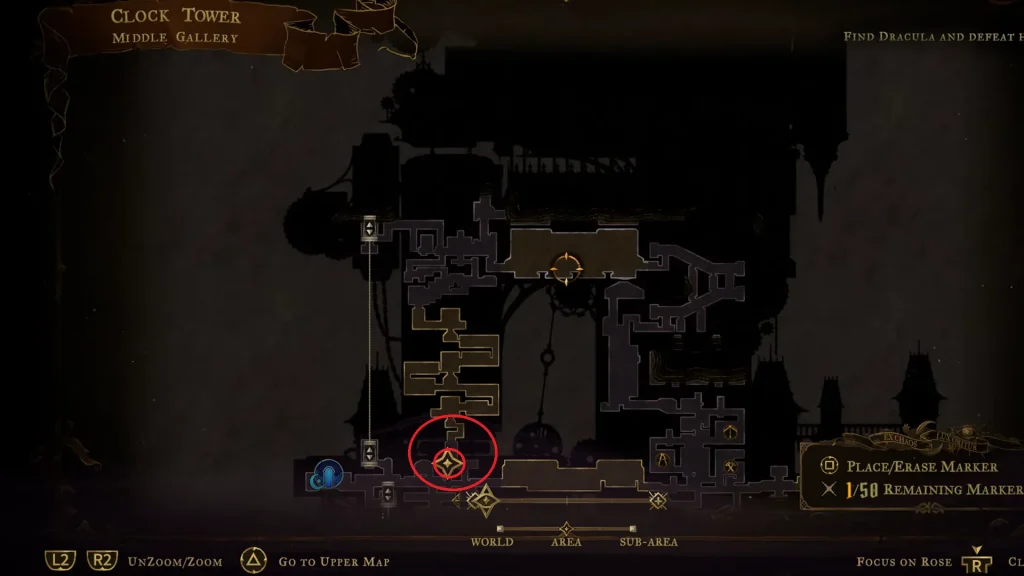
It’s found in the Mechanic’s Ascent in the Clock Tower; just follow the marker on the map to get to the spot, find the treasure chest, and you will find the weapon inside.
It’s a standard spear-type weapon focused on dealing long-range damage without making you get close to the enemy, so pretty much the opposite of a gauntlet- or sword-focused gameplay. It comes with a 50 Attack rating and the ability to throw the Halberd like any spear in your possession.
Claymore | Clock Tower
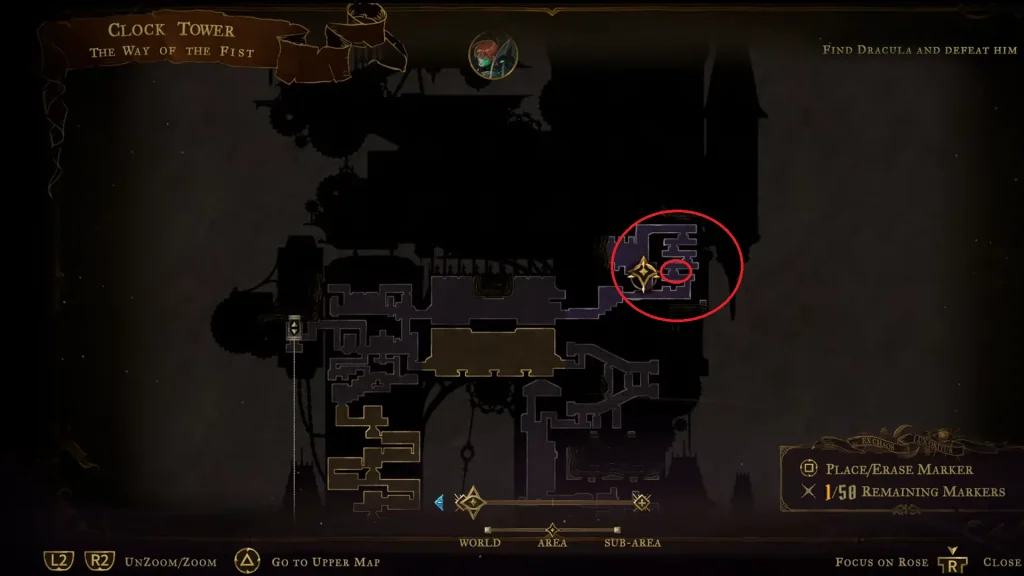
Claymore is located in the Way of the Fist in Clock Tower. Get to the marked spot on the map and turn left to finish off a small platforming challenge. This one can be tricky; you just need to move down the floor quickly without getting caught in the moving spike blocks in the narrow hallways.
Once you are on the bottom floor, you will find the treasure chest; open it to grab the weapon. It’s a powerful blade that comes with a 50 Attack rating and has a strong charge attack that makes this weapon valuable in combat encounters.
Chauve-Souris | Clock Tower
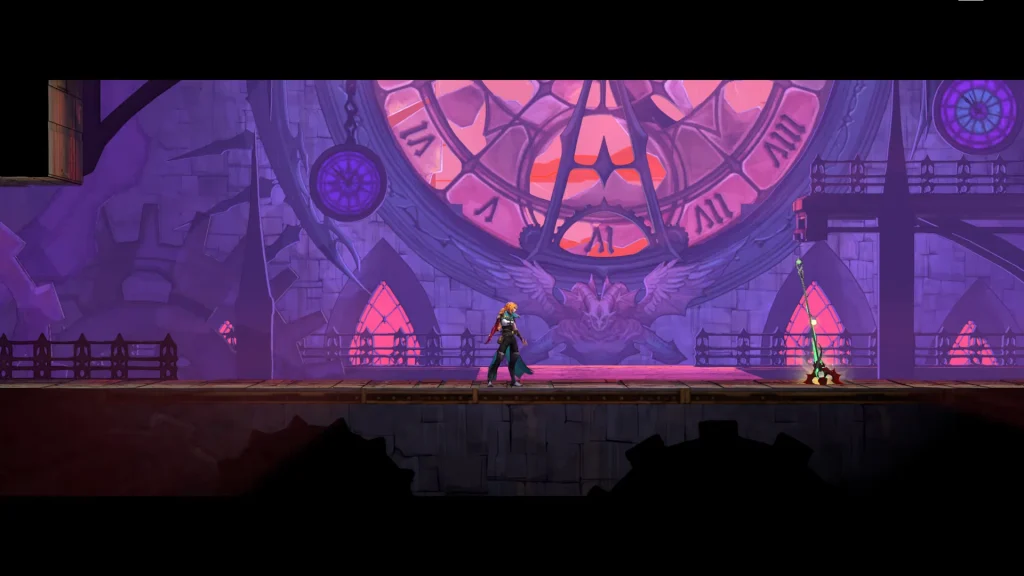
Go to the Clock Tower Bridge in Clock Tower to begin your boss encounter against Isaac. Defeat the boss, and you will find the weapon Chauve-Souris on the ground.
Note: You’ll need to collect Zealot’s clue to reach the boss; check the guide for details.
Do note, Chauve- Souris is a cursed spear weapon; when you throw the spear, it will go after two targets at the same time. If any poor, unfortunate enemies get in the way of the spear, they will get pierced with the weapon. The attack rating here sits at 100, making it one of the best weapons in the game for a more tactical approach to the game.
War And Famine | Notre-Dame
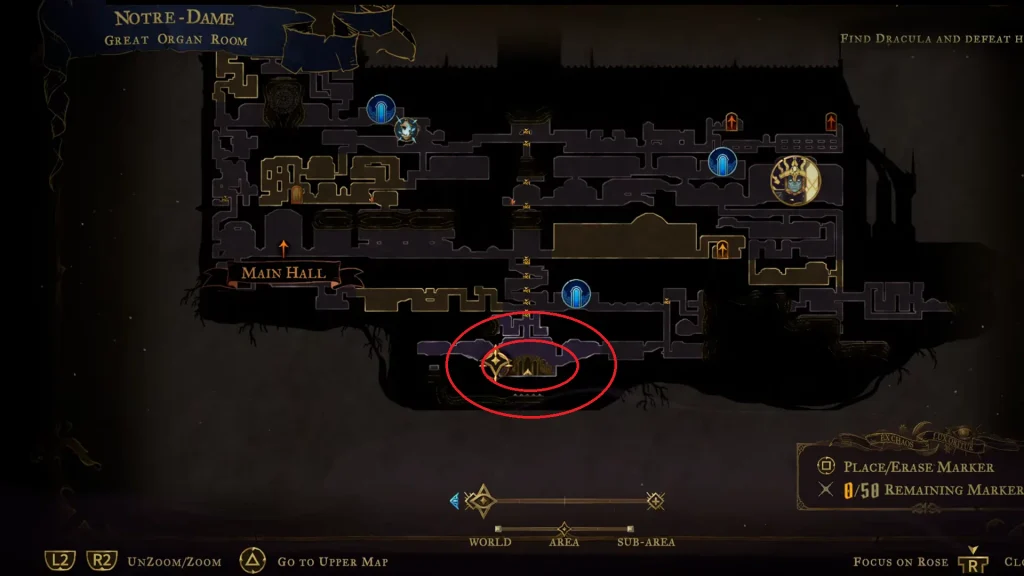
War and Famine is found in the Great Organ Room in Notre-Dame. Get to the bottom of the room as shown in the image above; here, you must input the correct theme order by pressing the right button on the floor. One can easily mess up the rhythm, so follow the clues in the image below.
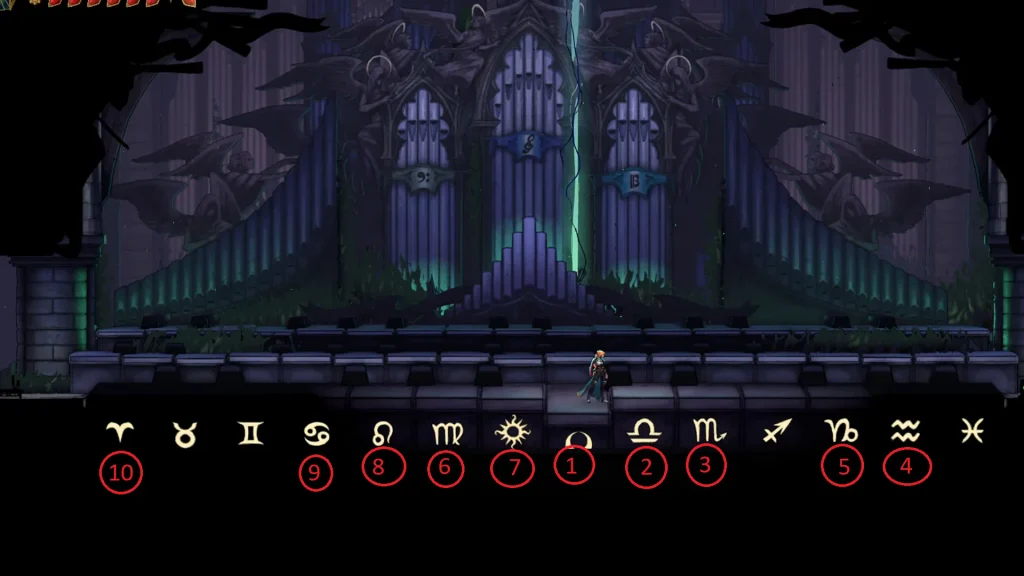
I’ve added numbers to each tile on the floor; just stand on each tile for a few seconds before moving to the next one. Standing on each tile on the floor will make a noise or release a musical note; pay attention to the note. Follow the numbers I’ve assigned to each of the music tiles; you will need to make a large dash from 5 to 6 and another small dash from 9 to 10. Besides making dashes, the rest of them only require you to stand on the spot for a few seconds, once you have heard the music blaring out of the instrument behind.
Completing will open the door to the left; head left, drop down to the floor below, and the path will lead you to the pair of weapons at the end, just sitting on a platform. You will get two sickles of the Horseman; the uniqueness of the weapon lies in its perk. The last attack in the combo creates an empowering area on the ground. Since it’s a dual-wielded weapon, it’s primarily focused on making combos. The attack rating here is at 100, and the appearance of the sickle is also solid!
Joyeuse | Notre-Dame
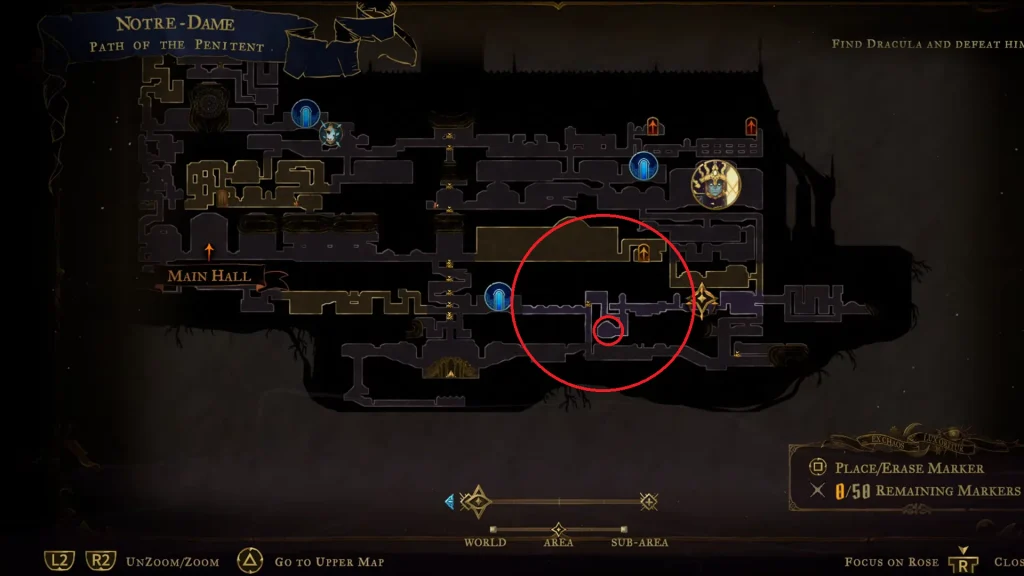
Get to the spot marked on the map in Path of the Penitent in Notre-Dame; here you will find a lever. Just hit the lever and make your way to the left, and soon you will find the treasure chest in the corner. This is going to be another small platforming challenge where you are jumping over spikes. The other thing you should worry about here is the floating skulls, so moving fast becomes the key ingredient to reach the chest and loot the weapon inside.
Joyeuse is a classic sword that deals 75 attack rating and deals more damage after a backdash and slide. There is nothing more to it; since it sits in the Masterpiece category, you are not going to get any new perks for the weapon.
Excalibur | Notre-Dame
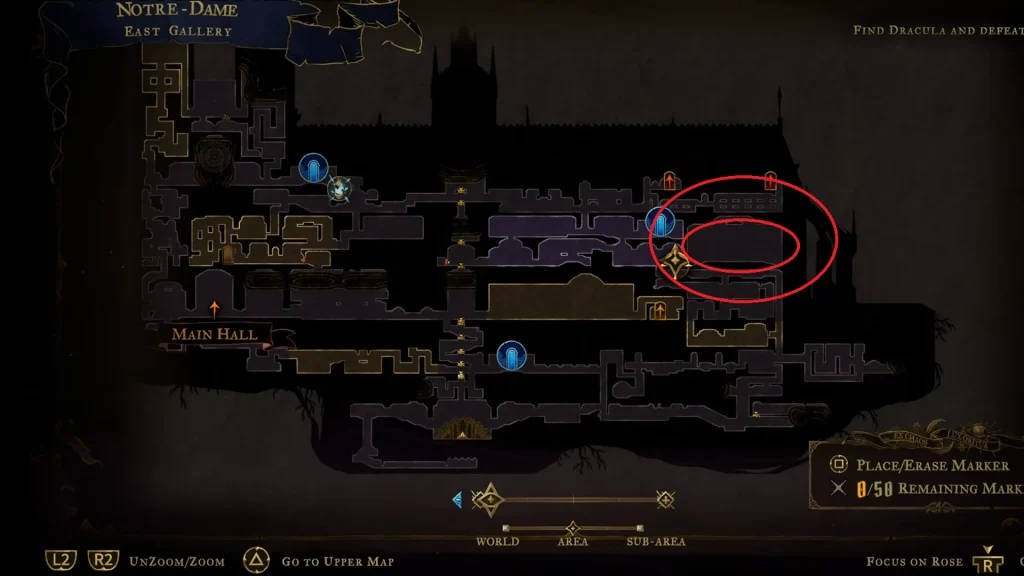
As you might have guessed, you will find the weapon stuck in the rock in the East Gallery section of Notre-Dame. To pull the sword out, you will need to equip Fist of Talos Arcana. Once you have it equipped, head to the boss room marked on the map and defeat the Arthur boss to claim the weapon for your own.
The sword comes with a 100 attack rating and allows you to shoot pure light projectiles on attack. The weapon can be charged and also has a blade dive move. Overall, it ain’t a bad weapon; the projectiles firing from attack do make it a great choice for a sword-focused build.
Arondight And Lancelot’s Shield | Notre-Dame
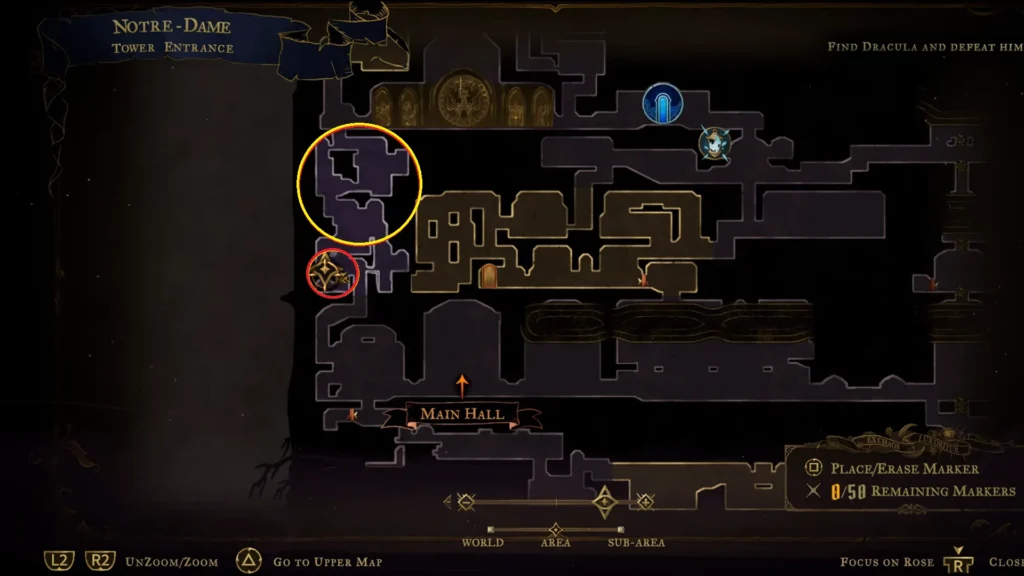
Arondight and Lancelot’s Shield is found inside the treasure chest located in the Tower Entrance in Notre-Dame. Just head to the yellow circle on the map by going through a small platforming challenge and then dive bomb into the floor below to reveal the secret area, marked with a red circle, with the chest on the left.
Arondight and Lancelot’s Shield is a Masterpiece rarity level shield that comes with a 75 attack rating and gives you the ability to block attacks on the front.
Vampire Killer | Notre-Dame
Defeating Death in Notre Dame unlocks the Vampire Killer weapon. The weapon is given to you by Trevor Belmont, a Belmont family heirloom. The attack power of the weapon burns enemies on hit, and enemies that get killed by the whip explode in flames. The stuff of legend is finally yours to keep.
