

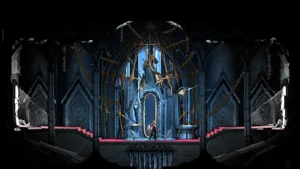

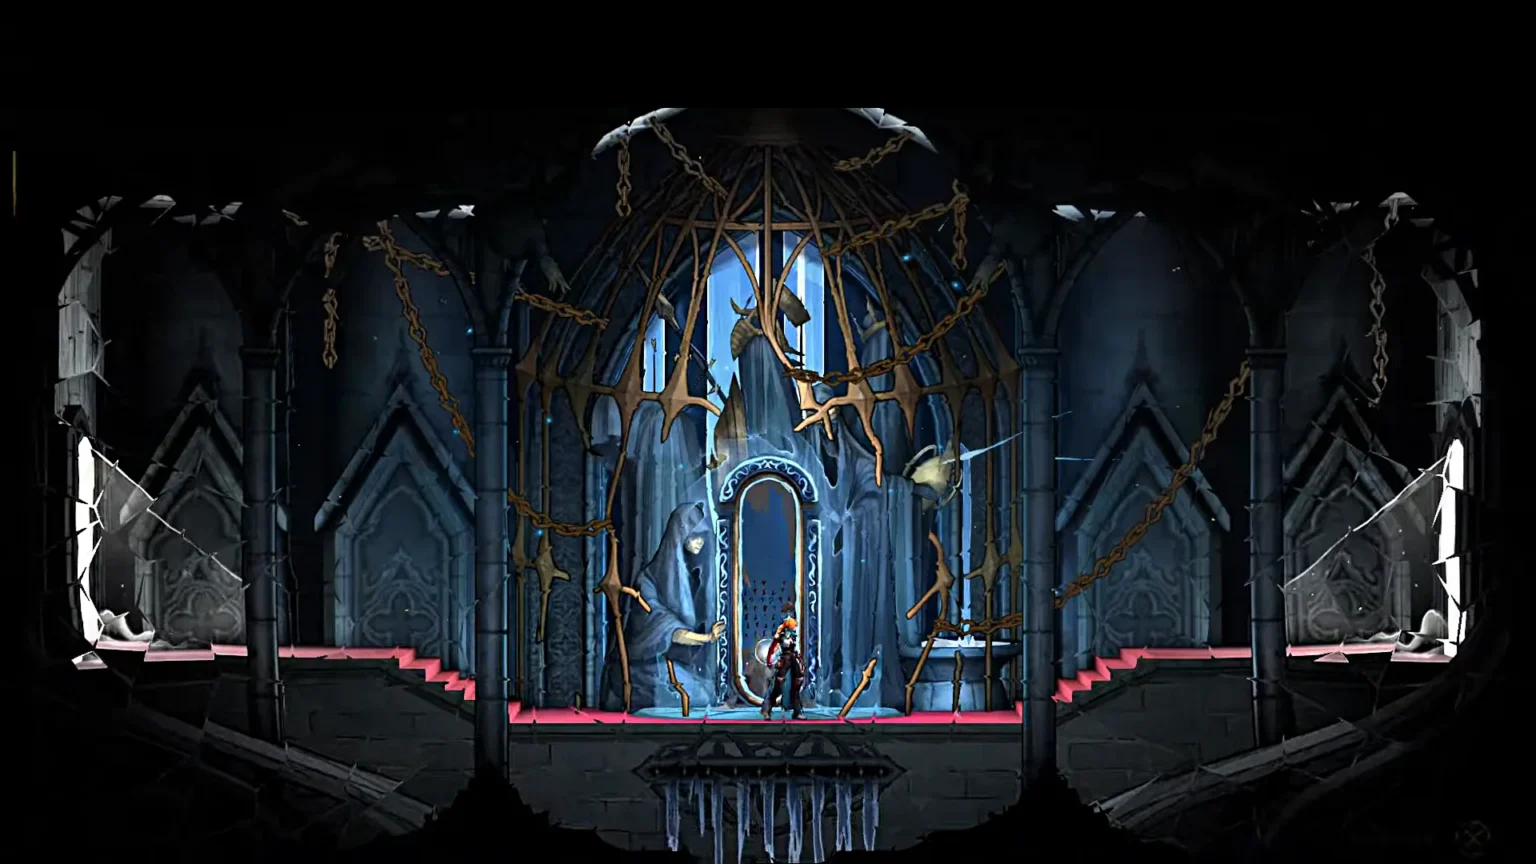

The very last thing that comes to mind when anyone thinks of Castlevania is detective work, besides being the vampire slayer. In the new game, Castlevania: Belmont’s Curse, you are set to find 40 different clues to track down bosses in the area.
All 40 of them are located in different sections of the map; finding them not only reveals the bosses but also helps you acquire new abilities and, most importantly, a trophy at the end for finding all 40/40 clues in the game.
In this guide, I will give a walkthrough for each Clue found in the game, with a location image to help you find them quickly in the game. This is one of the tasks that will take a long time, so buckle your seatbelt, and here we go!
All Clue Locations in Castlevania: Belmont’s Curse
Here I’ve briefly explained the clues and the Tarot card they are part of. The left column covers the details of all the Tarot cards and the boss names, and on the right, details for all the clues for that particular Tarot card.
| Card Name | Clues |
| The Cursed | #1 Clue | The First Card #2 Clue | The Prophecy |
| The Fallen | #1 Clue | A Lever for the Well #2 Clue | A Monster Terrorizes Paris |
| The Warrior | #1 Clue | The Warrior Is At The Top Of The Tower #2 Clue | Carpenter’s Crane Sketch |
| The Prophetess | #1 Clue| The Roots Of The Hollow Tree #2 Clue | Cemetery Fountain #3 Clue | Guardian’s Gaze #4 Clue | Roman Baths |
| The Builder | #1 Clue| Builder Fless To The Clock Tower #2 Clue | Blueprints For the Clock Tower |
| The Artist | #1 Clue| A Strange Painting of Notre-Dame #2 Clue | Artist Hides in the Main Hall #3 Clue | Alucard Guides #4 Clue | Brauner’s “Masterpiece” |
| The Occultist | #1 Clue | Carmilla In The Library #2 Clue | Magical Brush #3 Clue | Star Chart #4 Clue | Organic Astrology #5 Clue | Blood Poem |
| The Shadow | #1 Clue | Death Mark #2 Clue | The Masters Of Music Hide From Death #3 Clue | The Corrupted Pipes of Notre-Dame Organ #4 Clue| Melody Sheet For The Concerto Of Notre-Dame #5 Clue| Melody Sheet For The Concerto Of Notre-Dame #6 Clue| Melody Sheet For The Fugue Of Notre-Dame |
| The Miser | #1 Clue| Tomb Relic #2 Clue| Hospital Relic #3 Clue| Catacomb Relic #4 Clue| A Door Made Of Flesh And Eyes |
| The Whisperer | Stolen Oboles Clue |
| The Zealot | Issac Waits in The Clock Tower Clue |
| The Temptress | The Temptress Guards The Hall of Mirrors Clue |
| The Brittle King | Feat of Strength Clue |
| The Judge | Balancing The Scales of Justice Clue |
| The Sage | #1 Clue| A Sketch From Talos #2 Clue| Kneeling Is The Way #3 Clue| The Reflection Deceives #4 Clue| Eleanor Flees To The Cemetery |
All Clues to The Cursed
Clue #1: The First Card | Paris Street
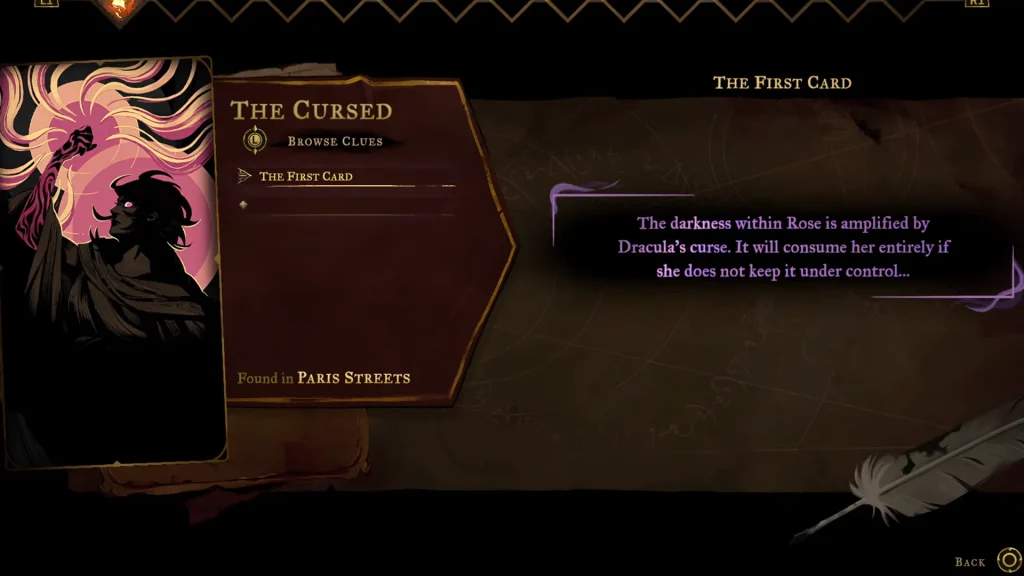
“The darkness within Rose is amplified by Dracula’s Curse. It will consume her entirely if she does not keep it under control…”
This is the default card; you will start the game with the card, making it a non-missable clue.
Clue #2: The Prophecy | Gallery of the Four Virtues, Notre-Dame
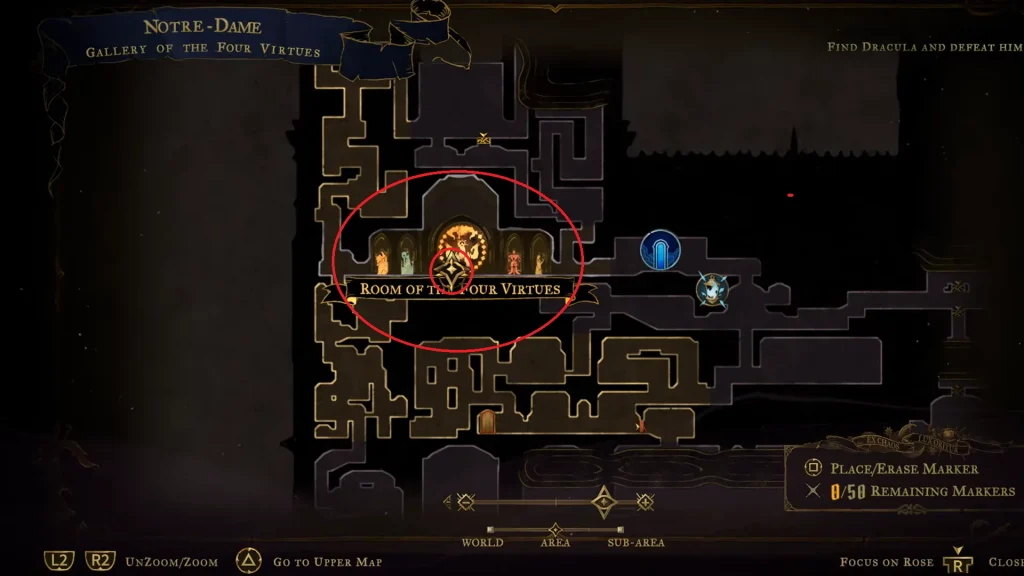
“Only when the Bells of Virtue ring and humanity overcomes its Self will cursed darkness lift and restore the blessing light.”
The Prophecy is found in the middle of the Gallery of the Four Virtues, in front of the circular orange-colored stained glass window. Interact with the spot or altar right in front of the glass to grab the Prophecy Clue. The clue serves a key role in unlocking the True Ending to Castlevania Belmont’s Curse.
All Clues to The Fallen
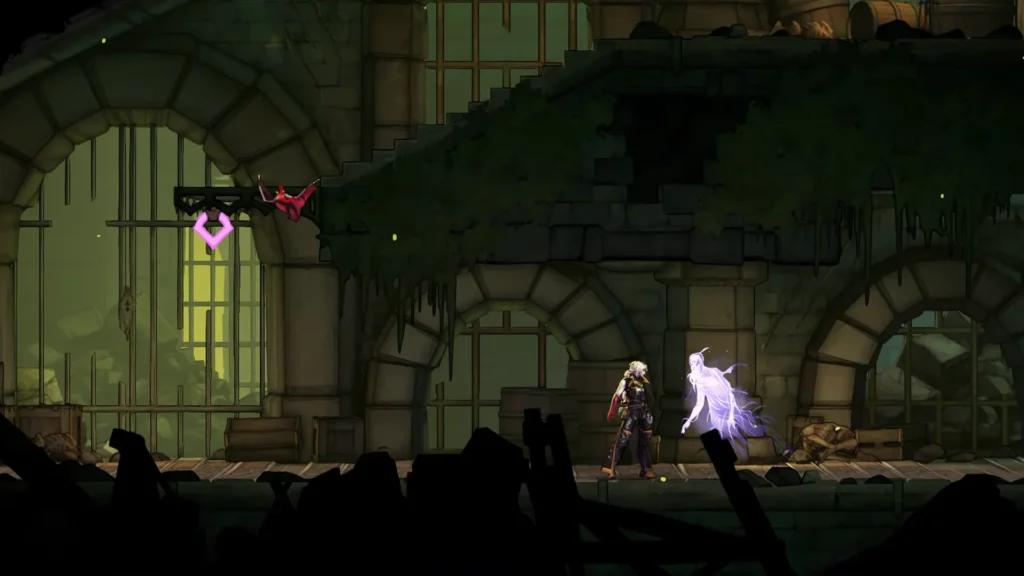
Both A Lever For The Well (Clue #1) and A Monster Terrorizes Paris (Clue #2) are found in two different sections on Paris Street. Do take a look at the guide to find both clues needed for the Fallen boss encounter.
All Clues to The Warrior
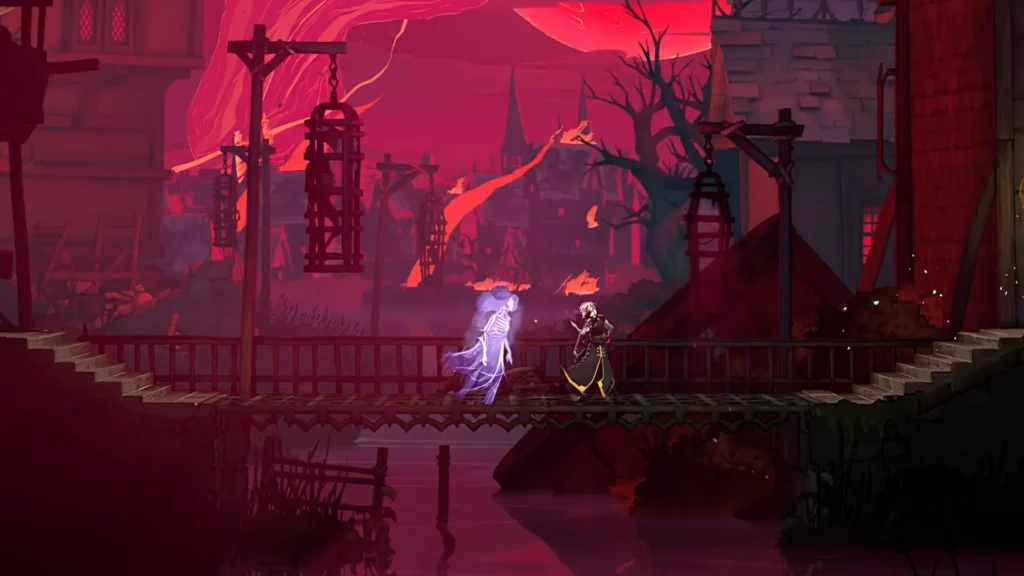
The Warrior Is At The Top Of The Tower (Clue #1) and Carpenter’s Crane Sketch (Clue #2) for The Warrior are also found on Paris Street. Do take a look at the guide on finding both clues for The Warrior boss fight.
All Clues to The Prophetess
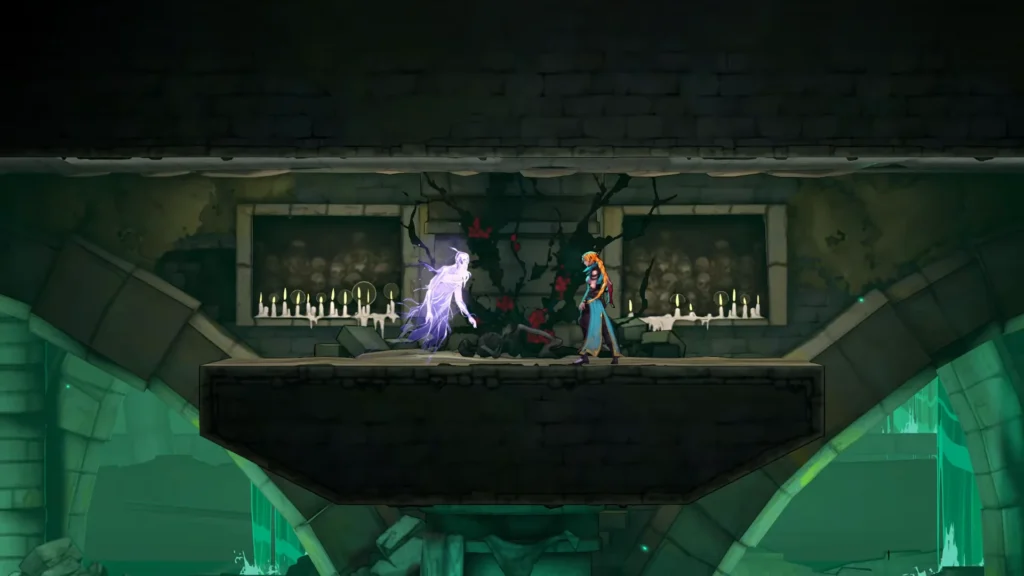
The Roots Of The Hollow Tree (Clue #1), Cemetery Fountain (Clue #2), Guardian’s Gaze (Clue #3), and Roman Baths (Clue #4) are found in Holy Innocent’s Cemetery. After finding all four clues for the Prophetess, you will be on your way to battle Medusa. Defeating her grants you the key to unlock the sealed door in the Catacombs.
All Clues to The Builder
Clue #1: Builder Fless To The Clock Tower | Abandoned Workshop, Main Hall
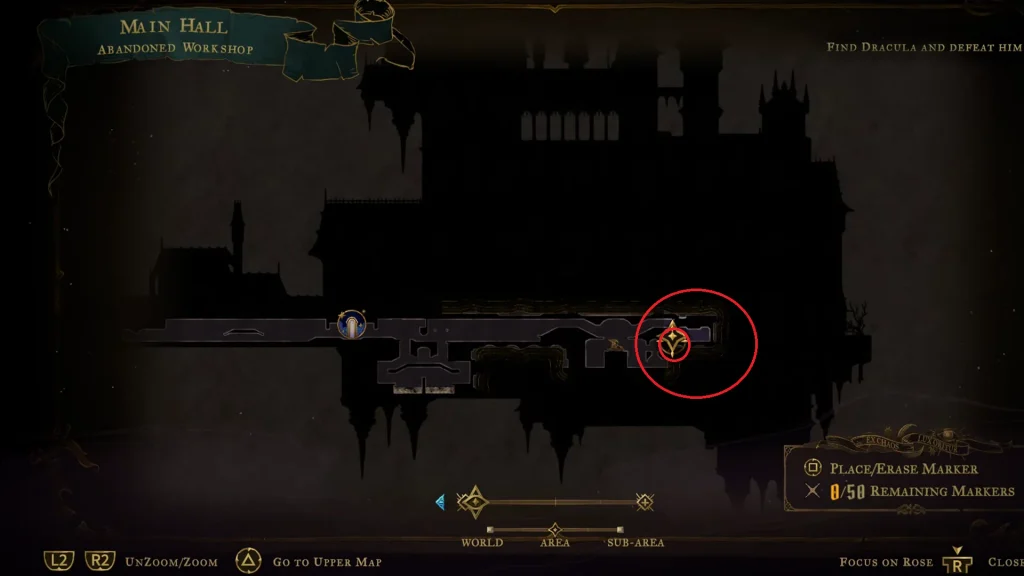
“The strikes and blows of hammers cease, the furnaces are dead. Your Master Builder tortured seem’d And to the Clock he fled.”
The clue here is far east of the Abandoned Workshop in the Main Hall, as seen in the image above. Instead of talking to the floating spirits, here you will find a statue in the middle of the room. Interact with the statue to get the clue for Builder.
Clue #2: Blueprints For The Clock Tower | Daedalus Crossing, Clock Tower
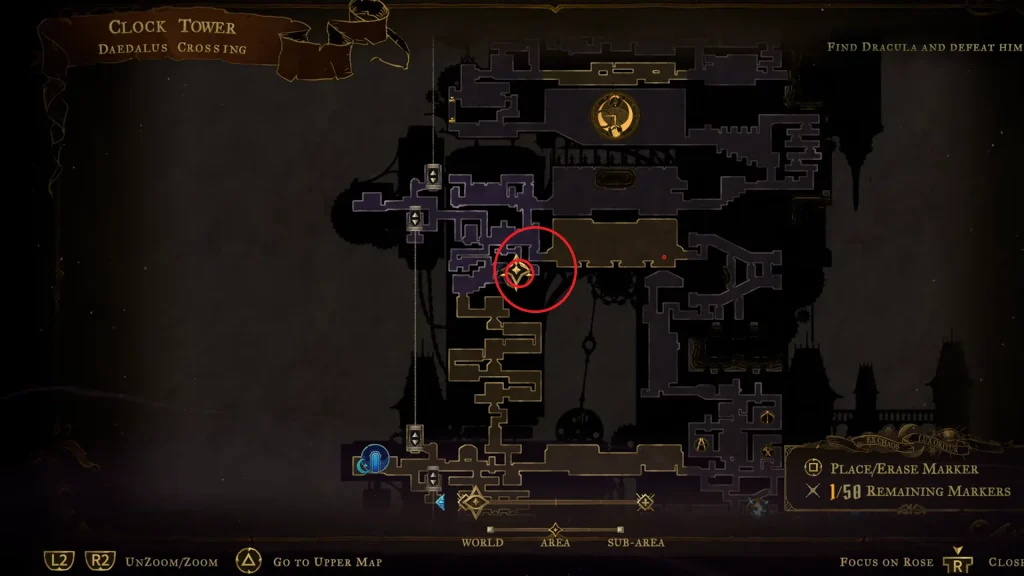
“Total isolation impossible. Airflow required. Ventilation shaft will maintain minimal distractions.”
The second clue for the Builder is found in Daedalus Crossing in the Clock Tower, as located in the image above. Interact with the table with the purple glowing object, and you will get the map to the Builder.
All Clues to The Artist
Clue #1: A Strange Painting Of Notre-Dame | Gallery of Eternal Night, Main Hall
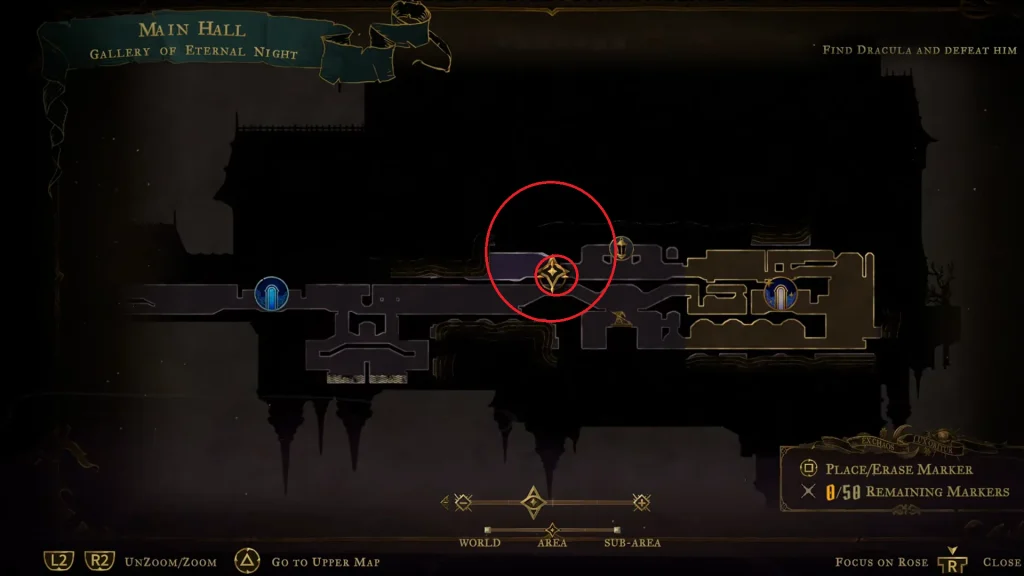
“The paint, its fresh. It looks like Notre-Dame Cathedral. And there’s a signature. “Brauner””
Get to the spot in the Gallery of Eternal Night in the Main Hall, as seen on the map. In the room, you will find many paintings hanging on the wall; interact with the large painting with the picture of Notre-Dame in the large frame to get the clue. Along with the clue, you will also get a rough sketch of Notre-Dame.
Clue #2: Artist Hides In The Main Hall | Elevator Tower, Main Hall
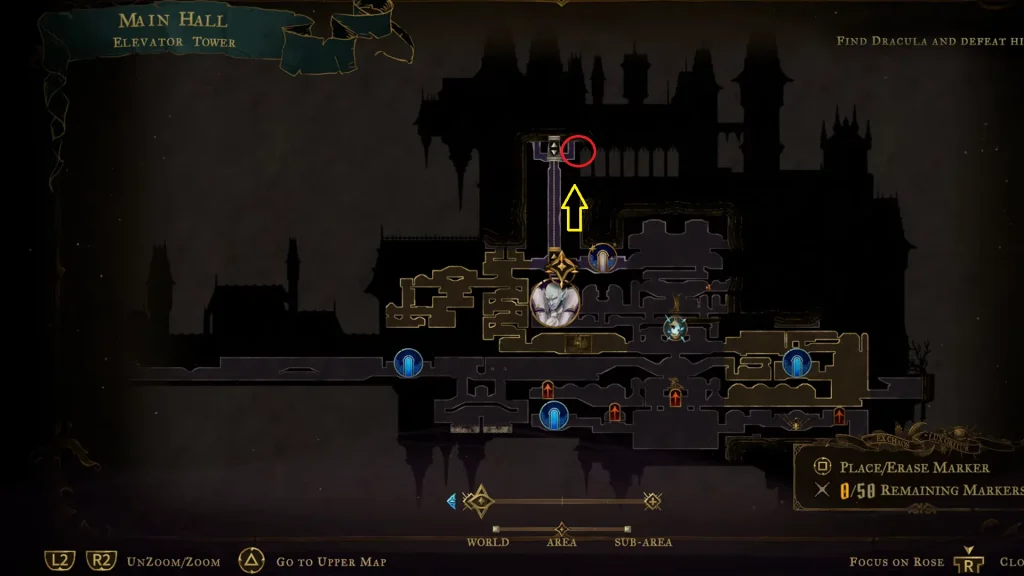
“The Sad, the Mad, the Doomed, the Damned, Your Artiste loves them all. He paints and sculpts your feeding stock, Well hidden in your Hall.”
Head to the spot in the Elevator Tower in the Main Hall, just as marked on the image above. Here, take the elevator to the north, turn right, and you will find a statue at the corner. Interact with the statue to get the second clue for the Artist.
Clue #3: Alucard Guides | Servant’s Hall, Main Hall
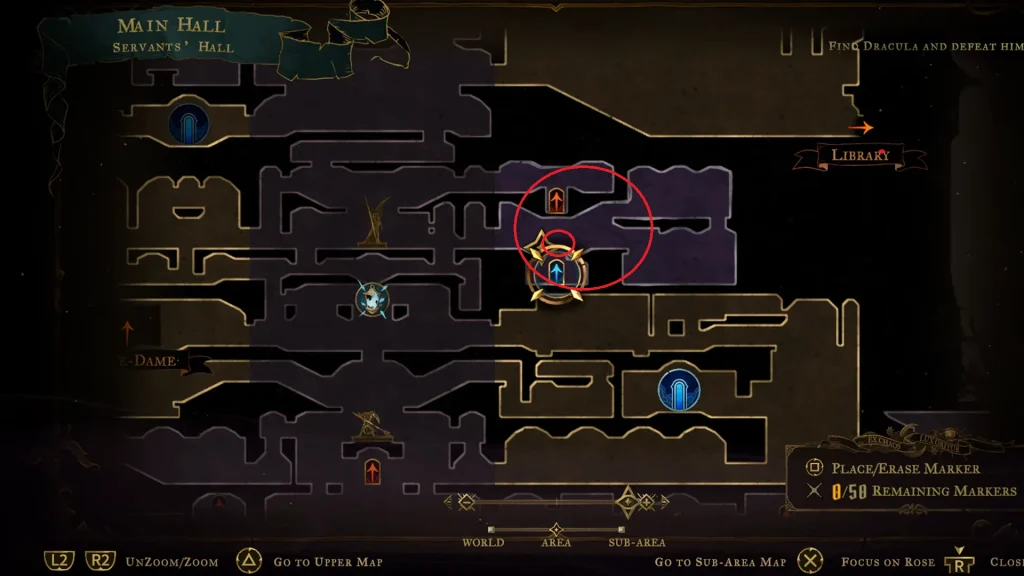
“The Artiste chose to honor one, Who left your side too soon. The Master’s son will point the way, His face still makes us swoon.”
The third clue can easily be found in the Servant’s Hall, Main Hall. Interact with the statue on the platform, next to the picture of Alucard, to get the clue. Here, you will get a rough sketch of Alucard with the clue written underneath it.
Clue #4: Brauner’s ”Masterpiece” | Brauner’s Atelier, Main Hall
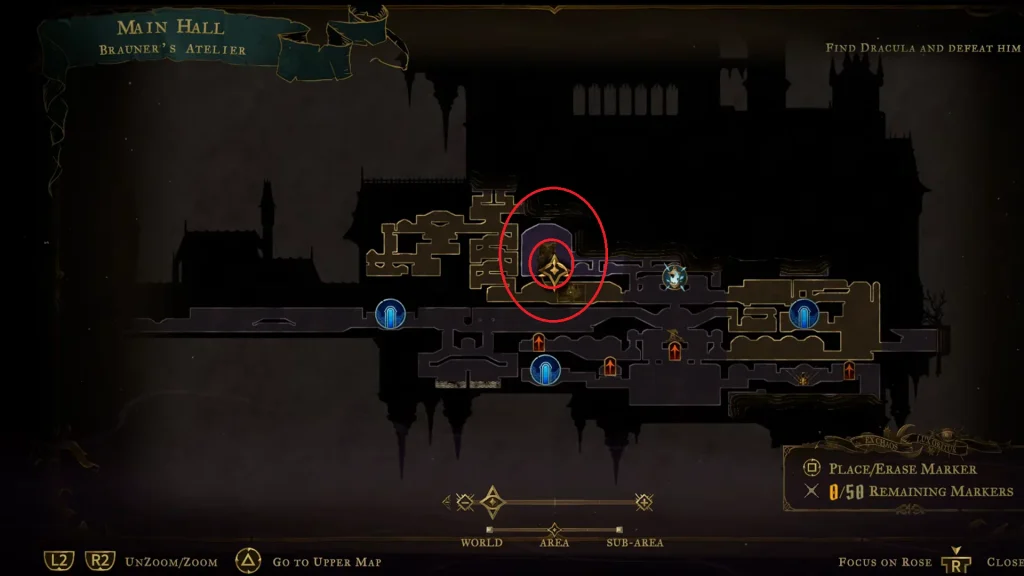
The last clue is found in Brauner’s Atelier in the Main Hall, as marked on the image above. Interact with the large structure in the middle of the room to get the last clue for the Artist. While the clues so far have been about dialogue and poems, this clue is a letter to Talos from Brauner Artiste.
All Clues to The Occultist
Clue #1: Carmilla In The Library | Brauner’s Atelier, Main Hall
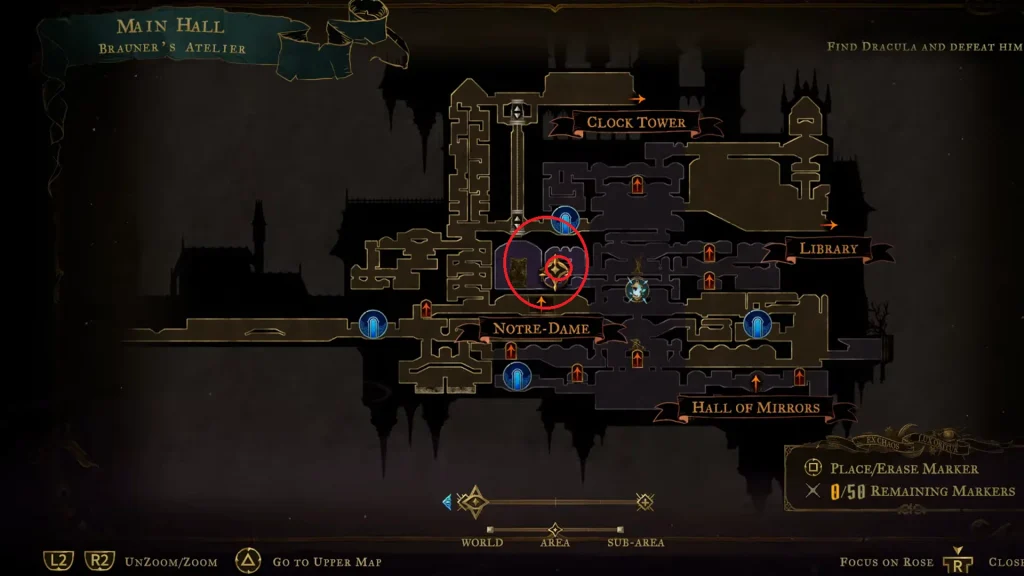
Get to the spot marked on the map, located in Brauner’s Atelier, Main Hall. Head right from the large structure that we interacted with to get the fourth clue for the Artist. Here, get over the small platform by using a grappling hook, directly over Alucard’s painting hanging on the wall. Just like the last clue for the Artist, this one also comes in the form of a letter to Carmilla from Brauner Artiste.
Clue #2: Magical Brush | Observation Tower, Library
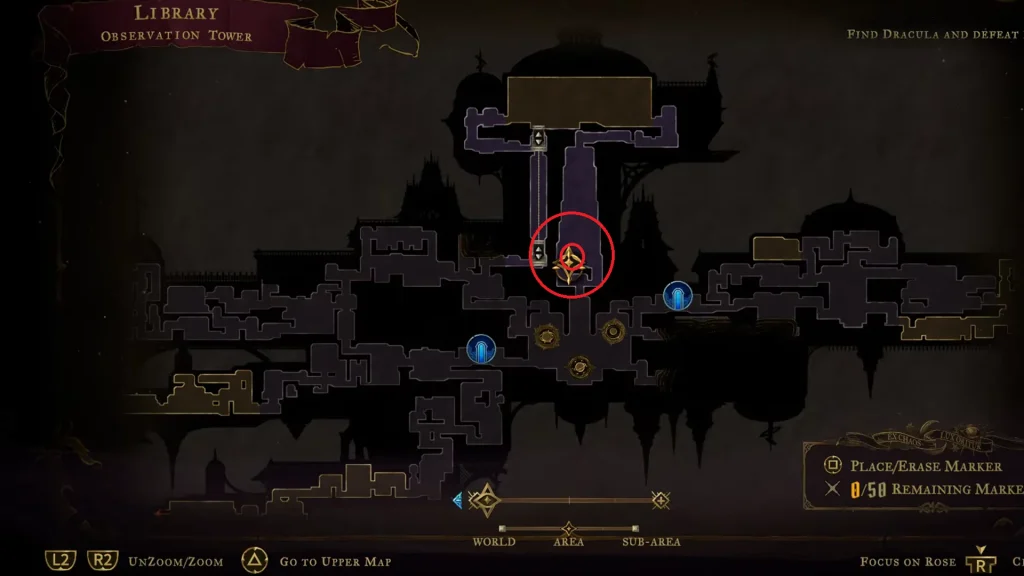
“Your loyal ‘cultist finally seized, The Artist’s precious tool. The blood now flows up to the stars, To usher in your rule.”
This one will take you to the Observation Tower in the Library, as seen on the map above. Here, you will find a statue on the platform next to the giant circular object behind it. Interact with the statue to get the clue for Occultist.
Clue #3: Star Chart | Astronomer’s Office, Library
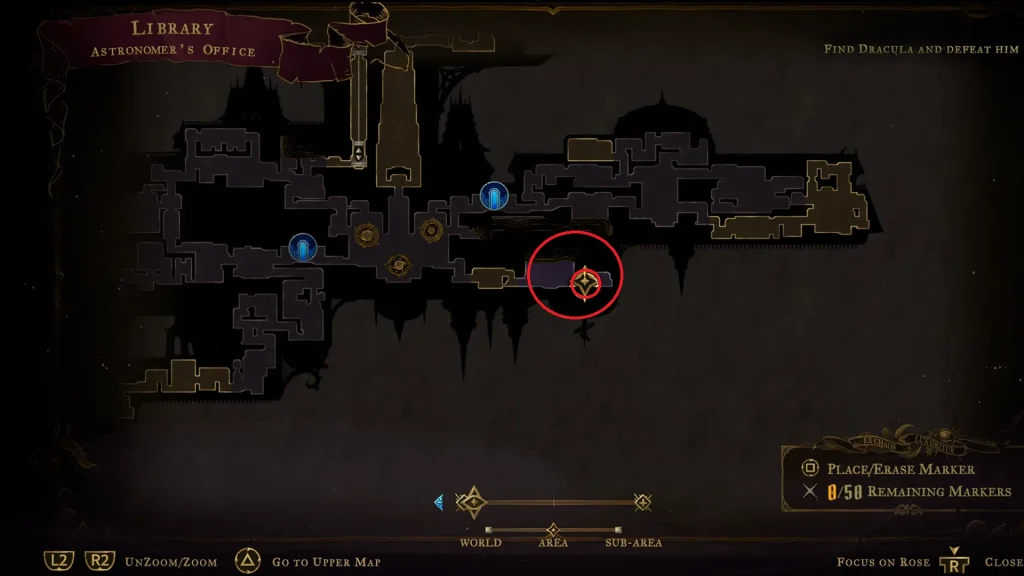
You need to get to the southeastern section of the Astronomer’s Office in the Library. Go to the east side of the room to find the clue on the table. You will get a sketch that is similar to the Vitruvian Man (L’uomo vitruviano) by Leonardo da Vinci. The clue will be about an astronomical study being completed but needed for livestock.
Clue #4: Organic Astrology | Drawing Room, Library
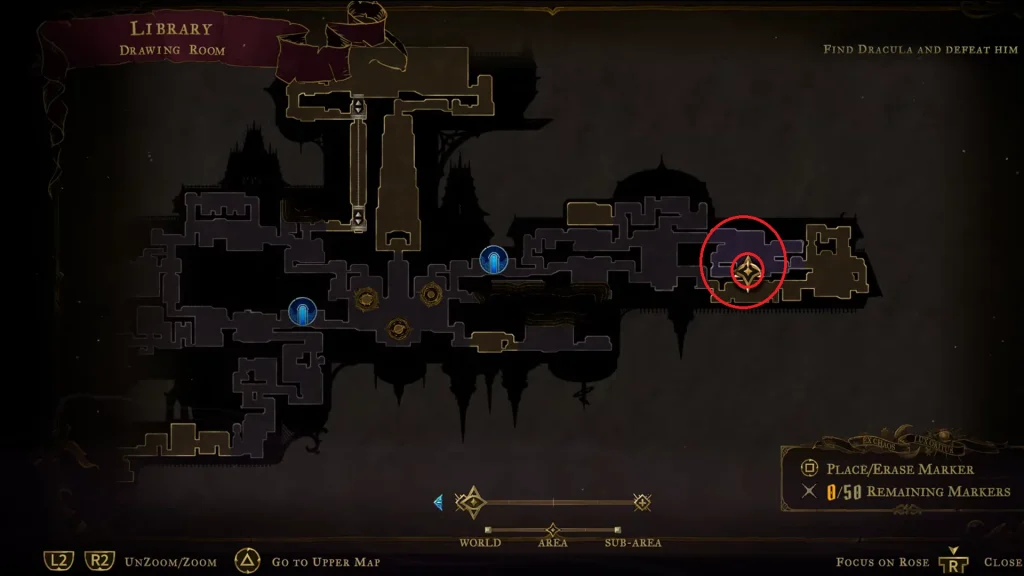
The fourth clue is located in the Drawing Room of the Library. Head west of the area, and you will find a table next to many drawings on the wall. Interact with the table to get the clue about Organic Astrology, with the same picture of Leonardo da Vinci’s L’uomo Vitruviano, but this time a trail of blood connecting a face and a hand.
Clue #5: Blood Poem | Natural Philosophy Shelves, Library
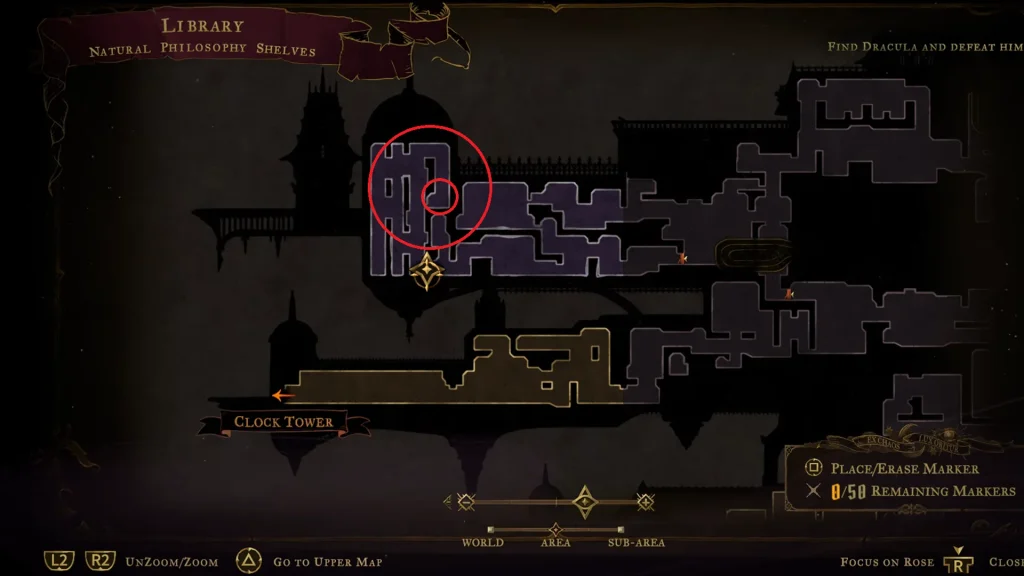
“My heart still jumps when I gaze at the stars, I think naught but of you. If, beneath the stars, your blood is still warm, I hope that you do too.”
The final clue for Occultist can be found in the Natural Philosophy Shelves in the Library, as marked on the image above. You need to do a bit of platforming to head to the top of the area and then drop down to the area with the desk. Interact with the desk to get the clue.
All Clues to The Shadow
Clue #1: Death Mark | Charnel Galleries, Catacombs of Paris
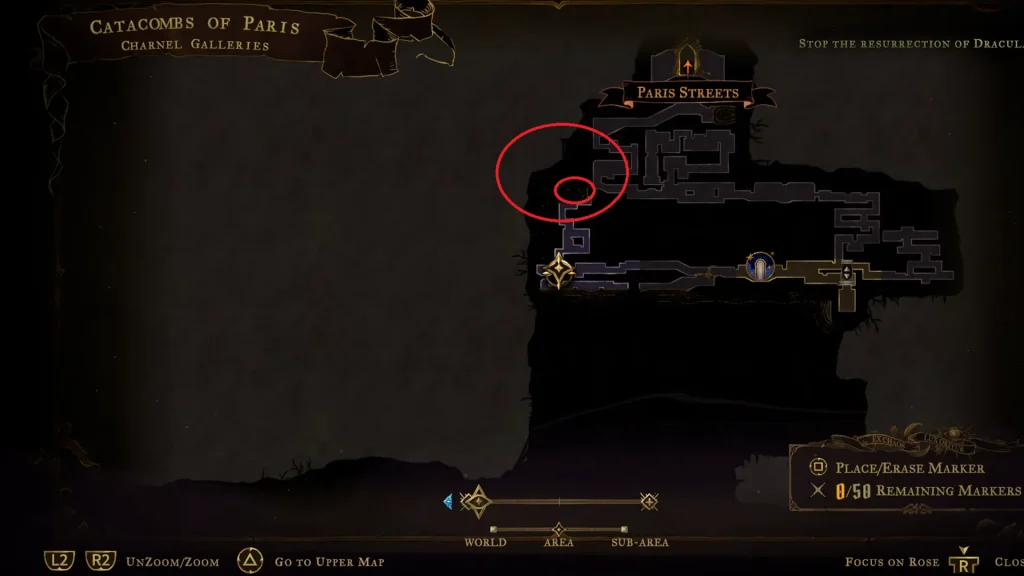
“The monster…dragged our souls down to the Altar of Bones…followed marks on the walls…they must have dropped me…”
Head to the spot marked on the map in the Charnel Galleries, Catacombs of Paris. Move to the top, and you will come across a platforming challenge. Right at the end of the challenge, don’t take the doorway to the right; instead, head up, and you will find a spirit hovering in the middle of the platform. Talk to the spirit to get the clue for the Shadow.
Clue #2: The Masters Of Music Hide From Death | Collapsed Crypt, Notre-Dame
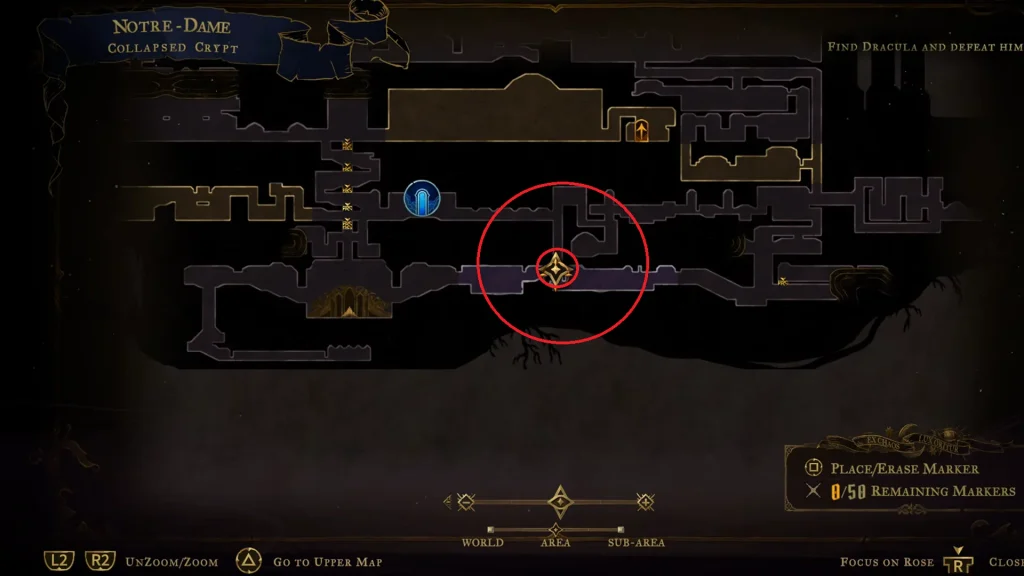
“I saw the Music Masters of Notre-Dame running through the cathedral. One flew to the Felche, the other to the scriptorium.”
This one is located in the Collapsed Crypt in Notre-Dame; get to the spot marked on the map, then drop down the wooden bridge over the spikes.
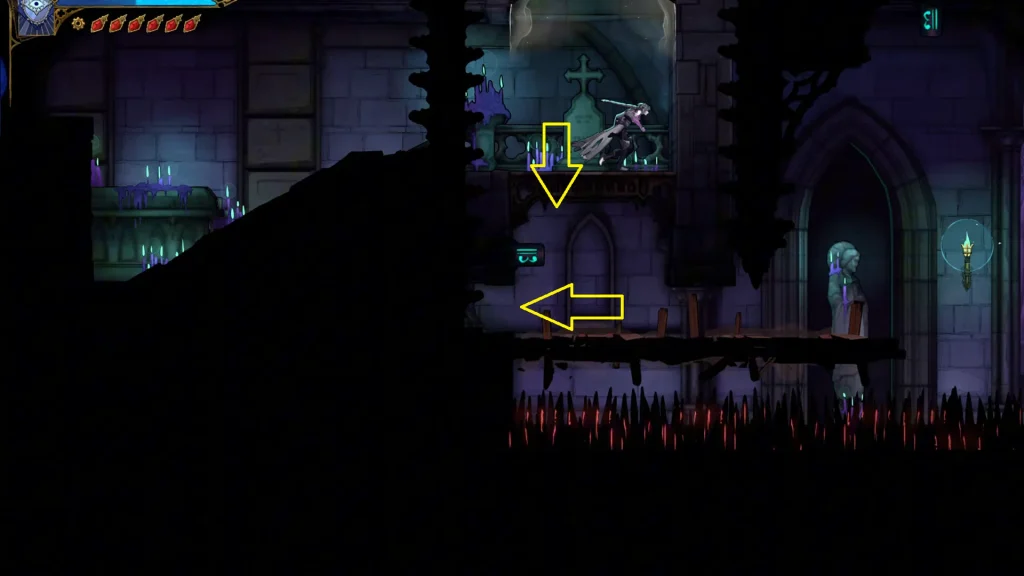
Now, instead of heading right, turn left and go through the small hole on the left; it will lead you to a hidden room, where you will find the spirit for the clue.
Clue #3: The Corrupted Pipes Of The Notre-Dame Organ | Transept, Notre- Dame
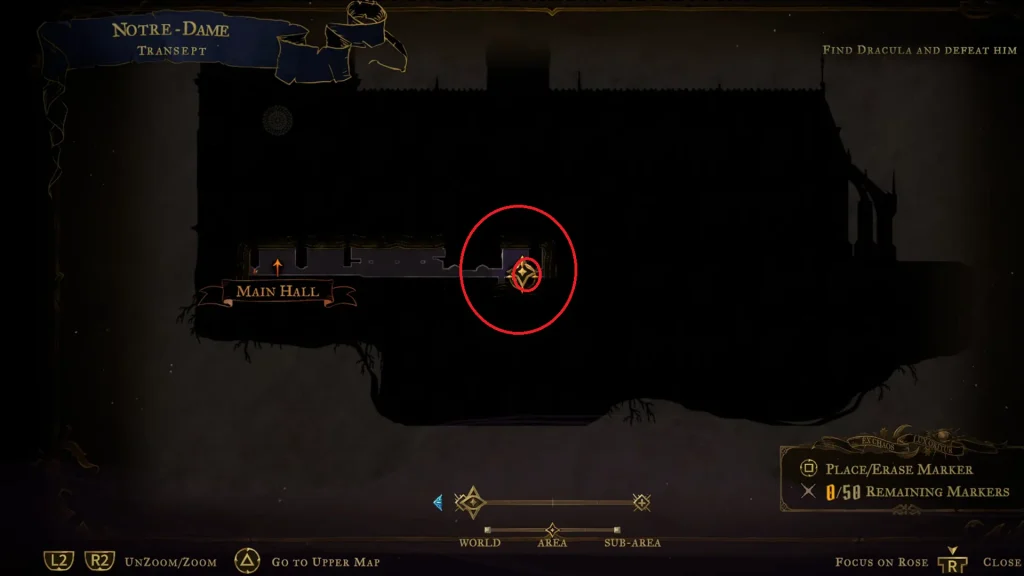
Get to the spot marked on the map in the Transept section in Notre-Dame. On your way, you will come across lasers blocking your path. A dialogue will trigger, which will end with the clue about the corrupted pipes of Notre-Dame.
Clue #4: Melody Sheet For The Concerto Of Notre-Dame | La Flèche, Notre-Dame
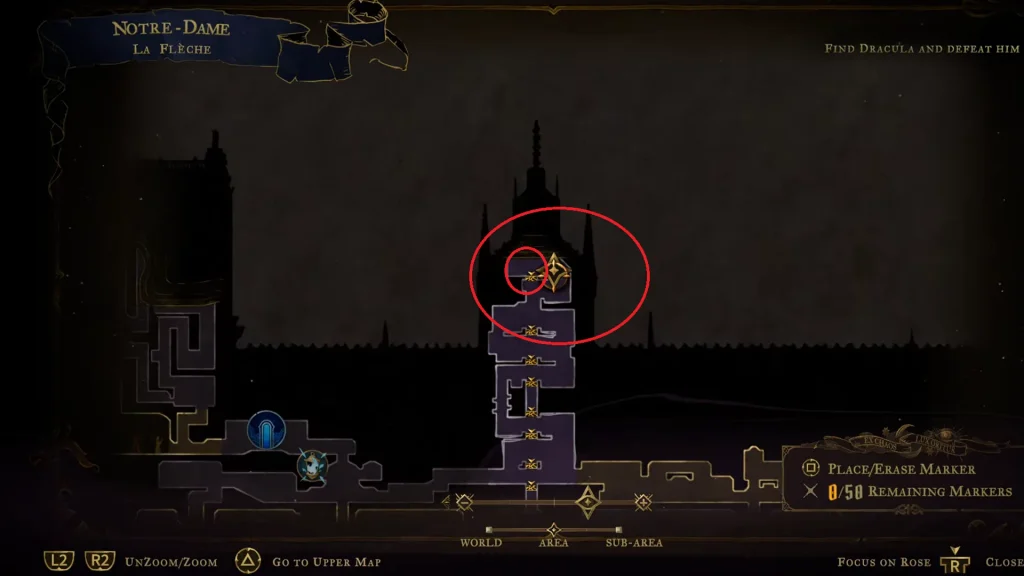
“Take this concerto to cure our fair Notre Dame of this tragic misfortune.”
Now we are moving all the way to the top of Notre-Dame, the La Flèche area, as seen in the image above. Right on top, you will find the Spirit, talking to her; she will reward you with the clue of the Melody Sheet.
Clue #5: Melody Sheet For The Sonata Of Notre-Dame | Sealed Scriptorium, Notre-Dame
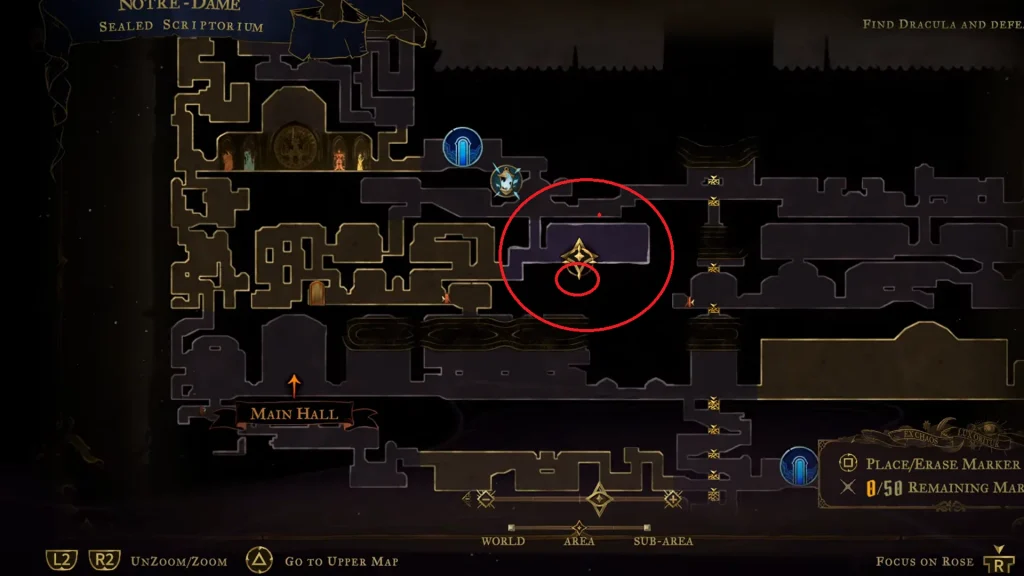
This one is found inside the Sealed Scriptorium in Notre-Dame, but it’s hidden underneath the floor. There are no levers that lift up the floor to reveal the secrets within; we have to do this the old-fashioned way.
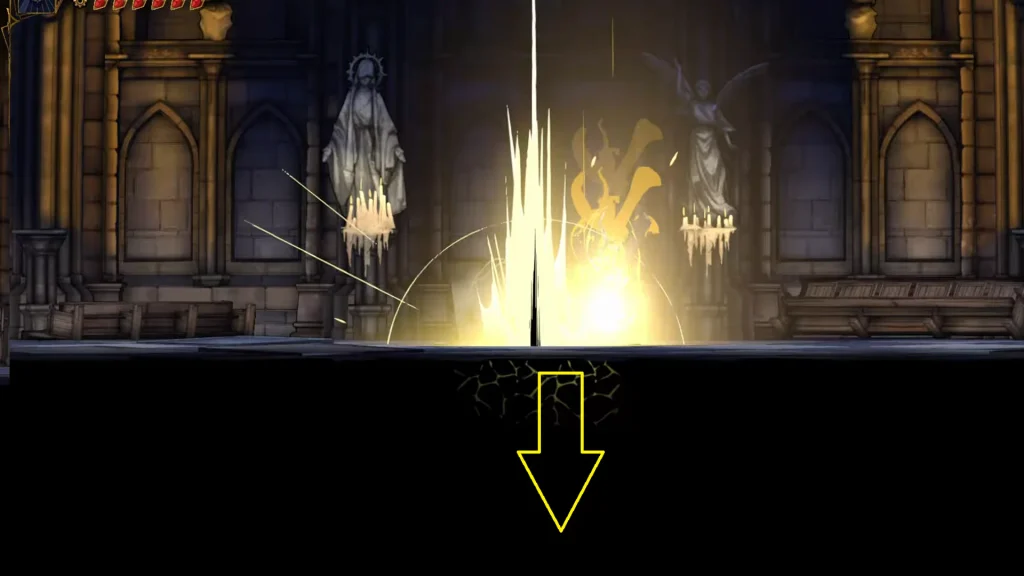
The area is filled with grappling hook points; just grab on to them and then break the floor in the middle of the area. Once you are on the lower floor or in the hidden area, you will spot the spirit on the left. Talk to her to get the clue, which will be about another Melody sheet.
Clue #6: Melody Sheet For The Fugue Of Notre-Dame | Great Organ Room, Notre-Dame
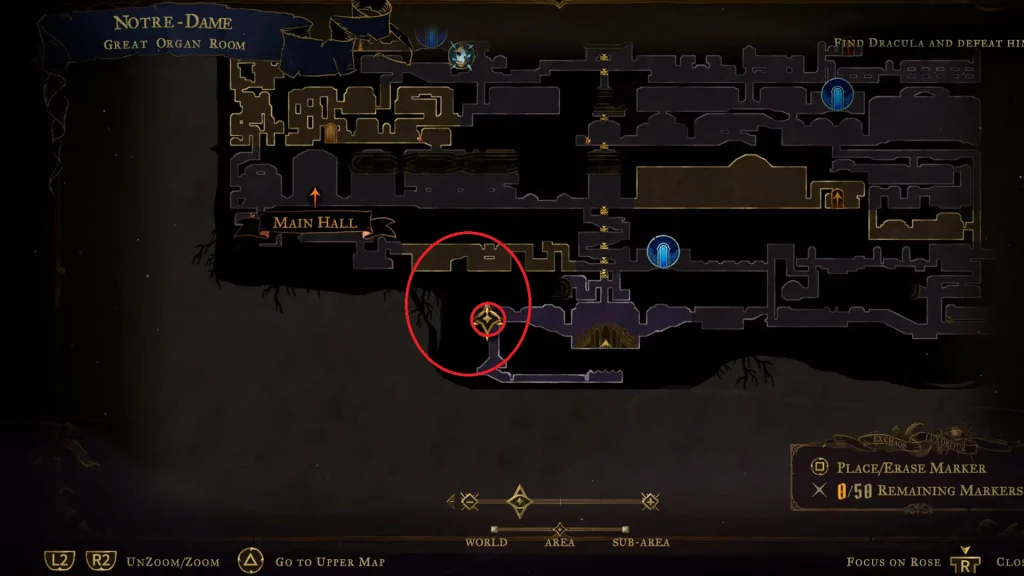
Go to the marked spot west of the Great Organ Room, Notre-Dame. Instead of going down, you will find the Spirit on the left, in the corner. Talk to the Spirit to get the last clue about the Shadow, which is a sheet of Medley.
All Clues to The Miser
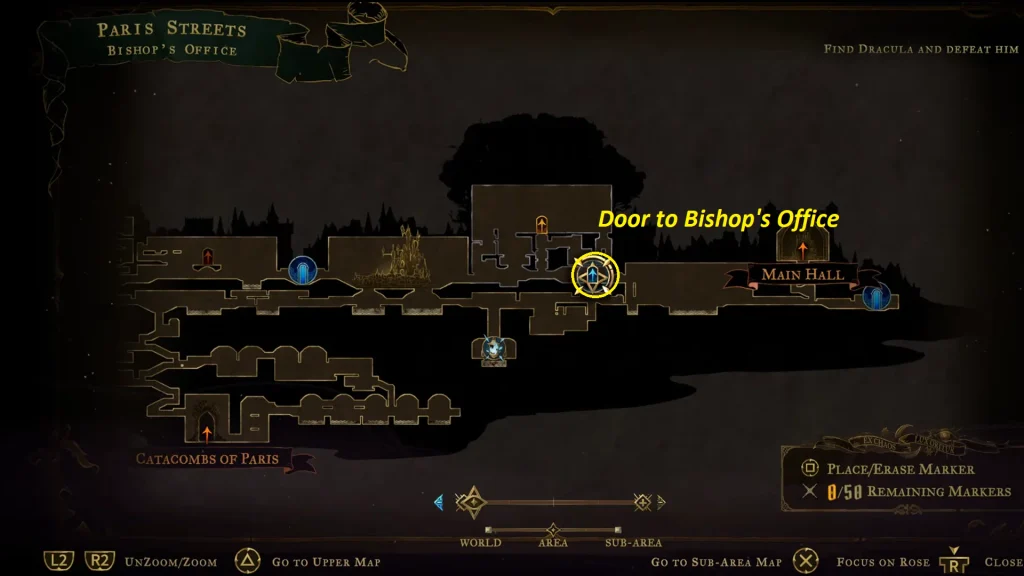
The first three clues for The Miser are found inside the Bishop’s Office; the last one is found in a different place.
Clue #1: Tomb Relic | Bishop’s Office, Paris Street
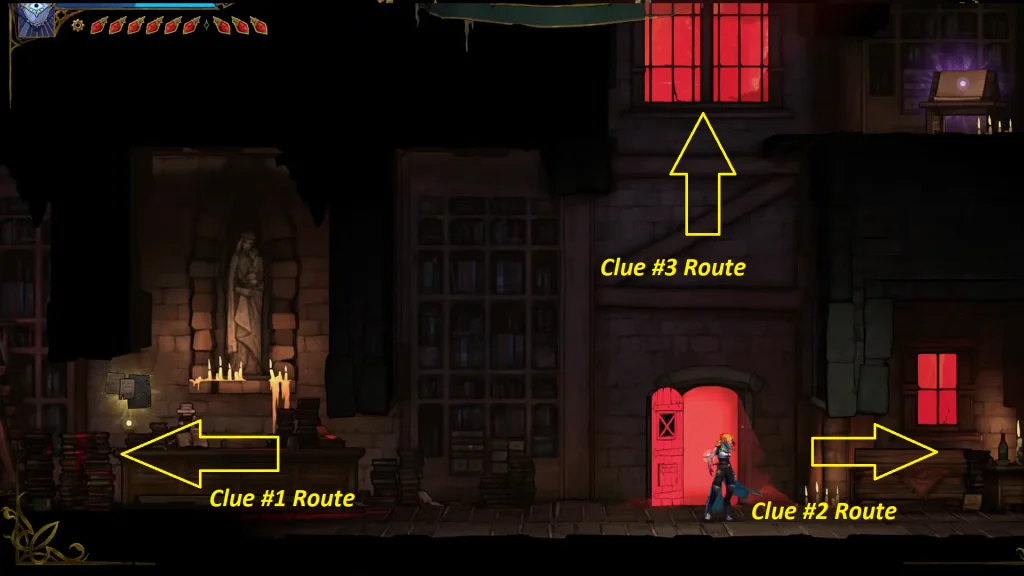
Get to the Bishop’s Office in Paris Streets by going through the door marked on the map. Once inside, head to the left section of the room and then jump between walls to get to the platform on top, where you will find the clue on a wooden book-reading table.
Clue #2: Hospital Relic | Bishop’s Office, Paris Street
Head inside the Bishop’s Office, the same office room we took to get our first clue. Once you are inside the office, interact with the object on the right side of the entrance door, and you will find the second clue in the room or Bishop’s Office.
Clue #3: Catacomb Relic | Bishop’s Office, Paris Street
After entering the Bishop’s Office, the same office where we found the first two clues, jump between walls above the entrance door to find the third clue about the Miser.
Clue #4: A Door Made Of Flesh And Eyes | Mammon’s Lair, Catacombs of Paris
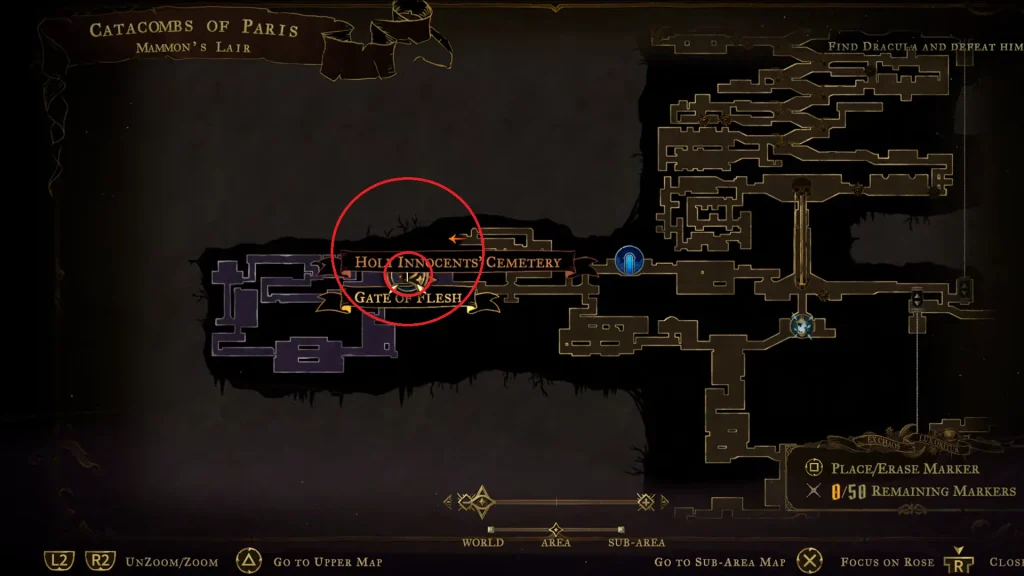
Interact with the portal found inside Mammon’s Lair in the Catacombs of Paris. Interacting with the portal gives you the clue for the Miser. The outer layer of the portal ring is made from Flesh and Eyes.
All Clues to The Whisperer
Clue #1: Stolen Oboles | Street of the Tomb Masons, Paris Streets
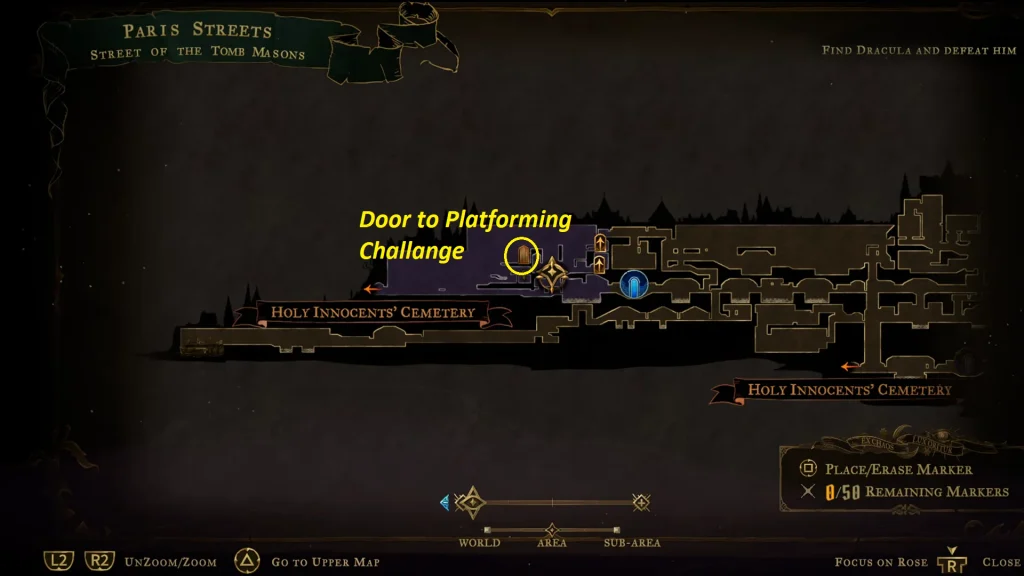
“The demon…stole my obol…now…the Ferryman can’t take me…oh misery, this purgatory…”
Head inside the door, marked on the map in the Street of the Tomb Masons in Paris Streets. Inside the room, you will have to complete a platforming challenge to make your way to the Spirit found inside the room. After the platforming section is over, talk to the spirit to learn about the clue to the Whisperer.
All Clues to The Zealot
Clue #1: Isaac Waits In The Clock Tower | Mechanic’s Ascent, Clock Tower
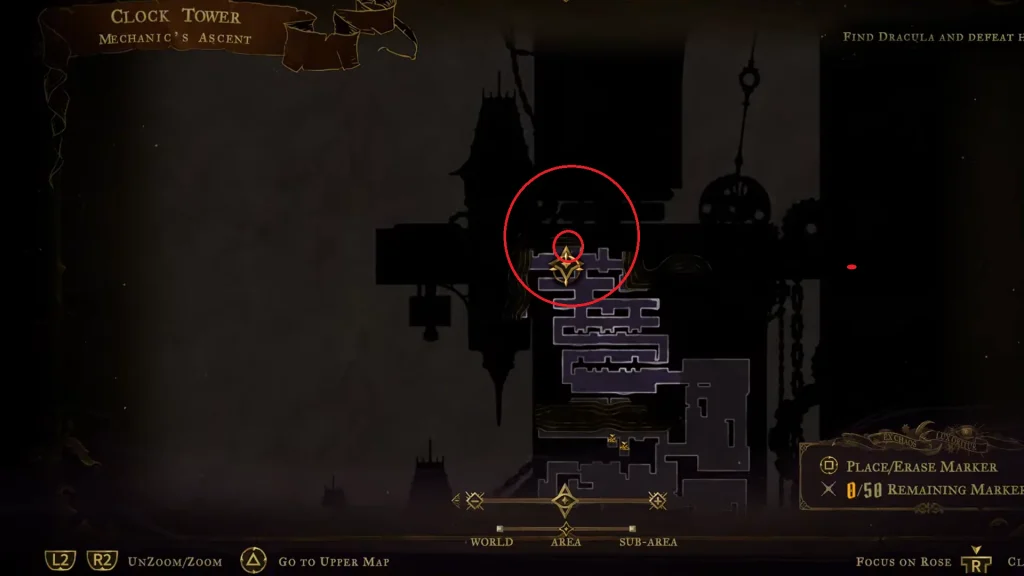
“The Zealot waits behind the trap, Where only Death may go. A victory there he hopes will give Redemption from this woe.”
This one takes us all the way up the Mechanic’s Ascent in the Clock Tower. Get to the spot marked on the map, and on the top of the platform, you will find a statue that you can interact with to get the clue about the Zealot.
All Clues to The Temptress
Clue #1: The Temptress Guards The Hall of Mirrors | Glass Gallery, Hall of Mirrors
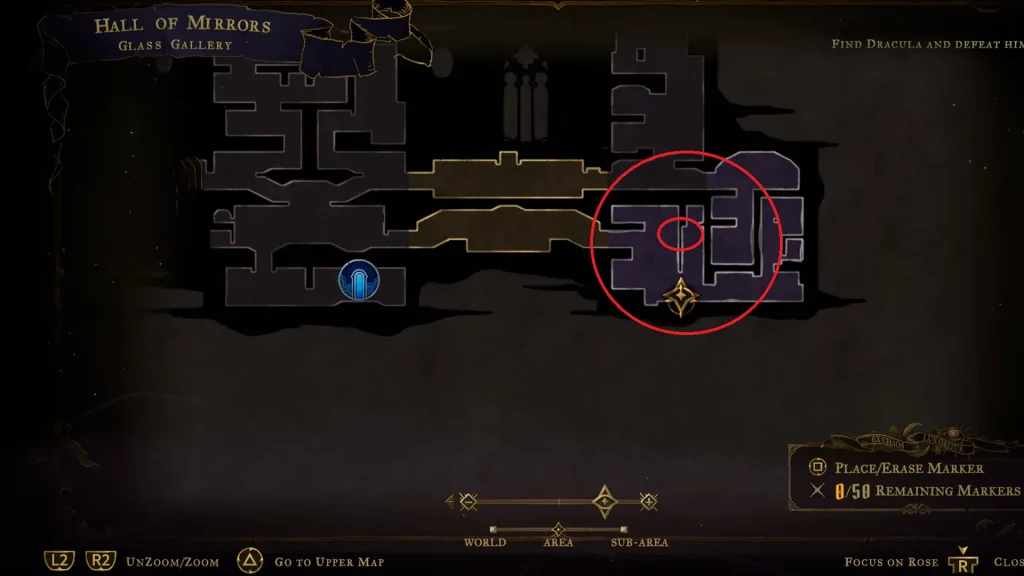
“Your loyal Temptress guards the hall, Her heart still burns for you. The Belmont comes in hot pursuit; she still has not a clue.”
Get to the spot in the Glass Gallery in the Hall of Mirrors, marked on the map. Here you will have to move up to find the statue with the clue. As you are moving up, be careful of the rotating blades spinning on the left side of the wall; use the grappling ability to carefully navigate to the top to find the statue on the left platform. Interact with the statue to grab the clue.
All Clues to The Brittle King
Clue #1: Feat Of Strength | East Gallery, Notre-Dame
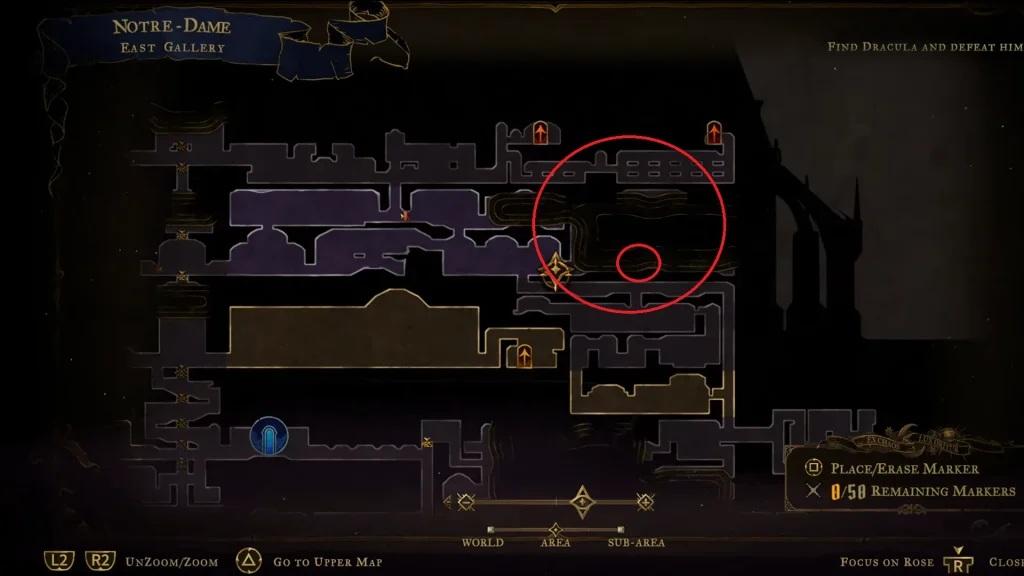
“Only a titan of strength, a colossus of virtue, a giant of heart shall draw this sword and, anointed by the sword of dragons, be the savior of France.”
Interact with the sword stuck to the rock in the middle of the East Gallery in Notre-Dame. You don’t have to pull the sword out; just interacting with it will get you the clue about the Brittle King.
All Clues to The Judge
Clue #1: Balancing The Scales Of Justice | Palace of Justice, Paris Streets
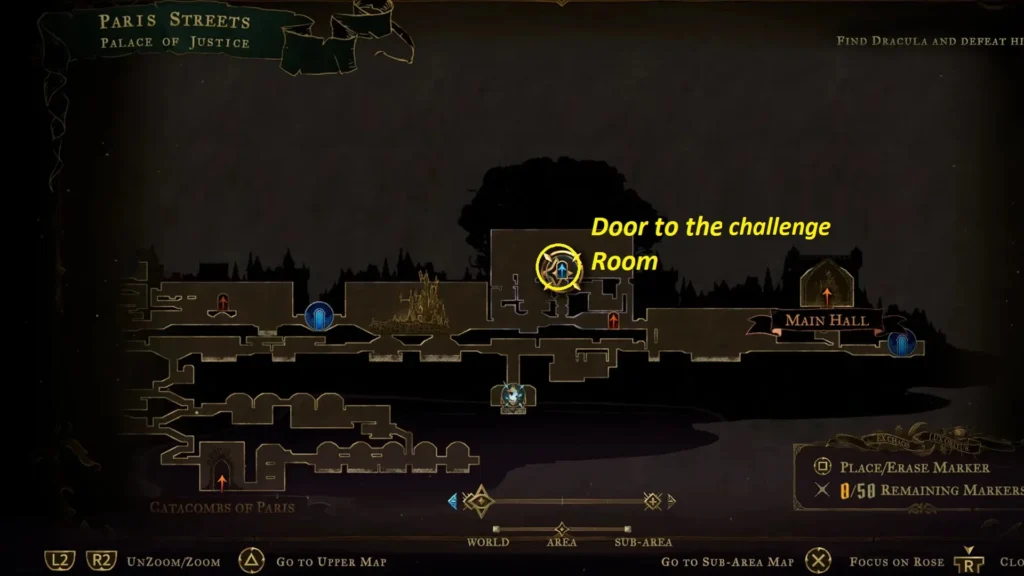
“Neither tyranny nor force may move the scales of justice, Only that which is written on the heart and the spirit of the law.”
Head inside the room marked in the Palace of Justice on Paris Street. Once inside, turn left and keep moving forward, and you will quickly get ambushed by enemies. Defeat all of them and then interact with the large scale in the middle to get the clue about the Judge.
All Clues to The Sage
Clue #1: A Sketch From Talos | Builder’s Bureau, Clock Tower
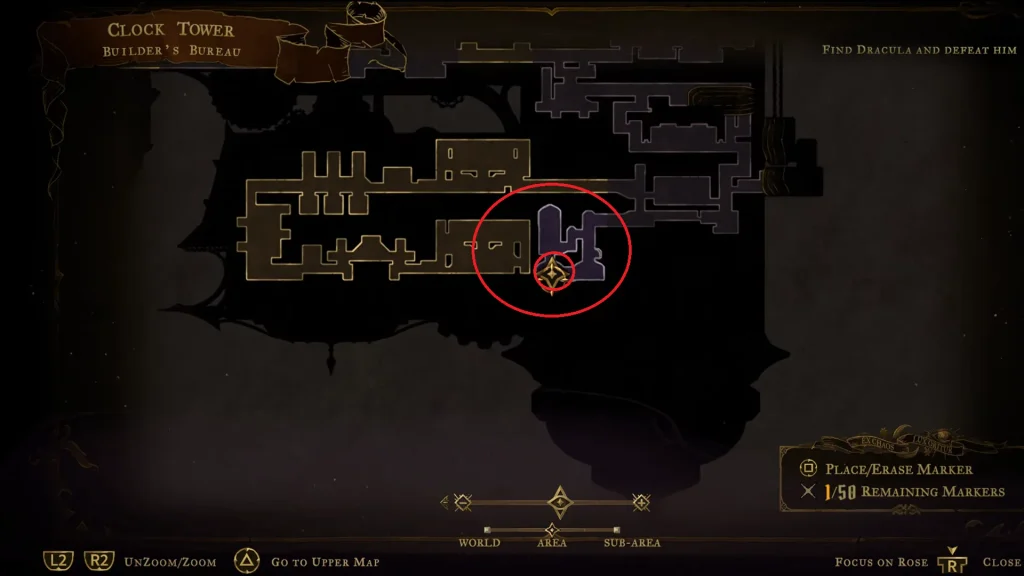
Make your way over to Builder’s Bureau in Clock Tower, then go to the spot marked on the map, and right on the desk, you will find the first clue about the Sage. The clue will be about the sketches from different parts of the map.
Clue #2: Kneeling Is The Way | Looping Hallway, Hall of Mirrors
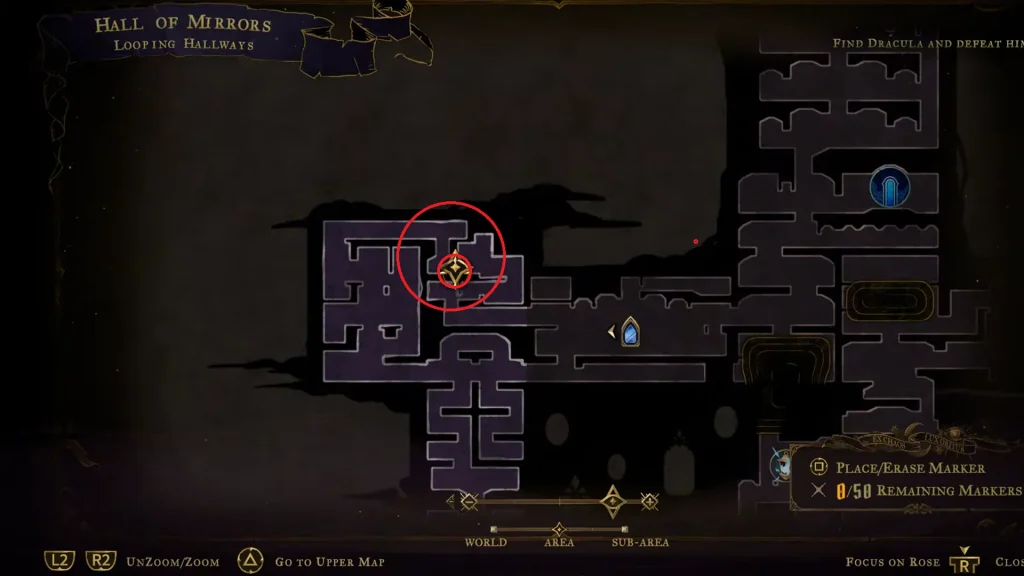
“What sorrow traps the victims here, throughout this hall of fear. To bend the knee before your shade, Will make the way most clear.”
Move to the marked spot on the image in the Looping Hallways in the Hall of Mirrors to interact with the statue to learn about the second clue about the Sage.
Clue #3: The Reflection Deceives | Steps of Misdirection, Hall of Mirrors
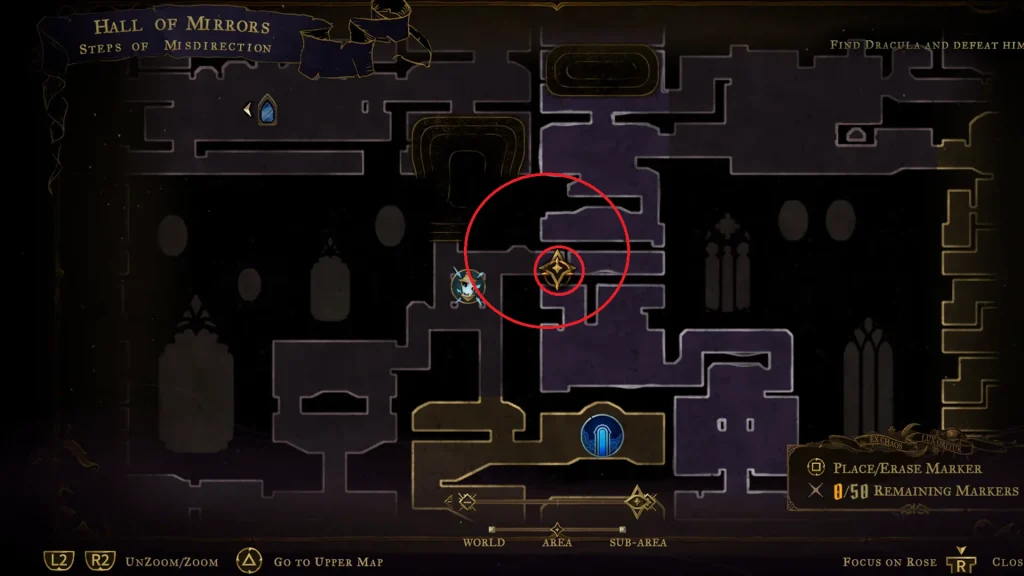
“The shades that drew the Belmont in, Now send her round and round. The true way waits all on its own, Where deadly shades abound.”
The third clue will be found in the spot in the Steps of Misdirection in the Hall of Mirrors. Get to the spot and interact with the statue to learn about the third clue.
Clue #4: Eleanor Flees To The Cemetery | Heart of the Maze, Hall of Mirrors
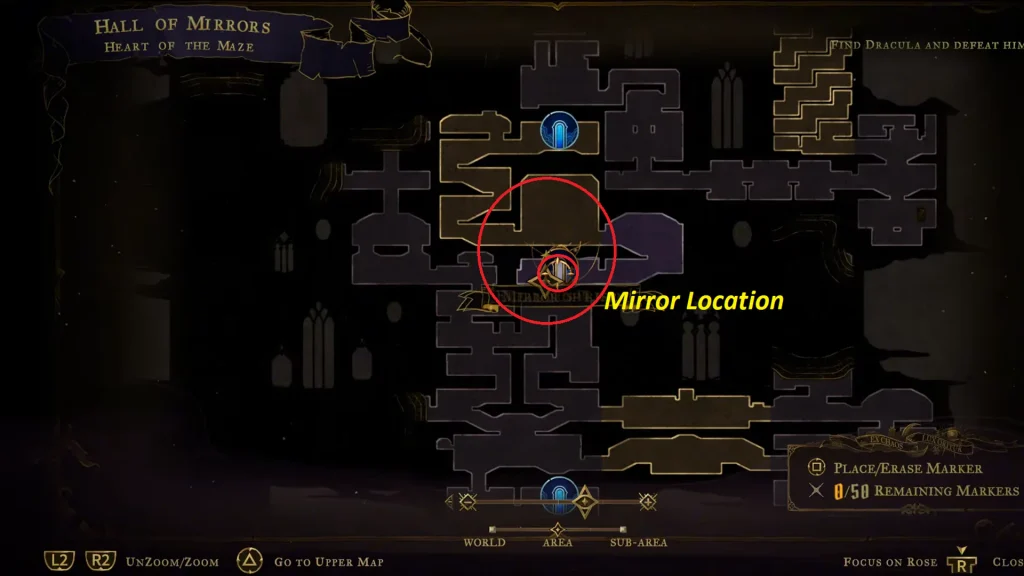
The last clue is found in the Heart of the Maze in the Hall of Mirrors; get to the spot marked on the map. Interact with the mirror at the spot to learn the last clue about the Sage.
