




Mortal Shell 2 features a plethora of items to help in combat and make your build better by min-maxing the stats. These items are hard to come by, but they are game-changers. Among the unique items the game introduces early on are Tarstones and Seals. Some of the Tarstones are found easily, while others are locked behind Trials, bosses, and puzzles, but the journey to obtain them is worth the bonus perk that you will unlock for your weapons.
Suffice to say, Tarstones will play a major role in setting up a perfect build for your character. And here, we are going to take a look at all the Tarstones available in Mortal Shell 2.
All Tarstones in Mortal Shell 2
Tarstones act like gems (Active/ Support) in Path of Exile; you can slot them inside your melee or ranged weapon to unlock new abilities or just give a simple boost to all of your stats. The fun doesn’t end here; the game also offers different types of Tarstones, each with its own purpose for the weapon and the overall build you are planning to create.
Here we will take a look at all Tarstones, including their stats, locations, and most importantly, whether they are Ability, Infusion, Combat, or Support type.
- Ability: Adds a new ability type to your melee or ranged weapon. It allows you to pull off new moves with your weapons to strategize your gameplay beyond basic attacks.
- Infusion: Infuses or adds a status infliction to the weapon, allowing your hits to deal Burn or Bleed damage on enemies.
- Combat: A simple damage boost such as Leech, Damage over time to kills and attacks.
- Support: Support stat boosts such as Critical Chance, Stagger Damage, or to melee or range attacks.
Note: You can also upgrade your Tarstone by giving Franz the Etching Needles. It’s a quest item that adds more options to the Tarforge in the Marrow Keep. The Etching Needle is obtained just before Magdalena, the Lady of the Woods boss.
All Tarstones Found on the North Side of the Map
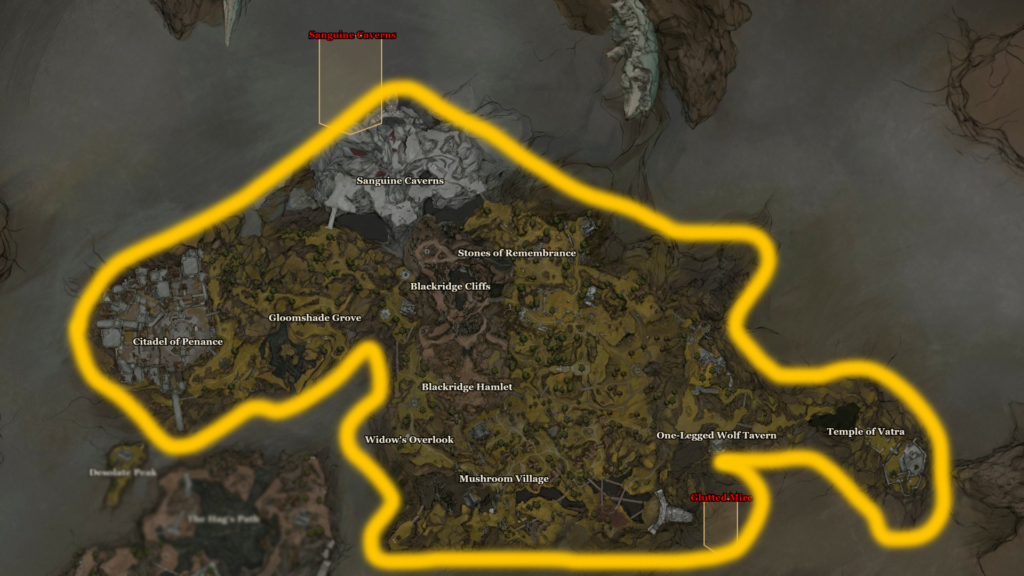
Here is the list of areas covered in this section: Citadel of Penance/ Sanguine Caverns/ Stone of Remembrance/ Blackridge Cliffs/ Widow’s Overlook/ Mushroom Village/ One-Legged Wolf Tavern/ and lastly Temple of Vatra.
| Tarstone Name | Stats | Location |
| Retribution Stone [Support Tarstone] | Level 1: Improves Riposte damage Level 2: Riposte damage increased by 20% Level 3: Riposte damage increased by 30% Level 4: Riposte damage increased by 50% | Complete the trial located a bit north of Widow’s Overlook. Just head up to the trial altar and interact to begin the trial. |
| Auspicious Stone [Support Tarstone] | Level 1: Improves melee Critical Chance. Level 2: Melee attacks have +10% Critical Chance. Level 3: Melee attacks have +15% Critical Chance. Level 4: Melee attacks have +18% Critical Chance. | Head over to Mushroom Village Beacon and move southwest from the beacon to get to the spot. Here, interact with three candles around the village to open the chest to recover the stone. |
| Berserker’s Stone [Support Tarstone] | Level 1: Improves melee damage the lower your Health is Level 2: Melee damage increased up to 130% when Health is at 35% or below Level 3: Melee damage increased up to 140% when Health is at 40% or below Level 4: Melee damage increased up to 165% when Health is at 50% or below | Travel to One-Legged Wolf Beacon, then move directly east from the beacon point to get to Temple of Vatra. Here, you must light up all three candles to open the chest. |
| Marksman’s Stone [Support Tarstone] | Level 1: Improves ranged Critical Chance Level 2: Ranged attacks have +10% Critical Chance Level 3: Ranged attacks have +12% Critical Chance Level 4: Ranged attacks have +15% Critical Chance | Found in a chest east of Mushroom Village Beacon, north of Mushroom Village Gate Beacon. |
| Deadeye Stone [Support Tarstone] | Level 1: Improves ranged Critical Damage Level 2: Ranged Attacks deal +20% Critical Damage Level 3: Ranged attacks deal +30% Critical Damage Level 4: Ranged attacks deal +40% Critical Damage | Head inside the Sanguine Caverns Gate in the Sanguine Caverns region, and you will find the chest near the camp inside. |
| Siegebreaker’s Stone [Support Tarstone] | Level 1: Improves ranged Stagger Damage Level 2: Ranged attacks deal +150% Stagger Damage Level 3: Ranged attacks deal +200% Stagger Damage Level 4: Ranged attacks deal +220% Stagger Damage | Travel to Mushroom Village Gate Beacon and then head inside the Glutted Mire Gate. Get inside, light all 3 candles to open the chest, and loot the reward. |
| Bulwark Stone [Combat Tarstone] | Level 1: Provides Damage Reduction to all characters Level 2: All characters have +10% damage reduction Level 3: All characters have +15% damage reduction Level 4: All characters have +25% damage reduction | Head to Citadel of Penance Beacon, then move all the way south of the region to reach the broken bridge to find a chest at the end. |
| Gloombound Stone [Support Tarstone] | Level 1: Slain foes drop more Gloom Level 2: Obtain +15% Gloom from slain foes Level 3: Obtain +25% Gloom from slain foes Level 4: Obtain +40% Gloom from slain foes | Get to the yellow flower field found in the middle of the Stones of Remembrance area, and you will find the Gloombound Stone inside the chest. |
| Justiciar’s Stone [Support Tarstone] | Level 1: Slain foes drop more coins Level 2: Obtain +15% Coin from slain foes Level 3: Obtain +25% Coin from slain foes Level 4: Obtain +40% Coin from slain foes | Get to One Legged Wolf Beacon and move north from the spot all the way to the edge of the map. And you will find the item on an altar right behind the Snail miniboss. |
| Wounding Stone [Combat Tarstone] | Level 1: Melee attacks inflict Perforation Level 2: Inflict 2 Perforation stacks per strike Level 3: Inflict 4 Perforation stacks per strike Level 4: Inflict 7 Perforation stacks per strike | Move southeast from Widow’s Overlook Beacon, and you will come across the graveyard; loot the nearby chest to grab the Wounding Stone. |
| Grudge Stone [Combat Tarstone] | Level 1: Your Weapon deals a guaranteed Critical Hit Level 2: Every 10 attacks Level 3: Every 7 attacks Level 4: Every 5 attacks | Found inside a chest located next to the Citadel of Penance Beacon. |
| Unyielding Stone [Combat Tarstone] | Level 1: Your Weapon light attack combo has Stagger immunity Level 2: First attack only Level 3: First and Second attacks Level 4: All attacks | Make your way over the One-Legged Wolf Beacon point, then head northwest from the spot to find the trial and complete it to get the Unyielding Stone as a reward. |
| Parasitic Stone [Combat Tarstone] | Level 1: Slaying foes grants you Leech. Level 2: Gain 1 Leech stack per kill. Level 3: Gain 2 Leech stacks per kill. Level 4: Gain 3 Leech stacks per kill. | Head to Martyr’s Tomb Dungeon, found southeast of Widow’s Overlook Beacon. The chest you are looking for is locked inside the gate. Find the button in the area to lift the gate to grab the stone from the chest. |
| Shuddering Stone | Level 1: Projectiles generate a Knockback shockwave on impact. Level 2: Small shockwave on Impact. Level 3: Medium shockwave on Impact. Level 4: Large shockwave on Impact. | Get to Illusionist’s Cache Dungeon in the Desolate Peak area, located south of Citadel of Penance. Right at the end of the dungeon, you will find the chest with the item inside. |
| Myriad Stone [Combat Tarstone] | Level 1: Your Sidearm fires multiple projectiles in an arc without consuming additional Resolve. Level 2: Fire 3 projectiles per shot, each dealing 75% of the original damage. Level 3: Fire 5 projectiles per shot, each dealing 50% of the original damage. Level 4: Fire 7 projectiles per shot, each dealing 35% of the original damage. | Head to the east of Stones of Remembrance and destroy 3 stone tablets marked with yellow symbols to gain access to the Feeding Ground Dungeon. Inside, you will find the Myriad Stone. |
| Blackblood Stone [Combat Tarstone] | Level 1: Projectiles explode mid-air and deal splash damage Level 2: Exploding projectiles deal 2 splash damage Level 3: Exploding projectiles deal 3 splash damage Level 4: Exploding projectiles deal 4 splash damage | Get inside the Sanguine Caverns Gate in the Sanguine Caverns region. Now head inside the Pulsing Caves Beacon to find the stone in the chest. |
| Corroded Stone [Combat Tarstone] | Level 1: Projectiles start dealing damage over time after hitting their target. Level 2: Projectiles deal 8% damage every 7s for 30s. Level 3: Projectiles deal 12% damage every 7s for 30s. Level 4: Projectiles deal 15% damage every 7s for 30s. | Make your way inside Glutted Mire Gate, and you will find the item inside the Sunken Village Beacon. |
| Volatile Fragment [Combat Tarstone] | Level 1: Enemies dying by a ranged attack will explode, dealing splash damage. Level 2: Exploding enemies deal 15 splash damage. Level 3: Exploding enemies deal 25 splash damage. Level 4: Exploding enemies deal 35 splash damage. | Get inside the Mushroom Village Gate Beacon and defeat the boss at the end to obtain this stone. |
| Arbiter’s Prize [Infusion Tarstone] | Level 1: Level 1: Consume 30 Resolve to infuse your weapon with Bloodcurse. Level 2: Infusion lasts for 4 strikes Level 3: Infusion lasts for 8 strikes Level 4: Infusion is permanent | Fight and defeat the miniboss south of Widow’s Overlook Beacon. |
| Serpent Stone [Infusion Tarstone] | Level 1: Consume 15 Resolve to infuse your Weapon with Poison Level 2: Infusion lasts for 4 strikes Level 3: Infusion lasts for 8 strikes Level 4: Infusion is permanent | Defeat the boss at the end of the Stonebleed Gate Beacon located in the Sanguine Caverns. |
| Inflamed Clawstone [Infusion Tarstone] | Level 1: Consume 30 Resolve to unfuse your Weapon with Burn Level 2: Infusion lasts for 4 strikes Level 3: Infusion lasts for 8 strikes Level 4: Infusion is permanent | From Gloomshade Grove, make your way to Holding Cells Dungeon located northwest of the beacon, defeat the boss duo inside the cage to get the stone. |
| Emberseed Stone [Infusion Tarstone] | Level 1: Consume 20 Resolve to infuse your sidearm with Burn. The equipped Sidearm inflicts Burn on Critical Hits only. Level 2: Infusion lasts for 4 shots Level 3: Infusion lasts for 8 shots Level 4: Infusion is permanent | It’s found inside the Mushroom Village Beacon inside the beacon until you arrive at Passenger’s Shrine area; here you will find the stone inside the chest. |
| Magdalena’s Memento [Ability Tarstone] | Level 1: Consume 100 Resolve to rise into the air and unleash a flurry of ruthless strikes. Level 2: Each strike inflicts 2 Weak stacks. Level 3: Each strike has +15% Critical Chance. Each Strike Deals +50% Critical Damage Level 4: Each strike deals +100% Critical Damage | Get inside the Glutted Mire Gate and defeat the final boss at the end to get the drop. |
| Shrike Stone [Ability Tarstone] | Level 1: Consume 70 Resolve to leap high and plunge your weapon into the ground ahead. Level 2: The attack triggers a shockwave upon landing that deals 150 splash damage. Level 3: Resolve cost reduced to 50. Level 4: The attack deals 100 Break Damage to nearby foes upon landing. | Make your way inside Glutted Mire Gate until you reach the Sunken Village Beacon, head down the path to the open area to find the chest on a platform after the wooden bridge. |
| Lost Clotstone [Ability Tarstone] | Level 1: Consume 60 Resolve to spin in place and release your weapon with brutal force Level 2: The thrown weapon deals 200 splash damage on impact Level 3: The thrown weapon deals 300% damage to the struck target Level 4: Resolve cost reduced to 40 | Defeat the final boss right at the end of Sanguine Caverns Gate. [You will also unlock the achievement “Meat’s Back on the Menu, Boys.“] |
| Barrage Stone [Ability Tarstone] | Level 1: Consume 40 Resolve to launch a heavy round that detonates above the target, scattering explosive projectiles below Level 2: The heavy round detonates 2 times; each explosive projectile deals 8 splash damage Level 3: The heavy round detonates 2 times; each explosive projectile deals 12 splash damage Level 4: The heavy round detonates 3 times; each explosive projectile deals 14 splash damage | Head east of Gloomshade Grove and complete the trial to get the Barrage Stone as a reward. [This Tarstone used to be called Tarblighted Trophy] |
| Tarred Fragment [Ability Tarstone] | Level 1: Consume 50 Resolve to fire multiple tethered projectiles, spinning at high speed. Level 2: The tethered projectiles spin for 6s Level 3: The tethered projectiles spin for 8s Level 4: The tethered projectiles cover 150% of the range | Get inside Sanguine Cavern Gate and defeat the first boss to obtain the Tarstone. |
| Hand of Rock [Ability Tarstone] | Level 1: Consume 80 Resolve to unleash a swarm of relentless homing projectiles Level 2: Each projectile deals 10 damage Level 3: Each projectile deals 5 Break Damage Level 4: Firing rate is increased by 30% | Head inside the One Legged Wolf Tavern to buy the item from the bartender for 1500 coins. |
All Tarstones Located in the Middle of the Map
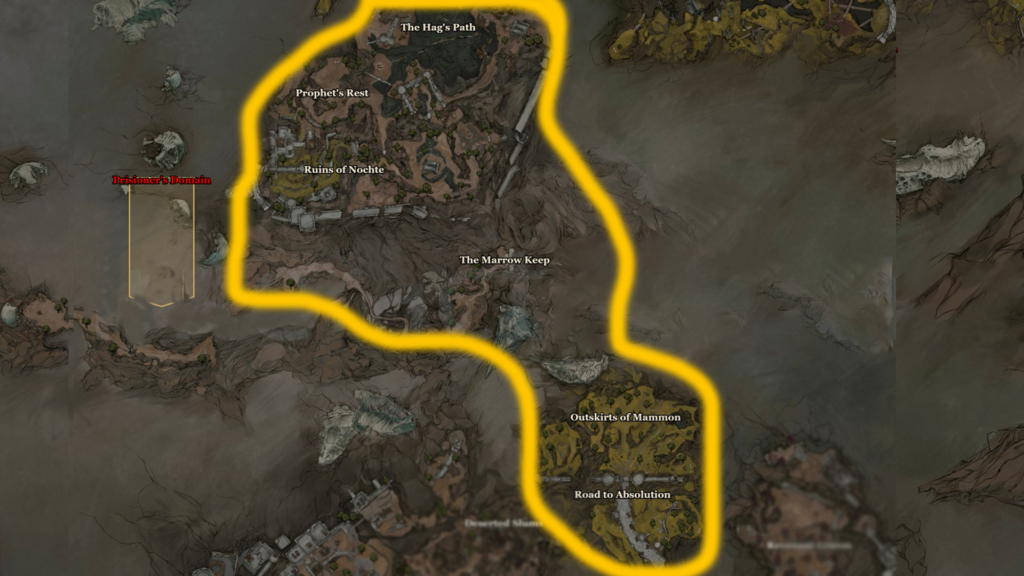
Here we will cover all Tarstones found in Prophet’s Rest/ The Hag’s Path/ Ruins of Nochte/ Marrow Keep/ Outskirts of Mammon/ and Road to Absolution.
| Tarstone Name | Stats | Location |
| Duality Stone [Combat Tarstone] | Level 1: Your Weapon light attack combo strikes twice Level 2: First attack only Level 3: First and Second attacks Level 4: All Attacks | From the Nochtean Gate Beacon, make your way to Ravaged Tomb Dungeon, found on its left. Head inside and you will find the Duality Stone inside the chest. |
| Clerik’s Stone [Combat Tarstone] | Level 1: Grants access to a special Heavy Combo Finisher Level 2: The heavy finisher has +20% Critical Chance Level 3: The heavy finisher has +25% Critical Chance Level 4: The heavy finisher has +30% Critical Chance | Get to the Outskirts of Nochte Beacon, and make your way east of the beacon to encounter an illusory wall. Get to Ruins of Nochte, and you will find an unusual wall with white paint on it. Break it to get inside and recover the item. |
| Ironpiercer’s Stone [Combat Tarstone] | Level 1: Projectiles pierce through enemies Level 2: Projectiles pierce up to 3 targets before stopping Level 3: Projectiles pierce up to 4 targets before stopping Level 4: Projectiles pierce up to 5 targets before stopping | Head inside the Prisoner’s Domain Gate, and you will find the item in a chest in the Slumwater Drain Beacon. |
| Rupturing Stone [Combat Tarstone] | Level 1: Projectiles that strike critically deal Break Damage Level 2: Projectiles deal 8 Break Damage Level 3: Projectiles deal 15 Break Damage Level 4: Projectiles deal 20 Break Damage | This stone is found in the chest just before the final boss encounter of the Prisoner’s Domain Gate. Once you see Ruk near the edge, don’t jump; instead, take the route left to find the chest. |
| Squall Stone [Combat Tarstone] | Level 1: Projectiles spin in place for a duration after hitting their target Level 2: Projectiles spin for 3s and deal 8% of original damage Level 3: Projectiles spin for 4s and deal 9% of original damage Level 4: Projectiles spin for 5s and deal 10% of original damage | Head inside the Prisoner’s Domain Gate, and you will find the stone inside the chest by interacting with the Executioner’s Pulpit Beacon. |
| Voltaic Crown [Infusion Tarstone] | Level 1: Consume 30 Resolve to infuse your Weapon with Lightning Level 2: Infusion lasts for 4 strikes Level 3: Infusion lasts for 8 strikes Level 4: Infusion is permanent | Get to the Nochtean Gate Beacon and make your way down to the end; defeat the boss to get the Tarstone as a reward. |
| Hag Stone [Infusion Tarstone] | Level 1: Consume 20 Resolve to infuse your Sidearm with Poison Level 2: Infusion lasts for 4 shots Level 3: Infusion lasts for 8 shots Level 4: Infusion is permanent | Get inside the Outskirts of Nochte Beacon until you arrive at the Infested Den; here you will find the Hag Stone inside the chest. |
| Acolyte’s Stone [Ability Tarstone] | Level 1: Consume 15 Resolve to perform a charged Light Attack. Level 2: The charged attack has a +15% Critical Chance. Level 3: The charged attack deals 150% Critical Damage. Level 4: Resolve cost reduced to 10. | Sold by the Merchant in the Marrow Keep area for 2k Coin. |
| Unwieldy Stone [Ability Tarstone] | Level 1: Consume 25 Resolve to perform a Charged Heavy Attack. Level 2: The charged attack grants 2 Leech stacks on kill. Level 3: The charged attack grants 3 Leech stacks and restores 20 Health on kill. Level 4: Level 4: The charged attack grants 5 Leech stacks and restores 35 Health on kill. | Sold by the Merchant in the Marrow Keep area for 2k Coin. |
| Captive’s Scabstone [Ability Tarstone] | Level 1: Consume 100 Resolve to swing your weapon in a violet arc, striking down all who stand close Level 2: Each strike deals 300% damage Level 3: Each strike deals 250 Stagger Damage Level 4: Resolve cost reduced to 75 | This one is found by defeating the final boss at the end of Prisoner’s Domain Gate. |
| Confessor’s Keepsake [Ability Tarstone] | Level 1: Consume 60 Resolve to charge your Sidearm, firing a powerful, devastating shot Level 2: The charged shot deals 200% damage Level 3: The charged shot deals 300% damage Level 4: The charged shot deals 350% damage | Defeat the first main area boss in the Prisoner’s Domain Gate. |
| Headsman’s Stone [Support Tarstone] | Level 1: Improves melee Critical Damage Level 2: Melee attacks deal +50% Critical Damage Level 3: Melee attacks deal +80% Critical Damage Level 4: Melee attacks deal +100% Critical Damage | Head to the Outskirts of Mammon Beacon, move southeast from the point to find the Headman’s Stone near the tree behind the Road to Absolution Ruins. |
| Enfeebling Stone [Combat Tarstone] | Level 1: Projectiles inflict Fragile Level 2: Inflict 5 Fragile stacks per strike Level 3: Inflict 6 Fragile stacks per strike Level 4: Inflict 7 Fragile stacks per strike | Complete the trail found east of Outskirts of Mammon Beacon. |
All Tarstones Found on the Southeastern Side of the Map
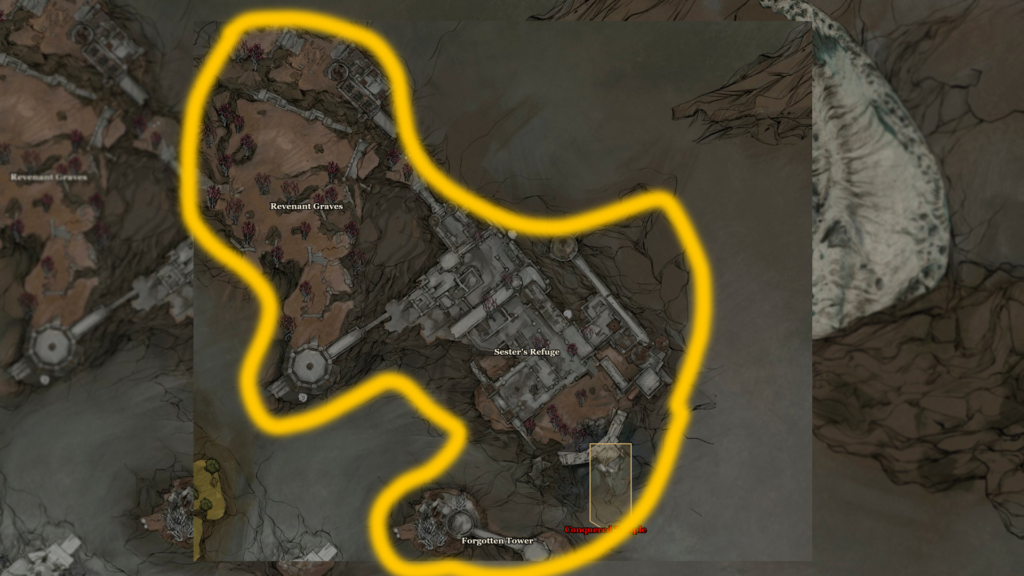
Here we are going to cover all Tarstones located in the Sester’s Refuge and Revenant Graves region.
| Tarstone Name | Stats | Location |
| Devout Stone [Support Tarstone] | Level 1: Killing an enemy with your Sidearm generates Resolve Level 2: Generates 7 Resolve Level 3: Generates 14 Resolve Level 4: Generates 28 Resolve | Make your way over to Sester’s Gate Beacon point, turn around, climb the stairs on the right, and you will find a locked steel gate. Pull the lever to lift the gate to get the Devout Stone. |
| Tyrant’s Stone | Level 1: Grants access to a special Heavy Combo Finisher. Level 2: The Heavy finisher inflicts 4 Weak stacks. Level 3: The Heavy finisher inflicts 5 Weak stacks. Level 4: The Heavy finisher inflicts 6 Weak stacks. | Get to Abbey Entrance Beacon, move north from the location to find the illusory wall. You will find the wall at the corner with a white mark on its bottom left corner. |
| Pulse Stone | Level 1: Projectiles generate a shockwave on impact that pulls enemies in. Level 2: Small shockwave on Impact. Level 3: Medium shockwave on Impact. Level 4: Large shockwave on Impact. | Head inside the Conquered Temple Gate and make your way to the Winterglass Lake Beacon. Move the hands blocking the path on the stairs, and you will find the item in the chest. [You will need the ” Immaculate Crown Key” item to move the hands] |
| Warden’s Stone | Level 1: Consume 30 Resolve to infuse your Weapon with Frost. Level 2: Infusion lasts for 4 shots Level 3: Infusion lasts for 8 shots Level 4: Infusion is permanent | Get inside the Conquered Temple Gate and defeat the first boss in the main area to get the stone as an item drop. |
| Nightgrasp Stone [Infusion Tarstone] | Level 1: Consume 30 Resolve to infuse your Weapon with Phantom. Level 2: Infusion lasts for 4 strikes. Level 3: Infusion lasts for 8 strikes. Level 4: Infusion is permanent. | From the Abbey Entrance Beacon, make your way to the Map Fragment section. Here, interact with three candles near the tower to open the route to the stone inside the chest. |
| Frostshard Stone [Infusion Tarstone] | Level 1: Consume 20 Resolve to infuse your Sidearm with Frost Level 2: Infusion lasts for 4 shots Level 3: Infusion lasts for 8 shots Level 4: Infusion is permanent | Get inside the Conqueror’s Hoard Beacon in the Conquered Temple Gate to find the stone within the chest. |
| Monarch’s Vestige [Infusion Tarstone] | Level 1: Consume 20 Resolve to infuse your Sidearm with Phantom Level 2: Infusion lasts for 4 shots Level 3: Infusion lasts for 8 shots Level 4: Infusion is permanent | Get to Abbey Entrance Beacon, head inside to enter the area “Kingdom of Fools”. Here, defeat the boss and grab the reward at the end. |
| Conqueror’s Reward [Ability Tarstone] | Level 1: Consume 100 Resolve to drive your weapon forward in a series of swift, piercing thrusts Level 2: Each strike deals 200% damage Level 3: The attack delivers 4 additional strikes Level 4: Resolve cost reduced to 75 | You must defeat the final boss at the end of Conquered Temple Gate to grab the reward. |
| Colossus Stone [Ability Tarstone] | Level 1: Consume 80 Resolve to thrust your weapon into the ground to send shockwaves rippling through nearby foes Level 2: Each shockwave deals 30 splash damage Level 3: Each shockwave covers a wider area Level 4: Each shockwave deals 80 splash damage | Head to the Silent Steps area found southwest of Sester’s Gate Beacon. |
| Fusillade Stone [Ability Tarstone] | Level 1: At 80 Resolve or higher, unleash a flurry of consecutive shots Level 2: Each shot has +20% Critical Chance Level 3: Each shot has +35% Critical Chance Level 4: Each shot deals +100% Critical Damage | Get inside the Conquered Temple Gate, then defeat the boss in the Winterglass Lake Beacon. |
All Tarstones Found in Southwestern Section of Map
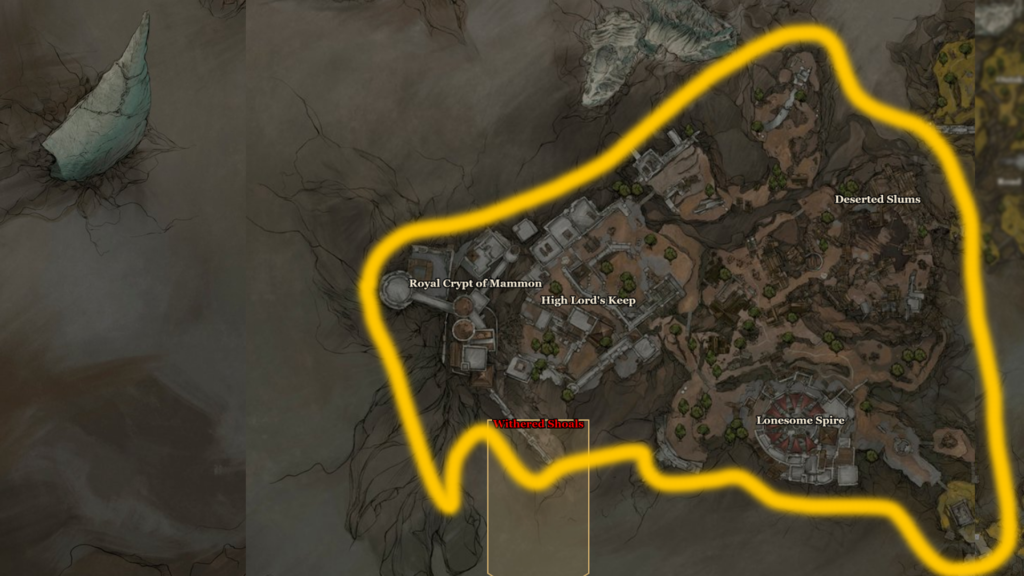
We are also going to cover the areas: Lonesome Spire, Deserted Slums, Royal Crypt of Mammon, High Lord’s Keep,
| Tarstone Name | Stats | Location |
| Shattering Stone [Support Tarstone] | Level 1: Improves melee Stagger Damage Level 2: Melee attacks deal +150% Stagger Damage Level 3: Melee attacks deal +200% Stagger Damage Level 4: Melee attacks deal +220% Stagger Damage | Head inside Collapsed Mine Dungeon, located directly south of Abandoned Outpost Beacon. You will find Shattering Stone inside the chest. |
| Spite Stone | Level 1: Improve ranged damage the lower your Health is. Level 2: Ranged damage increases up to 140% when Health is at 35% or below. Level 3: Ranged damage increases up to 150% when Health is at 40% or below. Level 4: Ranged damage increases up to 160% when Health is at 50% or below. | From Abandoned Outpost Beacon, head north to get into Bellkeeper’s Corner Dungeon. You will find the Spite Stone inside the chest, on a distant platform in the dungeon. [Ring the bell available next to the chest with your sidearm to create a bridge to the platform.] |
| Zealot’s Stone | Level 1: Grants access to a special Light Combo Finisher. Level 2: The light finisher generates +40% Resolve. Level 3: The light finisher generates +70% Resolve. Level 4: The light finisher generates +150% Resolve. | Get to High Lord’s Courtyard Beacon point, move a bit east to get inside the Besieged Ruins Dungeon. Complete the entire dungeon to get Zealot’s Stone as a reward. |
| Splitting Stone | Level 1: Your sidearm fires multiple projectiles without consuming additional Resolve. Level 2: Fire 2 projectiles per shot, each dealing 70% of the original damage. Level 3: Fire 3 projectiles per shot, each dealing 60% of the original damage. Level 4: Fire 4 projectiles per shot, each dealing 50% of the original damage. | Head to the east of the Gate of Mammon Beacon to find it in the chest; place it on the edge of a platform overlooking the area. |
| Charged Stone [Combat Tarstone] | Level 1: Your sidearm charges up faster Level 2: Sidearm charging speed increased by 20% Level 3: Sidearm charging speed increased by 35% Level 4: Sidearm charging speed increased by 50% | Head inside the Withered Sholas Gate and you will find the Tarstone inside the Nameless Pass Beacon. |
| Torpor Stone [Infusion Tarstone] | Level 1: Consume 25 Resolve to infuse your Weapon with Stasis. Level 2: Infusion lasts for 4 strikes. Level 3: Infusion lasts for 8 strikes. Level 4: Infusion is permanent. | Go through the Withered Sholas Gate, and you will find the stone behind the waterfall near the Ossinite Falls beacon. |
| Wretchcaller’s Stone | Level 1: Consume 30 Resolve to infuse your Weapon with Trauma Level 2: Infusion lasts for 4 strikes Level 3: Infusion lasts for 8 strikes Level 4: Infusion is permanent | Make your way inside the Gate of Mammon Beacon and defeat the boss at the end. |
| Accursed Stone [Infusion Tarstone] | Level 1: Consume 20 Resolve to infuse your Sidearm with Curse Level 2: Infusion lasts for 4 shots Level 3: Infusion lasts for 8 shots Level 4: Infusion is permanent | Head inside Abandoned Outpost Beacon to reach the Big Ol’ Hole area. Here you will find the stone in the chest at the very end of the area. |
| Weeping Stone | Level 1: Consume 20 Resolve to infuse your Sidearm with Trauma. Level 2: Infusion lasts for 4 shots Level 3: Infusion lasts for 8 shots Level 4: Infusion is permanent | This one can be bought from a merchant for 1,500 Coins found near the Abandoned Outpost Beacon. [Requires Night Time] |
| Infused Stone | Level 1: Consume 70 Resolve to throw your weapon to strike multiple targets before it circles back to you Level 2: Each strike inflicts 3 Perforation stacks Level 3: The thrown weapon strikes up to 4 targets Level 4: Each strike inflicts 150% damage | This one can be bought from a merchant for 1,500 Coins found near the Abandoned Outpost Beacon. [Requires Night Time] |
| Hexapod Core [Ability Tarstone] | Level 1: Consume 60 Resolve to carve through enemies with a rapid succession of strikes Level 2: Each strike grants 3 Warp stacks Level 3: The ability has Stagger immunity Level 4: Resolve cost increased to 80, but the ability continues with another barrage of ruthless dual-blade strikes | Defeat the final boss found at the end of Withered Shoals Gate. |
| Fulminant Stone [Ability Tarstone] | Level 1: Consume 60 Resolve to fire a heavy-caliber round that triggers multiple explosions around the target Level 2: The heavy-caliber shot triggers 3 explosions around the target Level 3: The heavy-caliber shot triggers 5 explosions around the target Level 4: Each explosion deals 20 Break Damage | This one can be bought from a merchant for 1,500 Coins found near the Abandoned Outpost Beacon. [Requires Night Time] |
| Strange Remnant | Level 1: Consumes 15 Resolve to unleash a stream of projectiles that chain between multiple targets. Level 2: Chaining projectiles deal 20 damage. Level 3: Projectiles chain between up to 4 targets. Level 4: Chaining projectiles deal 40 damage. | You must head inside Withered Shoals Gate and defeat the miniboss near the starting area to get it. |
| Infested Stone [Ability Tarstone] | Level 1: Consume 60 Resolve to fire a clinging projectile that triggers a massive explosion after a brief delay Level 2: The clinging projectile deals 100 damage upon exploding Level 3: The clinging projectile draws the aggression of all nearby enemies Level 4: The clinging projectile scatters 3 other clinging projectiles upon exploding | This one can be bought from a merchant for 1,500 Coins found near the Abandoned Outpost Beacon. [Requires Night Time] |
All Tarstone Locations in Southern Section of Map
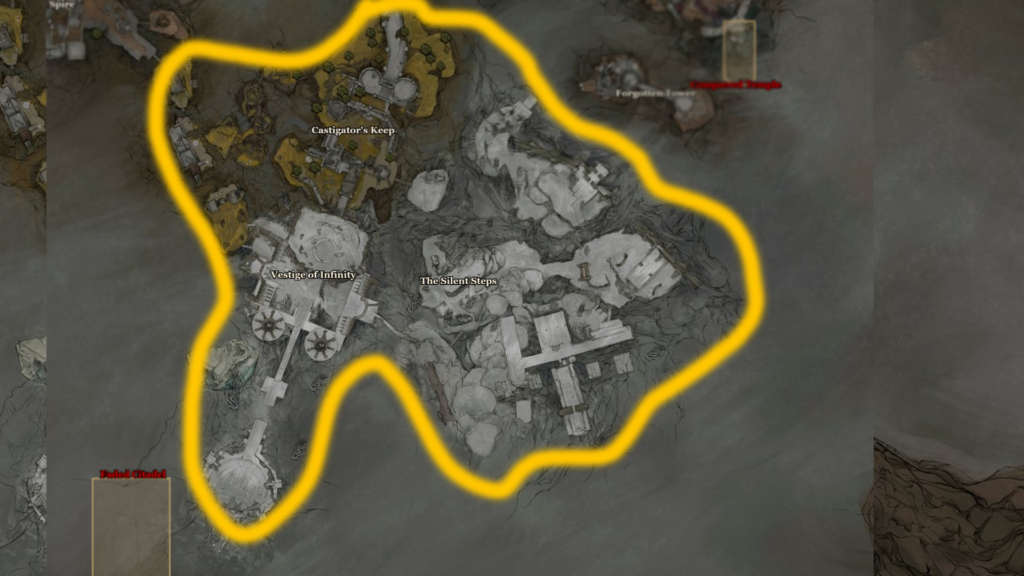
Here we are taking into account the last three areas: The Silent Steps / Castigator’s Keep/ and Vestige of Infinity.
| Tarstone Name | Stats | Location |
| Thief’s Stone [Combat Tarstone] | Level 1: Striking foes grants you Warp. Level 2: Gain 1 Warp stack per strike. Level 3: Gain 2 Warp stacks per strike: Level 4: Gain 3 Warp stacks per strike. | Travel to Gate of Infinity Beacon and complete the trial found near the spot to get the Thief’s Stone. |
| Stillblade’s Stone | Level 1: Grants access to a special Light Combo Finisher. Level 2: The light finisher deals 10 Break damage. Level 3: The light finisher deals 15 Break damage. Level 4: The light finisher deals 25 Break damage. | Get inside the Citadel Annex Beacon; you will find it in the Faded Citadel Gate. You must make it all the way to the end of the area to find the item inside the chest. |
| Unstable Stone | Level 1: Hitting the same enemy 15 times triggers an explosion that deals Splash damage. Level 2: The triggered explosion deals 20 splash damage. Level 3: The triggered explosion deals 30 splash damage. Level 4: The explosion triggers after 10 hits. | From Castigator’s Keep Beacon, head west, and you will find the chest behind the illusory wall. This wall is made of rocks, on the top of scaffolding. |
| Curseblood Stone | Level 1: Consume 320 Resolve to infuse your Weapon with Curse. Level 2: Infusion lasts for 15 strikes. Level 3: Infusion lasts for 30 strikes. Level 4: Infusion is permanent | Get inside Gate of Infinity Beacon and defeat the boss that shows up at the end to get the Curseblood Stone as a reward. |
| Viletongue Hedron | Level 1: Consume 20 Resolve to infuse your Sidearm with Bloodcurse. Level 2: Infusion lasts for 4 shots Level 3: Infusion lasts for 8 shots Level 4: Infusion is permanent | Get inside Castigator’s Keep Beacon and defeat the boss in Viletongue’s Domain. |
| Voltaic Amber | Level 1: Consume 20 Resolve to infuse your Sidearm with Lightning. Level 2: Infusion lasts for 4 shots Level 3: Infusion lasts for 8 shots Level 4: Infusion is permanent | Head south of Castigator’s Keep to defeat the boss in Vestige of Infinity. [Defeating the boss also unlocks a shortcut to the Disciple’s Pass Gate area] |
| Scholar’s Wormstone | Level 1: Consume Resolve over time to set the chainsaw in motion, augmenting your every attack. Level 2: Each chainsaw spin deals 15% of the weapon base damage. Level 3: Each chainsaw spin deals 25% of the weapon base damage. Level 4: Each chainsaw spin deals 35% of the weapon base damage. | Make your way inside the Faded Citadel Gate and defeat the final boss inside to grab the stone as a reward. [You will also unlock the achievement Nightmare Fuel] |
| Clockwork Shardstone [Ability Tarstone] | Level 1: Consume Resolve over time to hold your weapon before you with its chainsaw spinning at full speed Level 2: Each chainsaw spin deals 12% of the weapon base damage Level 3: Each chainsaw spin deals 15 Stagger Damage Level 4: Each chainsaw spin deals 20% of the weapon base damage | You will find the Makeshift Projectile north of Outskirts of Mammon Beacon. Then get southwest of Castigator’s Keep Beacon to get to the Alchemist Workshop. You must have the Makeshift Projectile and use the device on the Catapult to destroy the entry point to the Alchemist’s Workshop. Inside the workshop, you will find the Shardstone. |
| Solnir Shard | Level 1: Consume 25 Resolve to launch a heavy round in a parabolic arc that bursts on impact to deal splash damage. Level 2: The heavy round deals 70 splash damage in a small range. Level 3: The heavy round deals 120 splash damage in a small range. Level 4: The heavy round bursts into a wider explosion. | Defeating the first boss inside the Faded Citadel Gate will drop this stone. |
| Summoning Stone [Ability Tarstone] | Level 1: Consume 70 Resolve to summon the last slain foe to fight on your side. Level 2: The summoned foe attacks 2 times before vanishing. Level 3: The summoned foe attacks 5 times before vanishing. Level 4: Summon 2 foes instead of one. | Head inside the Disciple’s Pass Gate and destroy the second blue flame in the Ashen Sanctum area to open the locked area to find the chest inside. |
